【Pytorch Package】 SSD Pytorch Research / Detectron2 & mmdetection short research

Pytorch tuto를 모두 공부하고, 더 깊은 공부를 위해 SSD package를 공부한다.

  • SSD package를 가장 먼저 공부하는 이유는, SSD가 신경망 패키지 공부에 가장 쉽겠다고 생각했기 때문이다.
  • 무엇으로 공부하지..? 라고 고민을 먼저 했다. 가장 유명한 detection 패키지인 Detectron2, mmdetection으로 공부해볼까 했지만, 그것보다 좀 더 쉬운 하나 detection 패키지만을 먼저 공부해보는게 좋겠다고 생각했다

0. Find Reference Github Code

  1. amdegroot/ssd.pytorch
    • star : 4.1k, Contributors : 9, pytorch version : 1.0.0
    • last commit : 19.5 lnitial commit : 17.4
  2. sgrvinod/a-PyTorch-Tutorial-to-Object-Detection
    • star : 1.8k, Contributors : 2, pytorch version : 0.4
    • last commit : 20.8 lnitial commit : 18.8
    • Great Explanation about basics to SSD details
  3. lufficc/SSD
    • star : 1k, Contributors : 8, pytorch version : 1.4
    • last commit : 20.11 lnitial commit : 19.12
    • influenced by ssd.pytorch, aim to be the code base (very modular)

I will use lufficc/SSC repo. I think that this is up-to-date repository and developers emphasize this repo is high quality, fast and modular.

  • installation
      $ cd SSD
      $ pip install -r requirements.txt
      $ python setup.py install  # or $ pip install .
    
  • Colab installation
      !git clone https://github.com/lufficc/SSD.git
      %cd SSD
      !pip install -r requirements.txt
      !python setup.py install
        
      import ssd.config
      print(ssd.config.cfg)
    

Detectron2 & mmdetection short research

  1. Detectrion2 에서는 SSD, Yolo 와 같은 detector들은 제공하지 않는다.
  2. it is important to try building a model at least once from scratch to understand the math behind it.
  3. detectron2/MODEL_ZOO.md에 보면 제공되는 모델과 그 성능을 확인할 수 있다.
  4. 이것을 이용해서 pretrain할 때, cs231n-Transfer Learning을 참고하면 좋겠다. 나의 데이터량과 모델의 구조에 따라서 내가 어떤식으로 Transfer Learning을 진행해야하는지 나와있다.
  5. 아래에 공부하는 lufficc/SSD 또한 detectron2와 거의 유사한 구조를 가지고 있다. 따라서 lufficc/SSD를 적극적으로 공부해도 되겠다 (어차피 detectron2에서 SSD를 제공하지 않으므로)
  6. 하지만! mmdetection에서 SSD를 제공한다. 따라서 lufficc/SSD는 최대한 빠르게 넘어가고, mmdetection으로 넘어가는게 좋을 듯하다. mmdetection에서는 detection2보다 상대적으로 아주 많은 모델을 제공한다. 모델 비교는 아래의 링크에서 확인 가능 하다.
  7. detectron2와 mmdetection을 공부하기 전 논문을 읽어도 좋을 것 같다. 한글 블로그 정리 글도 많으니 참고하면 좋을 듯.
  8. 따라서 앞으로 공부순서는 아래와 같다.
    1. lufficc/SSD
    2. mmdetection의 SSD
    3. detectrion의 fasterRCNN
  9. detectron2/projects를 보면 [DeepLab, DensePose, Panoptic-DeepLab, PointRend, TensorMask, TridentNet] 와 같은 읽기만 해도 멋진 Detector or Segmentation 모델, 논문이 있으니 이것들을 공부해도 좋을 듯 하다.
  10. 특히 mmdetection에 대해서는 나중에 추가적으로 더 공부.

1. Analysis of lufficc/SSD

  1. 독자적으로 사용하는 pypi 패키지가 2개 있다.
    • yacs : config파일을 다루기 쉽게, CN()이라는 자체적은 클래스를 제작해놓음. 아래와 깉이 디렉토리 구조로 내용을 담고 있다.
        DATASETS:
            TEST: ()
            TRAIN: ()
        DATA_LOADER:
            NUM_WORKERS: 8
            PIN_MEMORY: True
        INPUT:
            IMAGE_SIZE: 300
            PIXEL_MEAN: [123, 117, 104]
      
    • vizer : 이미지에 vizualization을 해주는 툴을 직접 개발해 놓음. 이미지와 box좌표, 이미지와 mask좌표가 있다면 그걸로 이미지에 그림을 그려 시각화를 해줌.
  2. VOC와 COCO data를 직접 다운
    • 과거에 정리해둔 Datasets 정리 포스트를 보고 파일 다운로드
    • 그리고 export 설정으로 우분투 터미널에게 path를 알려줘야 한다.
    • 경로 설정 까지 완료 (코랩 ssd_package_setup.ipynb 파일 참조)
  3. 그 후, 코드 공부 순서는 다음과 같다
    • Demo
      • $ python demo.py –config-file configs/vgg_ssd300_voc0712.yaml –images_dir demo –ckpt https://github.com/lufficc/SSD/releases/download/1.2/vgg_ssd300_voc0712.pth
    • Single GPU training
      • $ python train.py –config-file configs/vgg_ssd300_voc0712.yaml
    • Single GPU evaluating
      • $ python test.py –config-file configs/vgg_ssd300_voc0712.yaml

2. Package Github Exploration

  • file Tree
      📦SSD
      ┣ 📂configs
      ┃ ┣ 📜efficient_net_b3_ssd300_voc0712.yaml
      ┃ ┣ 📜mobilenet_v2_ssd320_voc0712.yaml
      ┃ ┣ 📜mobilenet_v3_ssd320_voc0712.yaml
      ┃ ┣ 📜vgg_ssd300_coco_trainval35k.yaml
      ┃ ┣ 📜vgg_ssd300_voc0712.yaml
      ┃ ┣ 📜vgg_ssd512_coco_trainval35k.yaml
      ┃ ┗ 📜vgg_ssd512_voc0712.yaml
      ┣ 📂demo
      ┃ ┣ 📜000342.jpg
      ┃ ┣ 📜000542.jpg
      ┃ ┣ 📜003123.jpg
      ┃ ┣ 📜004101.jpg
      ┃ ┗ 📜008591.jpg
      ┣ 📂figures
      ┃ ┣ 📜004545.jpg
      ┃ ┣ 📜losses.png
      ┃ ┣ 📜lr.png
      ┃ ┗ 📜metrics.png
      ┣ 📂outputs
      ┃ ┗ 📜.gitignore
      ┣ 📂ssd
      ┃ ┣ 📂config
      ┃ ┃ ┣ 📜defaults.py
      ┃ ┃ ┣ 📜path_catlog.py
      ┃ ┃ ┗ 📜__init__.py
      ┃ ┣ 📂data
      ┃ ┃ ┣ 📂datasets
      ┃ ┃ ┃ ┣ 📂evaluation
      ┃ ┃ ┃ ┃ ┣ 📂coco
      ┃ ┃ ┃ ┃ ┃ ┗ 📜__init__.py
      ┃ ┃ ┃ ┃ ┣ 📂voc
      ┃ ┃ ┃ ┃ ┃ ┣ 📜eval_detection_voc.py
      ┃ ┃ ┃ ┃ ┃ ┗ 📜__init__.py
      ┃ ┃ ┃ ┃ ┗ 📜__init__.py
      ┃ ┃ ┃ ┣ 📜coco.py
      ┃ ┃ ┃ ┣ 📜voc.py
      ┃ ┃ ┃ ┗ 📜__init__.py
      ┃ ┃ ┣ 📂transforms
      ┃ ┃ ┃ ┣ 📜target_transform.py
      ┃ ┃ ┃ ┣ 📜transforms.py
      ┃ ┃ ┃ ┗ 📜__init__.py
      ┃ ┃ ┣ 📜build.py
      ┃ ┃ ┗ 📜__init__.py
      ┃ ┣ 📂engine
      ┃ ┃ ┣ 📜inference.py
      ┃ ┃ ┣ 📜trainer.py
      ┃ ┃ ┗ 📜__init__.py
      ┃ ┣ 📂layers
      ┃ ┃ ┣ 📜separable_conv.py
      ┃ ┃ ┗ 📜__init__.py
      ┃ ┣ 📂modeling
      ┃ ┃ ┣ 📂anchors
      ┃ ┃ ┃ ┣ 📜prior_box.py
      ┃ ┃ ┃ ┗ 📜__init__.py
      ┃ ┃ ┣ 📂backbone
      ┃ ┃ ┃ ┣ 📂efficient_net
      ┃ ┃ ┃ ┃ ┣ 📜efficient_net.py
      ┃ ┃ ┃ ┃ ┣ 📜utils.py
      ┃ ┃ ┃ ┃ ┗ 📜__init__.py
      ┃ ┃ ┃ ┣ 📜mobilenet.py
      ┃ ┃ ┃ ┣ 📜mobilenetv3.py
      ┃ ┃ ┃ ┣ 📜vgg.py
      ┃ ┃ ┃ ┗ 📜__init__.py
      ┃ ┃ ┣ 📂box_head
      ┃ ┃ ┃ ┣ 📜box_head.py
      ┃ ┃ ┃ ┣ 📜box_predictor.py
      ┃ ┃ ┃ ┣ 📜inference.py
      ┃ ┃ ┃ ┣ 📜loss.py
      ┃ ┃ ┃ ┗ 📜__init__.py
      ┃ ┃ ┣ 📂detector
      ┃ ┃ ┃ ┣ 📜ssd_detector.py
      ┃ ┃ ┃ ┗ 📜__init__.py
      ┃ ┃ ┣ 📜registry.py
      ┃ ┃ ┗ 📜__init__.py
      ┃ ┣ 📂solver
      ┃ ┃ ┣ 📜build.py
      ┃ ┃ ┣ 📜lr_scheduler.py
      ┃ ┃ ┗ 📜__init__.py
      ┃ ┣ 📂structures
      ┃ ┃ ┣ 📜container.py
      ┃ ┃ ┗ 📜__init__.py
      ┃ ┣ 📂utils
      ┃ ┃ ┣ 📜box_utils.py
      ┃ ┃ ┣ 📜checkpoint.py
      ┃ ┃ ┣ 📜dist_util.py
      ┃ ┃ ┣ 📜logger.py
      ┃ ┃ ┣ 📜metric_logger.py
      ┃ ┃ ┣ 📜misc.py
      ┃ ┃ ┣ 📜model_zoo.py
      ┃ ┃ ┣ 📜nms.py
      ┃ ┃ ┣ 📜registry.py
      ┃ ┃ ┗ 📜__init__.py
      ┃ ┗ 📜__init__.py
      ┣ 📜demo.py
      ┣ 📜DEVELOP_GUIDE.md
      ┣ 📜requirements.txt
      ┣ 📜setup.py
      ┣ 📜test.py
      ┣ 📜train.py
    
  1. ssd/modeling/detector
    • ssd/modeling에는 아래와 같은 신경망 구성 요소를 nn.module로 구현해놓은 파일이 있다.
      1. anchors
      2. backbone
      3. box_head
    • ssd_detector.py 에서 nn모듈”SSDDetector”을 return 해줌.
      • SSDDetector는 아주 짧은 nn모듈이며, 아래의 2 모듈을 사용
        • from ssd.modeling.backbone import build_backbone
        • from ssd.modeling.box_head import build_box_head
    • 따라서 신경망 구현에 대한 정확한 코드를 보고 싶다면, 위의 3개의 폴더 내부의 파일들을 봐야한다.
    • 이 폴더 내부 파일에 대해서는 아래의 큰 chapter로 다시 다룰 예정
  2. ssd/utils
    • checkpoint.py import CheckPointer : ckpt의 링크에서 모델 paramerter를 다운받고, 나의 신경망에 넣는 함수
      • model_zoo 파일로 가서, pth파일을 download하고 받은 cached_file을 return받는다.
      • torch.load 함수를 사용한다.
    • model_zoo.py
      • torch.hub 모듈을 사용한다.
      • 이 모듈에는 download_url_to_file/ urlparse/ HASH_REGEX 와 같은 함수가 있다.
      • 나의 신경망 파라미터를 pht파일로 저장하고, 그것을 github에 올려놓고 누군가가 나의 신경망 파라미터를 사용할 수 있게 하려면, 이 torch.hub모듈을 사용해야겠다.
    • registry.py
      • registry - 모듈을 config의 dictionary구조처럼 저장해 놓고, 쉽게 불러와 사용할 수 있게 해놓은 툴.
      • 이와 같이 사용함
              # ssd/modeling/backbone/vvg.py
              @registry.BACKBONES.register('vgg')
              def vgg(cfg, pretrained=True):
                  model = VGG(cfg)  # 같은 파일에서 정의한 클래스
                  if pretrained:
                      model.init_from_pretrain(load_state_dict_from_url(model_urls['vgg']))
                  return model
                    
              # ssd/modeling/backbone/__init__.py
              def build_backbone(cfg):
                  return registry.BACKBONES[cfg.MODEL.BACKBONE.NAME](cfg, cfg.MODEL.BACKBONE.PRETRAINED)
        
      • 또는 이와 같이 사용됨.
              # ssd/modeling/box_head/vvg.py
              @registry.BOX_HEADS.register('SSDBoxHead')
              class SSDBoxHead(nn.Module):
                  def __init__(self, cfg):
                      super().__init__()
                      self.cfg = cfg
                      self.predictor = make_box_predictor(cfg)
                      self.loss_evaluator = MultiBoxLoss(neg_pos_ratio=cfg.MODEL.NEG_POS_RATIO)
                      self.post_processor = PostProcessor(cfg)
                      self.priors = None
              # ssd/modeling/box_head/__init__.py
              def build_box_head(cfg):
                  return registry.BOX_HEADS[cfg.MODEL.BOX_HEAD.NAME](cfg)
        
      • registry에 모듈을 저장해두고, config에 적혀있는데로, 각각의 상황마다 각각의 모듈을 호출하기 쉽게 만들어 놓음. switch문이나 if문을 여러개써서 어떤 boakbone을 string으로 입력했는지 확인하는 작업이 필요없다.
      • 어려울 것 없고, 이 registry도 하나의 dictionary이다. 전체 코드에서는 dict{dict, dict, dict, dict …} 와 같은 구조로 사용 중.
  3. ssd/data/transforms
    • transforms.py -torchvision.transfoms 에 있을 법한 함수들이 직접 만들어져 있다.
      • Ex) resize, ToTensor, RandomFlip.. 과 같은 클래스들이 직접 구현되어 있다.
      • 특히 compose 또한 직접 구현해놓았다.
      • 위의 클래스들은 모두 __call__(parameters) 들이 구현되어 있다. def과 다르게 class로 만들어 놓은 클래스는 call을 정의해야만, 함수 포인터로써 클래스를 사용할 수 있다. 예를 들어 아래와 같이 사용이 가능하다.
          class ToTensor(object):
              def __call__(self, cvimage, boxes=None, labels=None):
                  return torch.from_numpy(cvimage.astype(np.float32)).permute(2, 0, 1), boxes, labels
                    
          transform = [RandomSampleCrop(),
                          RandomMirror(),
                          ToTensor()]
                    
          transform = Compose(transform)
          return transform
        
    • __init__.py :

      • build_transforms, build_target_transform 와 같은 함수들이 정의되어 있고, 다른 파일에서 이 함수만 사용함으로써 쉽게 transform을 수행할 수 있다.
  4. SSD/ssd/data
    • ssd/data/datasets/coco.py & SSD/dataset/voc.py 각 데이터 셋을 사용하기 위한 함수들이 잘 정의되어 있다.
      • Readme.md에 있는 data directory 구조를 똑같이 사용한다면, 나중에도 사용 가능!
      • terminal 필수
          $ VOC_ROOT="/path/to/voc_root"
          $ export COCO_ROOT="/path/to/coco_root"
        
      • export한 정보는 아래와 같이, os.environ 함수를 사용해 호출 될 수 있다.
          # SSD/train.py
          num_gpus = int(os.environ["WORLD_SIZE"]) if "WORLD_SIZE" in os.environ else 1
          voc_root = os.environ['VOC_ROOT']
          coco_root = os.environ['COCO_ROOT']
        
    • ssd/data/datasets/build.py & SSD/dataset/__init__.py

      • build.py : make_data_loader라는 함수가 정의되어 있고, from torch.utils.data.dataloader import default_collate 를 사용해서, 거의 직접 dataloader를 구현해 놓았다.

3. Analysis of lufficc/SSD/demo.py

  •   $ python demo.py \
          --config-file configs/vgg_ssd300_voc0712.yaml \
          --images_dir demo \
          --ckpt https://github.com/lufficc/SSD/releases/download/1.2/vgg_ssd300_voc0712.pth
      $ python demo.py \
          --config-file configs/vgg_ssd512_voc0712.yaml \
          --images_dir demo \
          --ckpt https://github.com/lufficc/SSD/releases/download/1.2/vgg_ssd512_voc0712.pth
    
  • def main()
    1. argparse 나의 포스트
    2. load config file that include info like num_classes, Dataset…
    3. print
       Loaded configuration file configs/vgg_ssd300_voc0712.yaml
              
       MODEL:
       NUM_CLASSES: 21
       INPUT:
       IMAGE_SIZE: 300
       ...
      
  • def run_demo(cfg, ckpt, score_threshold, images_dir, output_dir, dataset_type)
    1. @torch.no_grad() : decorator, Because it define __enter__, __exit__ on code here.
    2. model = build_detection_model(cfg)
      • modeling/detector/__inti__.py에서 modeling/deector/ssd_detector.py의 nn모듈”SSDDetector”을 return 해줌
      • 이 모듈의 전체 신경망 코드는 나중에 공부.
    3. ssd.utils.checkpoint import CheckPointer 로 신경망 파라메터 load.
    4. transforms = build_transforms(-> compose([transforms]))
    5. glob.glob(directory_path) == os.listdir(directory path)
    6. for i, image_path in enumerate(image_paths : list of images_path):
      • os.path.basename : 마지막 파일명만 return (‘Module’ Research 참고)
      • result = model(images.to(device))[0]
      • boxes, labels, scores = result[‘boxes’], result[‘labels’], result[‘scores’]
      • drawn_image = draw_boxes(image, boxes, …)
      • Image.fromarray(drawn_image).save(path)

4. Analysis of lufficc/SSD/ssd/modeling

  • SSD/ssd/modeling/backbone/vvg.py
    • class vvg16(nn.module)
      • input(300x300,500x500) 따라서 많은 convd2d, relu, Maxpooling 등을 처리해나간다.
      • 3개의 feature이 returm되며, features = [(1024,w,h),(512,w/2,h/2),(256,w/4,h/4)] 이다. (정확하지 않다.)
  • SSD/ssd/modeling/box_head/box_head.py
    • class SSDBoxHead(nn.Module)
    • 여기에서 많은 모듈을 사용한다
            from ssd.modeling.anchors.prior_box import PriorBox
        (1) from ssd.modeling.box_head.box_predictor import make_box_predictor
            from ssd.utils import box_utils
            from .inference import PostProcessor
        (2) from .loss import MultiBoxLoss
      
    • 하나하나 간략이 알아가보자.
      1. self.predictor = make_box_predictor(cfg)
        • cls_logits, bbox_pred = self.predictor(features)
        • cls_logits, bbox_pred : 모든 class에 대한 점수값, 이미지에서 bbox의 의미를 return한다.
        • conv2d만을 사용해서 최종결과를 반환한다. 생각보다 softmax 이런거 안하고 생각보다 단순하게 conv2d를 반복해서 적용하여, 마지막에 가져야할 tensor size에 맞춘다.
        • 그렇게 적당한 크기에 맞춰진 cls_logits, bbox_pred가 return 되는 것이다
      2. self.loss_evaluator = MultiBoxLoss(neg_pos_ratio=cfg.MODEL.NEG_POS_RATIO)
        •   gt_boxes, gt_labels = targets['boxes'], targets['labels']
            reg_loss, cls_loss = self.loss_evaluator(cls_logits, bbox_pred, gt_labels, gt_boxes)
          
        • 코드에서 위와 같이 사용된다. 즉 ground true와 비교해서 regressing_loss와 class_loss를 계산하게 된다.
        • class MultiBoxLoss(nn.Module)의 forward에서 loss함수를 정의했다.
          •   classification_loss = F.cross_entropy(confidence.view(-1, num_classes), labels[mask], reduction='sum')
              smooth_l1_loss = F.smooth_l1_loss(predicted_locations, gt_locations, reduction='sum')
              return smooth_l1_loss / num_pos, classification_loss / num_pos
            
          • 이와 같이 우리가 흔히 아는, torch.nn.functional.Fcross_entropy, torch.nn.functional.smooth_l1_loss 함수를 사용한 것을 볼 수 있다.
        • 앞으로 코드는 이 loss를 줄이기 위해 노력할 것이다. 그렇다면 cls_logits, bbox_pred가 self.predictor(features)에 의해서 더욱 정확하게 나오기 위해 노력할 것이다.
        • 코드 전체에서 forward만 잘 구현해 놓음으로써 이렇게 자동으로 backpropagation이 이뤄지고, 신경망 내부의 모든 weight, bias가 갱신되게 만들어 놓았다. 막상 backward까지 직접 구현하는 코드는 많이 없는듯 하다.
      3. self.post_processor = PostProcessor(cfg)
      4. self.priors = None
        • 위의 3,4는 inference를 위한 코드이다. 나중에 필요하면 보자.
        • 지금은 빨리 mmdetection구조를 알아가고 싶다.
        • 코드 구조와 모듈들 알아가는게 너무 재미있다.
        • 이제 torch layer가 구현되는 코드는 완전히 이해가 가능하다. 모르는 것도 없고, 모르면 금방 찾을 수 있겠다.
    • 그래서 결국에는 아래와 같은 값을 return 한다.
      • train 과정에서는 tuple(detections, loss_dict)
      • test 과정에서는 tuple(detections, {})
      • 이때, detections = (cls_logits, bbox_pred)
      • 그리고, loss_dict = 위의 regressing_loss와 class_loss가 dictionary 형태로 return 된다.
  • SSD/ssd/modeling/detector/ssd_detector.py
    • 위의 2개의 큰 모듈을 modeling/backbone, modeling/boxhead를 사용하는 간단한 코드
    •   class SSDDetector(nn.Module):
            def __init__(self, cfg):
                super().__init__()
                self.cfg = cfg
                self.backbone = build_backbone(cfg)
                self.box_head = build_box_head(cfg)
              
            def forward(self, images, targets=None):
                features = self.backbone(images)
                detections, detector_losses = self.box_head(features, targets)
                if self.training:
                    return detector_losses
                return detections
              
      
    • 여기서 신기한건, train하는 과정에서 detection결과(cls_logits, bbox_pred)는 아에 버려진다. 왜냐면 이미, loss 계산을 마쳤으니까!!

5. Analysis of lufficc/SSD/train.py

  • 시작 하기 전에
    • 처음 보는 pypi 모듈이라고 하더라도, 쫄지말고 공부하자.
    • 앞으로 mmdetection, detectron2에서 더 모르는 모듈이 많이 나올텐데, 이 정도로 쫄면 안된다.
    • SSD package 부시기로 했는데, 내가 부셔지면 안되지!! 화이팅!
  • main()
    1. import torch.distributed
      • GPU가 2개 이상일 때 사용하는 코드이다. 데이터 병렬처리 작업을 하고 싶으면 공부해서 사용하면 된다.
      • Official document
      • Data Parallel Tutorial : 나의 상황(single-device training, single-machine multi-GPU)에 따라서 torch에서 추천해주는 모듈을 사용하면 된다.
    2. 코드 제작자는 print를 절대 사용하지 않는다. logger를 사용해서 terminal에 출력!
    3. model = train(cfg, args)
  • train(cfg, args):
    1. optimizer, scheduler 정의
      • from ssd.solver.build import make_optimizer, make_lr_scheduler
      • from ssd.solver.build 에는 optimizer, lr_scheduler 가 정의되어 있다. (별거 없음)
      • optimizer = torch.optim.SGD(model.parameters(), lr=lr, … )
      • LRscheduler = torch.optim.lr_scheduler(optimizer, last_epoch)
    2. checkpointer = CheckPointer(model, optimizer, scheduler, cfg.OUTPUT_DIR, save_to_disk, logger)
      • ssd/utils/checkpoint.py : 모델을 학습시키는 중간중간, model, optimizer, scheduler를 save, load하는 함수가 def 되어 있다.
      • data = {‘model’: ~ ,’optimizer’: ~ ,’scheduler’: ~ } 이와 같이 dict으로 저장한다음, torch.save(data, “{}.pth 형식의 paht”)로 저장하면 된다.
    3. model = do_train(cfg, model, train_loader, optimizer, scheduler, checkpointer, device, arguments, args)
  • do_train (ssd/engine/trainer.py)
    • torchvision을 만들기
    • dataloder에서 data 가져오기
    • 파라메터 갱신하기
    •   summary_writer = SummaryWriter(log_dir=os.path.join(cfg.OUTPUT_DIR, 'tf_logs'))
        for iteration, (images, targets, _) in enumerate(data_loader, start_iter):
            loss_dict = model(images, targets=targets)
            loss = sum(loss for loss in loss_dict.values())    
            optimizer.zero_grad()
            loss.backward()
            optimizer.step()
            scheduler.step()
              
            if iteration % args.log_step == 0:
                logger.info( # 현재 학습 상태 출력
                summary_writer.add_scalar
      
    • MAX_ITER = ephch: 160000 정도로 설정되었지만, 그래도 아마 scheduler에 의해서 조기 학습 종료도 가능할 듯 싶다.

6. Analysis of lufficc/SSD/inferene.py

  • pass

7. summary

  • 지금까지의 과정을 통해서 lufficc/SSD을 이용해서 아래와 같은 것을 알아보았다.
    1. 어떻게 구성되어 있는지
    2. 각각의 파일들은 대충 어떤 역할을 하는지
    3. 파일들이 서로 어떻게 호출되고, 어떻게 사용되는지
    4. 다음에 이런 방식으로 모듈화 되어 있는 패키지를 어떻게 사용해야 할지
  • 분명 지금은 코드를 한줄한줄 정확히 알고, 코드 한줄을 지나면 데이터들의 형태나 타입이 어떻게 되는지 확인해보지는 않았다.
  • 지금은 당장 사용할 것도 아닌데 그렇게 까지 코드를 공부할 필요는 없다고 생각했다. 차라리 detectron2 혹은 mmdetection의 내부 코드들을 하나하나 씹어 먹는게 낫지 굳이 이거는 그냥 꿀덕꿀덕 삼키는 식으로 공부했다.
  • 이 과정을 통해서, 패키지를 보고 탐구하는 것에 대한 두려움이 사라졌다.
  • 패키지 내부의 코드를 부셔버려야지, 내가 맨붕와서 부셔지면 안된다. 라는 것을 깨달았다.
  • 이와 같은 방식으로 탐구해 나간다면, 어떤 패키지와 코드를 만나든, 잘 분석할 수 있겠다.
  • 추가로!! 다음에 정말 정확히 분석해야할 패키지가 생긴다면, 아래와 같은 작업을 꼭 하자.
    • 원하는 모듈만 import해서, 직접 함수나 클래스를 사용해보거나
    • 디버깅을 해서, 데이터 흐름이 어떻게 되는지 정확하게 뜯어보거나
    • 직접 코드 전체를 가지고 학습이나, inference를 해보거나
    • 즉. 눈으로만 코드 보지말고, 직접 코드를 실행해보고 확인해보자!!
【Python-Module】 Module, Function research of Pytorch tuto

Pytorch tutorial을 공부하면서, 새로운 함수나 모듈이 나왔을 때 고찰해보고 공부해본 내용을 담아 놓았다.

  • 너무 깊이 들어가지 말자. 1단계만 타고 들어가자.
  • 2단계 초과로 타고 들어가지 말자!!! 나는 너무 끝도 없이 타고 들어간다.

1. torch.max()

!ls -al
total 16
drwxr-xr-x 1 root root 4096 Dec 21 17:29 .
drwxr-xr-x 1 root root 4096 Jan  5 07:34 ..
drwxr-xr-x 1 root root 4096 Dec 21 17:29 .config
drwxr-xr-x 1 root root 4096 Dec 21 17:29 sample_data
  • 꼭 먼저 아래의 사진 부터 보기

  • n차원 행렬 array에 대해서 array[1,2,:,1] , array[:,2,3,1] , array[1,2,:,1,5] 를 출력해보면 1차원 백터이다!

  • 이 1차원 백터에 대해서 가장 큰 값 (max)를 찾는다

import torch
arr = torch.randint(1,100,(3,6,9))
max_value0, index0 = torch.max(arr,0)
max_value1, index1 = torch.max(arr,1)
max_value2, index2 = torch.max(arr,2)

print(max_value0.shape) # 3빠지고 -> index는 0~2 중 하나겠군
print(max_value1.shape) # 6빠지고 -> index는 0~5 중 하나겠군
print(max_value2.shape) # 9빠지고 -> index는 0~8 중 하나겠군

# 아래처럼 x,y의 위치가 그대로 대응된다.
arr[0,:,0], torch.max(arr[0,:,0]), max_value1[0,0]
arr[1,:,2], torch.max(arr[1,:,2]), max_value1[1,2]
torch.Size([6, 9])
torch.Size([3, 9])
torch.Size([3, 6])


(tensor([53, 34, 59, 48, 90, 34]), tensor(90), tensor(90))

2. np.shape, torch.shape

  • if 2차원이라고 감지되고 있다면, (1,4)와 (4,1)은 완전히 다른거다.
  • 2차원이라고 감지되는 상태와, 1차원이라고 감지되는 상태는 완전 다르다.
output = torch.randint(1,100,(4,10))
preds = torch.randint(1,10,(4,1)) # 1,4 를 하면 아래의 zip이 잘 동작 안한다.

# i.shape = 1
# ei.shape = 1,10

for i, el in zip(preds, output):
    print(el, el.shape, i)
tensor([26, 78,  9,  1, 81, 82, 82, 51, 28, 41]) torch.Size([10]) tensor([3])
tensor([36, 80, 87, 30, 26,  8,  3, 89, 96, 83]) torch.Size([10]) tensor([3])
tensor([62, 35, 60, 90, 20, 84, 32, 72, 64, 83]) torch.Size([10]) tensor([7])
tensor([81, 23, 72, 88, 43, 79, 59,  2, 12, 40]) torch.Size([10]) tensor([4])
import numpy as np
a = np.random.randn(1,4)
b = np.random.randn(4,1)
print(a.shape, b.shape)

c = torch.randn(1,3)
d = torch.randn(3,1)
print(c.shape, d.shape)
(1, 4) (4, 1)
torch.Size([1, 3]) torch.Size([3, 1])
  • np.sqeeze는 2차원으로 감지되는 행렬을, 1차원으로 바꿔주는 역할도 한다.
# https://note.nkmk.me/en/python-numpy-ndarray-ndim-shape-size/
a = np.squeeze(a)  # (4,)는 원소 4개의 tuple을 의미한다. 즉 2차원 행렬이 아니라고 감지하고 있는 상태. 즉 백터.
b = np.squeeze(b)
print(a.shape, b.shape)

c = torch.squeeze(c)  # (4,)는 원소 4개의 tuple을 의미한다. 즉 2차원 행렬이 아니라고 감지하고 있는 상태. 즉 백터.
d = torch.squeeze(d)
print(a.shape, b.shape)
(4,) (4,)
(4,) (4,)

3. torch.nn.functional

  • nn.module이란 무엇일까?
    • nn document에 Containers에 Module, Sequential, ModuleList 등이 있다. 이것은 “Layer를 담는 그릇” 이다. 즉 “신경망 전체 그릇”이라고 표현하면 좋다.
    • 그리고 nn document 여기에, 이 그릇에 들어갈 층(Layer)들이 들어가 있다. 또한 Loss Function도 들어가 있다.
  • 위의 nn document 와는 다르게, Layer 하나하나를 독단적으로 사용할 수 있게 하는 것이, torch.nn.functional as F 이다.
    • torch.nn.functional 의 return은 해당 layer를 통과하고 나온 tensor가 나온다. (def -> Tensor)
    • F.relu() 이와 같이 GIt에 저장되어 있다.
  • F.softmax
    • return : -> Tensor
    • input의 shape가 어떤 것이라 할지라도, 하나의 dim만 바라보면 1차원 백터가 된다.
    • Ex) dim=1 일 때 arr[1,:,2], arr[5,:,2,1] = 1차원! 백터 ()
    • 그 1차원 백터에 대해서 모든 index값의 softmax값을 구한다.
filters = torch.randn(8,4,3,3) # 몇장 depth 행 열

inputs = torch.randn(1,4,5,5) # 몇장 depth 행 열

out_tensor = F.conv2d(inputs, filters, padding=1)

out_tensor.shape
torch.Size([1, 8, 5, 5])
# `junha <https://devguide.python.org/documenting/>`_


# A Foolish Consistency is the Hobgoblin of Little Minds [1]

# [1]: http://www.python.org/dev/peps/pep-0008/#a-foolish-consistency-is-the-hobgoblin-of-little-minds
import torch
import torch.nn.functional as F
output = torch.randn((4,10))
preds = torch.randint(0,9,(4,))

# 2차원이라고 인지한 상태
temp1 = torch.randint(1,100,(1,10))
print(temp1.shape)
temp2 = torch.randint(1,100,(10,1))
print(temp2.shape)

# 여기서 el은 2차원이 아니라, 1차원으로 인지되어 나온다.
for i, el in zip(preds, output):
    print(type(i), type(i.item()))
    print(el, el.shape)
    break

for i in zip(preds, output):
    print(type(i), len(i), "elements : ",i[0].item(), i[1].tolist())
    break
torch.Size([1, 10])
torch.Size([10, 1])
<class 'torch.Tensor'> <class 'int'>
tensor([-0.1235,  1.0481, -0.3385, -0.6615,  1.2481, -1.0524, -0.3961,  0.7990,
         1.6359, -0.3628]) torch.Size([10])
<class 'tuple'> 2 elements :  3 [-0.12354857474565506, 1.0481327772140503, -0.3384615480899811, -0.6614770889282227, 1.248133897781372, -1.0524193048477173, -0.3961334228515625, 0.7990166544914246, 1.635870337486267, -0.36283737421035767]
# [F.softmax(el, dim=0)[i].item() for i, el in zip(preds, output)]
# [F.softmax(torch.squeeze(el), dim=0)[i.item()].item() for i, el in zip(preds, output)]
[F.softmax(el, dim=0)[i].item() for i, el in zip(preds, output)]

# pred_index : 4장의 사진 각각의 해당하는 index
# softmax_result : 1장의 사진에 대한 labels 10개의 softmax결과 값 중. 그 index가 가지는 softmax값

4. torch.cat

  • Concatenates (tensors (sequence of Tensors), Dimension)
  • document
  • Concatenates 되기 위해, 들어가는 tensor들의 dimention이 적절해야한다.
x = torch.randn(2, 3)
print('x :',x)
cat_dim0 = torch.cat((x, x, x), 0) # (**2**, 3) * 3개 = (**6**, 3)
print('cat_dim0 :\n',cat_dim0)
cat_dim1 = torch.cat((x, x, x), 1) # (2, **3**) * 3개 = (2, **9**)
print('cat_dim1 :\n',cat_dim1)

5. torch.stack

  • list나 tuple을 이용해서, sequence of Tensors로 표현되어 있는 것을 tensor로 묶어 준다.
  • 아래와 같은 경우. len of list(3) + tensor_x(2,3) -> tensor(3,2,3)
x = torch.randn(2, 3)
print('x :',x)
stack_dim0 = torch.stack([x, x, x], 0) 
print('stack_dim0 :\n',stack_dim0, stack_dim0.shape)
stack_dim1 = torch.stack((x, x, x), 1) 
print('stack_dim0 :\n',stack_dim1, stack_dim1.shape)
x : tensor([[-0.6724,  0.4038,  1.3529],
        [ 0.1946,  1.9841, -0.4614]])
stack_dim0 :
 tensor([[[-0.6724,  0.4038,  1.3529],
         [ 0.1946,  1.9841, -0.4614]],

        [[-0.6724,  0.4038,  1.3529],
         [ 0.1946,  1.9841, -0.4614]],

        [[-0.6724,  0.4038,  1.3529],
         [ 0.1946,  1.9841, -0.4614]]]) torch.Size([3, 2, 3])
stack_dim0 :
 tensor([[[-0.6724,  0.4038,  1.3529],
         [-0.6724,  0.4038,  1.3529],
         [-0.6724,  0.4038,  1.3529]],

        [[ 0.1946,  1.9841, -0.4614],
         [ 0.1946,  1.9841, -0.4614],
         [ 0.1946,  1.9841, -0.4614]]]) torch.Size([2, 3, 3])

6. PIL.Image

  • depth checking
  • PIL 기초
    • R_image = PIL.Image.open(‘path’)
    • R_image.size = 행렬
    • R_image.mode = depth
try :
    from PIL import Image
    import os
    # PIL 간단하게 사용해보기. 
    root = "/home/sb020518/tutoPytorch/data_for_5/PennFudanPed"
    mask_path = os.path.join(root, "PedMasks", "FudanPed00001_mask.png")
    mask1 = Image.open(mask_path)
    print(type(mask1),mask1.size, mask1.mode) # L은 gray scale image = 8 bit 이미지

    root = "/home/sb020518/tutoPytorch/data_for_5/PennFudanPed"
    mask_path = os.path.join(root, "PNGImages", "FudanPed00001.png")
    img1 = Image.open(mask_path)
    print(img1.size, img1.mode)
except :
    pass

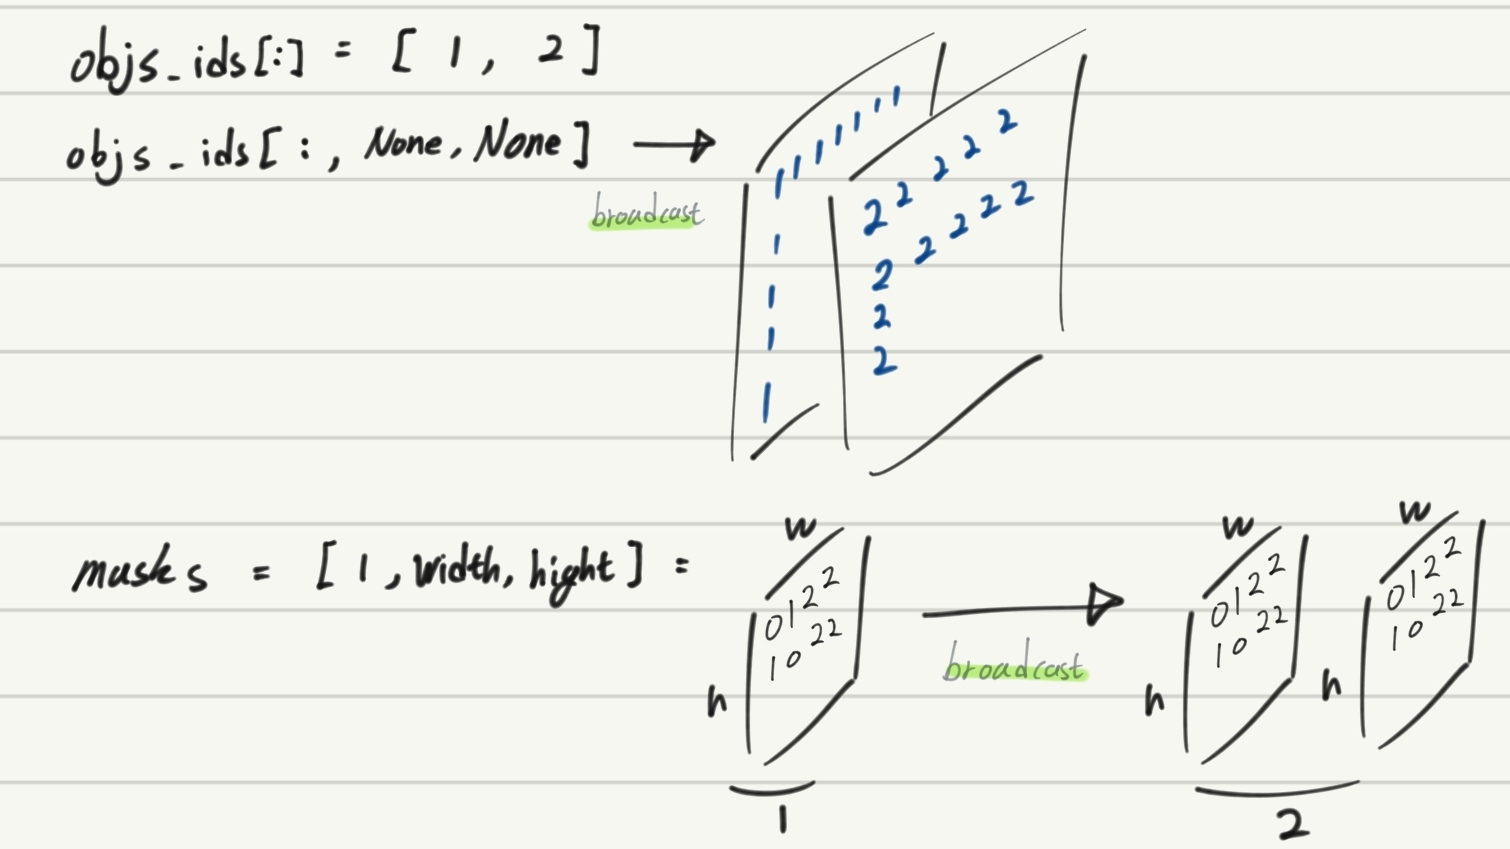
7. np.unique + objs - broadcast + np.where

- np.unique

  • 중복되는 원소들을 제거해준다.
  • np.unique document
  • [1 2 1 1 2 2 3] -> [1,2,3]

    - torch에서 broadcast를 이용한 COC O형식의 Mask 결과 추출하기

(5.torchvision_finetuning_instance_segmentation의 내용중 일부)
obj_ids = [1 2] => shape : (2,)
objs_ids[:] => array([1, 2], dtype=uint8)
obj_ids[:, None, None] = not defiend 이라고 하지만, –broadcast—> (2, width, hight) 가 되겠다.
masks = [1,width, hight] ———————————— –broadcast—> (2, width, hight)
masks = ( mask == objs_ids[:, None, None]) ————shape is———> (2, 536, 559)

masks[0,:,:] ==> 원래 1이 있던 자리만 True되어 있음
masks[1,:,:] ==> 원래 2가 있던 자리만 True되어 있음

img

- np.where

  • 원하는 숫자가 어느 위치에 있는지를 찾아 return해주는 모듈 (Find index of a value in a Numpy array (both 1D & 2D))
  • where document : https://thispointer.com/find-the-index-of-a-value-in-numpy-array/
  • 숫자를 찾고 싶으면 np.where(arr=hope_to_find_num)
  • output = 원한 위치의 all indices
  • bool에서 ture를 찾고 싶으면 np.where(arr), 단 arr의 data type = bool
import numpy as np
root = "/home/sb020518/tutoPytorch/data_for_5/PennFudanPed"
mask_path = os.path.join(root, "PedMasks", "FudanPed00001_mask.png")
mask1 = Image.open(mask_path)
mask = np.array(mask1) 
print('mask\'s shaep : ' , mask.shape)

objs_ids = np.unique(mask)
objs_ids = objs_ids[1:]
print("A number of objects :",objs_ids)
masks = ( mask == objs_ids[:, None, None])
print("masks.shape : ",masks.shape)
print("1번째 객체가 위치하는 곳 :", np.where(masks[0,...]==True))
print("2번째 객체가 위치하는 곳 :", np.where(masks[1,:,:]==True))
import torch
boxes = []
for i in range(objs_ids[-1]):
    pos = np.where(masks[i]) # masks[i] == masks[i,...] == masks[i,:,:] = 2차원 백터 = 여기서 True만 반환
    xmin = np.min(pos[1])
    xmax = np.max(pos[1])
    ymin = np.min(pos[0])
    ymax = np.max(pos[0])
    boxes.append([xmin, ymin, xmax, ymax])
torch.tensor(boxes,dtype=torch.float32)


8. torch.tensor VS torch.as_tensor VS torch.from_numpy()

각각의 document를 읽고 핵심만 정리한다. 참고 stackoverfloar PyTorch memory model: “torch.from_numpy()” vs “torch.Tensor()”

  • torch.tensor : list나 numpy를 받아들임 , copy a data = memory overhead = out-place 알고리즘
  • tensor_object.new_tensor : 보통 tensor를 받아들임, create a tensor with similar type but different size as another tensor.
  • torch.as_tensor: in place 알고리즘, numpy랑 메모리를 공유해서, numpy를 바꾸면 tensor도 바뀜, numpy의 dtype무시 torch.FloatTensor!
  • torch.from_numpy() : in place 알고리즘, numpy랑 메모리를 공유해서, numpy를 바꾸면 tensor도 바뀜, numpy의 dtype를 존중

Network에서 사용할 tensor함수

  • torch.Tensor.requires_grad_() - inplace 알고리즘
  • torch.Tensor.detach() - inplace 알고리즘

쨋든 pytorch에서 말하길 The recommended way to build tensors in Pytorch is to use the following two factory functions: {torch.tensor} and {torch.as_tensor}


9. TORCHVISION.TRANSFORMS

  • documentary site 내용 정리 하기.
    • img input은 PIL, Tensor image, Tensor images.
    • WARNING : batch에서 randoom seed를 그냥 이용하면 backpropa와 잘 양립 되지 않을 수 있으므로, torch.manual_seed(17) 를 이용해 seed 값 맞춰 줘라.
    • (torchvision.transroms.)Grayscale, Colorjitter, CenterCrop,Pad 등등.. 또한 하나의 nn모듈이다. 그래서 다 forward가 있고, 그것을 사용하는 것이다.
    • compose([list of Transforms]) 내부에는 위와 같은 nn모듈 클래스가 들어가고, 자동으로, forward에 들어가는 input은 img input이 된다. 여기에 들어가야할 자료형은 위에 정리 완료
    • scripted_transforms = torch.jit.script(transforms); # 이렇게 script를 사용하기 위해서는 compose말고 nn.Sequential로 묶으라는데 아직 뭔지 모르겠음.

10. Imform Return type or Variable type

def funtion(parameters) -> return_type : 
variable : type = value
def add(a,b) -> int:
    return a+b
a : int = 3
b : float = 4
type(b), add(a,b)

11. Object에 새로운 맴버변수 삽입이 가능하다,

  • backbone.out_channels??
  • ~(nn.Module 로써 정의된 class의 객체는 아니다) nn.sequential로 정의된 (class의) 객체든 뭐든 out_channels라는 맴버변수를 사용하면, 가장 마지막 layer의 out_channels 맴버변수가 자동으로 호출된다.~ -> 개소리 였다. 이거 아니다.
  • 결론 : Python 클래스로 정의된 객체에 새로운 맴버변수를 추가하는 것이 가능하다. 맴버함수도 가능하지만 self.Mamber_valuabe이 들어가선 안된다.
# 1. 여기서 1280은 어디서 나온 것 일까??
import torchvision
backbone = torchvision.models.mobilenet_v2(pretrained=True).features
backbone.out_channels = 1280

# 2. 기본 Faster RCNN에서 사용하는 backbone의 out_channels을 확인해보자,
#     하지만 잘 살펴보니, class FasterRCNN(GeneralizedRCNN):; out_channels = backbone.out_channels; 를 해줘서 알아서 out_channels에 맞춰주는 것 같은데...
from torchvision.models.detection.backbone_utils import resnet_fpn_backbone
backbone_2 = resnet_fpn_backbone('resnet50', pretrained=False)
out_channels = backbone_2.out_channels # resnet_fpn_backbone는 nn.Module로 정의된 class지만 out_channels라는 맴버변수 있다. 
print(type(backbone), out_channels)
# 3. test
backbone = torchvision.models.mobilenet_v2(pretrained=True).features
print(type(backbone)) # <class 'torch.nn.modules.container.Sequential'>
# backbone.out_channels  # 에러발생!!
backbone.junhaJJang  = 1111 # 이렇게 정의를 해주면?
backbone.junhaJJang # 이거는 사용가능하다. 
class junha:
    def __init__(self,a,b):
        self.a=a
        self.b=b
    def add(self,c,d):
        return self.a + self.b + c + d

object = junha(1,2)
dir(object)   # 'a', 'add', 'b'
object.e = 10
dir(object)   # 'a', 'add', 'b', 'e'
pass
object.f = 11

object.junhafuntion = lambda x,y:  x * y
print( object.junhafuntion(2,3) )
object.junhafuntion = lambda x,y: self.a * x * y
# print( object.junhafuntion(2,3) ) -> 에러발생!!
object.junhafuntion = lambda x,y, object_: x * y * object_.a
object.junhafuntion(1,2,object)

11.2 self로 정의한 변수만이 클래스의 attribute (맴버변수)로 인식한다

class junha():
    def __init__(self,a,b):
        self.a = a
        self.b = b
        hihi = 111 # 이건 단지 함수내 변수 일 뿐이다.
        self.hiii = 111
    def add():
        return self.a + self.b
    
ob = junha(1,2)

>>> ob.hihi 
    >>> # 에러발생!!  no attribute 'hihi'!!
>>> ob.hiii 
    >>> # 111로 정확하게 인식!

12. 상속과 __init__, super

  • maskrcnn.py 여기서 공부하면 좋을 코드를 가져왔다.
  • https://junha1125.github.io/docker-git-pytorch/2020-09-04-BalloonMask/ 여기를 보면 super에 대한 작은 정리가 되어 있다.
  • 좀더 자세한 설명은 여기를 참고 한다. https://leemoney93.tistory.com/37
try:
    class MaskRCNNPredictor(nn.Sequential):
        def __init__(self, in_channels, dim_reduced, num_classes):
            super(MaskRCNNPredictor, self).__init__(OrderedDict([
                ("conv5_mask", misc_nn_ops.ConvTranspose2d(in_channels, dim_reduced, 2, 2, 0)),
                ("relu", nn.ReLU(inplace=True)),
                ("mask_fcn_logits", misc_nn_ops.Conv2d(dim_reduced, num_classes, 1, 1, 0)),
            ]))

            for name, param in self.named_parameters():
                if "weight" in name:
                    nn.init.kaiming_normal_(param, mode="fan_out", nonlinearity="relu")
                # elif "bias" in name:
                #     nn.init.constant_(param, 0)
except:
    pass

이 코드를 유심히 유심히 보자. 여기서 공부해아할 것은 2개이다.

  1. nn.Sequential 를 상속한다.
  2. super().__init__(*parameters)
  3. OrderedDict 라는 함수를 사용한다.
  4. super(MaskRCNNPredictor, self) == super() ??

하나하나 알아보자.

  1. nn.Sequential는 Layer를 담는 Containers역할을 하는 하나의 Class이다. __init__ 말고도 다른 매소드 함수가 구현되어 있다. 그 메소드 함수들은 __init__에서 정의한 맴버변수를 사용할 것이다. nn.Sequential 클래스로 만든 객체 자체에 맴버변수가 정의 되어 있어야 한다.
    • nn.Sequential documentary 에서 볼 수 있는 것 처럼, segquential에는 ordered dict도 input 매개변수로 들어갈 수 있다.
  2. super().__init__(*parameters) 이것이 바로 위의 1번이 잘 동작되도록 만드는 코드이다. nn.Sequential내부의 다른 맴버함수들을 (클래스의 맴버변수가 잘 정의 된 상태에서) 문제 없이 잘 사용하기 위해서 해주는 작업니다.
  3. 아래의 코드 처럼
    • d = dir(); 라고 사용하면 d라는 dictionary 변수가 하나 정의 되는 것이다.
    • dir_valable = OrderedDict()를 하면 OrderedDict 변수가 하나 정의 되는 것이다.
    • dir과 OrderedDict는 거의 똑같은 동작을 하는 클래스이지만, OrderedDict는 값이 들어온 순서를 더 정확하게 기억해 놓는다.
    • 그리고 OrderedDict()내부에 [*(keyname, value)]를 적어 놓는 생성자를 아래에 사용한 것이다. OrderedDict Initialization, constructor에 대한 문서
  4. super자리에 코드들이 쫘르르륵 들어간다고 생각하라.(마치 해더파일에 있는 함수의 내용이 링크에 의해서 쫘르르 코드가 옮겨 들어가듯)
from collections import OrderedDict

dir_valable = OrderedDict([
                ("conv5_mask", 1),
                ("relu",2),
                ("mask_fcn_logits", 3),
            ])
dir_valable, list(dir_valable.keys()), (dir_valable.values())
(OrderedDict([('conv5_mask', 1), ('relu', 2), ('mask_fcn_logits', 3)]),
 ['conv5_mask', 'relu', 'mask_fcn_logits'],
 odict_values([1, 2, 3]))

13. import와 package

  • 공부하던 자료 : /tutoPytorch/5.torchvision_finetuning_instance_segmentation.ipynb
  • 이 파일을 공부하면서 생긴 궁금증을 아래와 같이 나열해 해결해나간다.
  • Torch Git 내부의 document1 : mask_rcnn.py, document2 : fast_rcnn.py 가능하면 꼭 열어볼 것을 추천
  1. model = torchvision.models.detection.maskrcnn_resnet50_fpn(pretrained=True)로 정의한 model에서, type(model.box_predictor)를 하면 왜 없는 모듈이라고 뜰까??
    • 111. mask_rcnn에 init가 정의되므로, 자식함수의 함수 오버라이딩이 발생한다. 222. 따라서 fast_cnn의 init의 내용은 전부 무시된다. 333. fast_cnn에서는 box_predictor가 fast_crnn_box_predictor로 정의가 되지만, mask_rcnn에서는 이 내용이 적혀 있지 않으므로, box_predictor로 정의된 맴버변수는 없다.
    • 위와 같은 개소리가 아니라… no attribute라고 뜨는 이유는… self.box_predictor 라고 정의된게 아니라서!!! 으그…. 유일한 맴버변수는 roi_heads 뿐이었다ㅠㅠ 다른것은 그냥 좆밥들…. (큰 목차 11-2 내용 참조)
    • super 덕분에, fast_rcnn의 init 내용이 mask_rcnn의 init에 전부 그대로 들어간다!!! super자리에 코드들이 쫘르르륵 들어간다고 생각하라.(마치 해더파일에 있는 함수의 내용이 링크에 의해서 쫘르르 코드가 옮겨 들어가듯)
    • 따라서 이와 같이 접근해야 한다.
       >>> type(model.roi_heads.box_predictor)
       torchvision.models.detection.faster_rcnn.FastRCNNPredictor
       >>> type(model.roi_heads.box_predictor.bbox_pred )
       torch.nn.modules.linear.Linear
      
  2. 내가 여기서 신기하다고 생각하는 것은 이거다 : mask_rcnn.py 파일에는 FastRCNNPredictor를 import내용이 전혀없다. 그럼에도 불구하고… from .faster_rcnn import FasterRCNN 를 호출했다는 이유만으로 FastRCNNPredictor가 Mask_crnn의 init의 super에 의해서 호출된다. 이게 가능한 이유가 뭘까??
    • 이 코드가 문제 없이 구동 되는 이유가 뭘까?
        import torchvision
        model = torchvision.models.detection.maskrcnn_resnet50_fpn(pretrained=True) # 이거를 그대로 부르면 num_classes = 91 이다. 
        type(model.roi_heads.box_predictor)
              
        >>> torchvision.models.detection.faster_rcnn.FastRCNNPredictor # (에러 안남)
      
    • 이것에 대해서는 다음과 같은 구조로 실험을 해보면 쉽게 이해할 수 있다. ```python
      • init.py
      • classes1.py
        • class junha1 여기서 junha2에 의해 정의된 객체를 맴버변수로 가지고 있기.
        • class junha2
      • classes2.py from .classes1 import junha1 junha1을 사용한 객체 생성 이 객체(junha1)의 junha2에 의해 정의된 맴버변수를 호출하면 어찌 될까?

      나의 상식과 다르게, 에러가 나지 않는다!!! ```

    • 결론 :
      • classes2.py에서 from .classes1 import junha2를 해주지 않아도 된다.
      • 다른 파일의 class, fun이든 import를 하면, 그 class 내부에 맴버변수나 맴버함수에서 사용되는, (다른 파일의) 다른 class의 객체는 무리 없이 사용가능하다.
      • 따라서 User는 내가 원하는 클래스, 함수만 import하면 그 내부에 속한 외부 클래스, fun에 대한 import는 신경쓰지 않아도 된다.
  3. A파일에서 from B파일 import B함수, Bclass 를 해놓았다면, C파일에서 form A파일 import B함수, Bclass 가능!
    • 참고 git line
    • 5.torchvision_finetuning_instance_segmentation.ipynb 코드 내부
        from torchvision.models.detection.rpn import AnchorGenerator 
        from torchvision.models.detection.anchor_utils import AnchorGenerator 
        # torchvision 0.5.0에서는 rpn.py에 import AnchorGenerator 정의
        # torchvision 0.1.5에서는 anchor_utils.py에 import AnchorGenerator 정의
      
    • 하지만 torchvision 0.1.5에서도 from torchvision.models.detection.rpn import AnchorGenerator를 해도 아주 잘 된다.
    • 왜냐하면, rpn.py에서 아래와 같이 정의 되어 있기 때문이다.
        # Import AnchorGenerator to keep compatibility.
        from .anchor_utils import AnchorGenerator
      

14. asset, unittest, logging, debudding

1. assert

  1. 파이썬은 동적 특성으로 인해 애플리케이션 대부분에 있어 디버깅보다 테스팅이 매우 중요하다.
  2. assert <표현식> [, '진단 메시지']
  3. 여러개의 assert를 확인하기 위해서 import unittest 를 한 test파일을 만드는 방법도 있다.
    1. test_filename.py를 만든다
    2. 그 파일 내부에 import unittest 하다.
    3. unittest.TestCase룰 상속하는 class를 만든다.
    4. unittest 클래스의 맴버함수로써 self.assetEqual()를 사용해 내가 만든 class를 test해볼 수 있다.
  4. 위와 같이 복잡하게 self.assetEqual()같은 맴버함수를 사용하지 않고, 직관적으로 asset만으로 test할 수 있는 pytest와 같으 모듈도 존재한다.
  5. 나중에 pytest를 구글링해서 찾아서 공부해보자.
a = 4
assert a == 4
# assert a != 4 , 'a shoud be 4'

2. logging

  • 과거 내가 만든 내용을 참고해서 다시 공부해보자.Blog logging Link : 다시 보니까.. 너무 대충 만듬 감이 있다. 그래서 아주 기초만 다시 공부해보자. 아래 문서도 그리 많은 내용을 담고 있진 않다.
  • logging 기초 문서
    1. 아래와 같은 log객체의 함수를 하용해서 메세지를 발행한다.
       # 코드 중간에 이런거 넣으면 된다
       logger.debug("debug 하고 싶은 내용 %s", str)
       logger.info("info하고 싶은 내용")
       logger.warning("warning해주고 싶은 내용")
       logger.error("error 내용")
       logger.critical("critical출력 하고 싶은 내용")
       log.critical(message [, args])
      
    2. 이는 메세지의 심각도 수준이 각기 다르기 때문이다. debug가 가장 낮은 심각도 critical이 가장 심각한 심각도를 의미한다.
    3. try, except문이 있다면, except문 내부에 위와 같은 log메세지 발행을 위한 코드를 넣어주면 된다.

3. debugging


15. python decorator 기본만 알기

  • decorator 란? 함수 앞뒤에 들어가야할 내용을 자동으로 넣어주는 매크로
  • 참조 reference
  • Python 으로 작성된 Opensource 의 코드들을 보다 보면, 아래와 같이 @ 로 시작하는 구문 들을 볼 수 있다.
  • 대상 함수를 wrapping 하고, 이 wrapping 된 함수의 앞뒤에 추가적으로 꾸며질 구문들을 decorator로 정의한다. 정의한 내용을 바꾸면 손쉽게 재사용이 가능하다.


  • decorator 정의 하는 방법 1 : def 사용
    1. 함수의 구조는 다음과 같다.
           def dec_functionName(func):
               def decorated():
                   ~~ 함수 이전에 실행되야하는 구문
                   ~~
                   func()  # 위에 매개변수로 들어간다.
                   ~~ 함수 이후에 실행되야하는 구문
                   ~~
                   return decorated
      
    2. 그리고 원하는 함수(위의 func의 인자로 들어감) 위에 @dec_functionName 를 적어주면 된다.
    3. 즉! decorator는 원래 작업의 앞 뒤에 추가적인 작업을 손쉽게 사용 가능하도록 도와주는 역할을 한다.
  • decorator 정의 하는 방법 2 : class 사용
    1. class의 call 맴버함수를 다음과 같이 정의한다.
      class class_for_decorator:
          def __init__(self, func):
                  self.func = func
          def __call__(self, *args, **kwargs):
                  ~~ 함수 이전에 실행되야하는 구문
                  ~~
                  self.func(*args, **kwargs)
                  ~~ 함수 이후에 실행되야하는 구문
                  ~~
      
    2. 그리고 원하는 함수(위의 func의 인자로 들어감) 위에 @class_for_decorator 를 적어주면 된다.

16. python 주의 할점

  1. self.variable, variable 분별하기
    • 아래의 코드를 살펴보자.
        class PennFudanDataset(Dataset):
            def __init__(self, root, transforms):
                self.root = os.path.join(root,"data_for_5","PennFudanPed")
                self.transforms = transforms
                # root = /home/sb020518/tutoPytorch
                self.imgs = list(sorted(os.listdir(os.path.join(self.root,"PNGImages"))))
      
    • self.root와 root는 완전히 다른 객체이다. 따라서 분리해서 생각해야한다.
    • 여기서 코딩 에러가 많이 나오니 주의하자.

17. __call__? + T.Compose(transforms) VS transforms.Compose?

  • 참고 링크
  • 5.torchvision_finetuning_instance_segmentation.ipynb 에서
    1. T.Compose(transforms) 를 적용한 transform
    2. transforms.Compose 를 적용한 traansforms_C 을 (내가 직접) 만들었다.
  • 그것을 이용해서 각각 dataset, dataset2를 만들었다.
  • 그리고 dataloader에 dataset, dataset2를 넣고, next(iter())를 적용해본 결과
    1. dataset 으로는 잘 동작하는데,
    2. dataset2 으로는 잘 동작하지 않는다.
  • 맨 처음 T.Compose(transforms) 그리고 transforms.Compose 이 코드상의 차이가 무엇인지 살펴보자.
    1. T.Compose(transforms) :
    2. transforms.Compose :
  • 이건 나중에 필요할 때 공부하자…

18. torch와 numpy의 이미지 차원 차이

  • 4Classifier.ipynb 에 이런 코드가 있다.
      # torchvision.datasets.CIFAR10.__getitem__(index=4) 라고 사용하면 안되지. 객체 만들고 그 객체로 Attribute 함수 사용해라.
      image, target =trainset.__getitem__(index=144)
      # type(image), target, image.size()
      plt.imshow(np.transpose(image.numpy(),(1,2,0))) # 4Classifier.ipynb에 설명 있으니 참조
      plt.title(classes[target])
      plt.show()
    
  • image.numpy() 필수로 해줘야 한다.
  • np.transpose(image.numpy(),(1,2,0)) 를 왜 하는 걸까?
    • 중요! 만약 이미지를 어디선가 load해서 가져왔을때.
    • tensor에서는 (몇장 ,depth ,행, 열)
    • numpy에서는 (행, 열, depth, 몇장)
    • tensor에서는 (depth ,행, 열)
    • numpy에서는 (행, 열, depth)
    • 따라서 바꿔줘야 한다.
from google.colab import files
uploaded = files.upload()

Upload widget is only available when the cell has been executed in the current browser session. Please rerun this cell to enable.

Saving testimage.png to testimage.png
from matplotlib import pyplot as plt
from matplotlib.image import imread
import numpy as np
import os
img = plt.imread('./testimage.png')
tensor = torch.tensor(img)
type(img), img.shape, type(tensor), tensor.shape
(numpy.ndarray, (300, 300, 4), torch.Tensor, torch.Size([300, 300, 4]))

하지만 data를 행렬로 그대로 가져온다면 torch와 tensor의 shape는 동일하게 생각해도 좋다

a = [[[[1,2],

     [4,5],

     [7,8]],

     [[10,11],

     [13,14],

     [16,17]]], ##

     [[[1,2],

     [4,5],

     [7,8]],

     [[10,11],

     [13,14],

     [16,17]]], ##

     [[[1,2],

     [4,5],

     [7,8]],

     [[10,11],

     [13,14],

     [16,17]]], ##

     [[[1,2],

     [4,5],

     [7,8]],

     [[10,11],

     [13,14],

     [16,17]]], ##

     [[[1,2],

     [4,5],

     [7,8]],

     [[10,11],

     [13,14],

     [16,17]]]] ##


import torch

temp1 = torch.randint(1,100,(2,3,4))

t3 = torch.tensor(a)

temp1.shape

temp1


import numpy as np

temp2 = np.random.randint(1,100,(2,3,4))

t4 = np.array(a)


temp1.shape, temp2.shape, t3.shape, t4.shape
(torch.Size([2, 3, 4]), (2, 3, 4), torch.Size([5, 2, 3, 2]), (5, 2, 3, 2))

  • 여기서 부터는 6.Transfer Learning for Computer Vision Tuto 참조

19. torchvision.datasets.ImageFolder

  1. 5.torchvision_finetuning_instance_segmentation.ipynb를 참고하면, 내가 새로운 dataset을 위한 class를 어떻게 정의하고, __getitem__ 과 같은 함수를 어떻게 정의해야하는지 알 수 있다.

  2. ImageFolder 공식 문서 참고하면 좋다.

  3. 만약 나의 데이터가 다음과 같은 구조로 정리 되어 있다면, 이 모듈을 사용하면 된다.

        
     root/dog/xxx.png
        
     root/dog/xxy.png
        
     root/dog/xxz.png


     root/cat/123.png
        
     root/cat/nsdf3.png
        
     root/cat/asd932_.png
        
    
  4. torchvision.datasets.ImageFolder(root : str, transform : Optional[Callable] = None)

data_dir = 'data/hymenoptera_data'

image_datasets = {x: datasets.ImageFolder(os.path.join(data_dir, x),

                                          data_transforms[x])

                  for x in ['train', 'val']}

dataloaders = {x: torch.utils.data.DataLoader(image_datasets[x], batch_size=4,

                                             shuffle=True, num_workers=4)

              for x in ['train', 'val']}

dataset_sizes = {x: len(image_datasets[x]) for x in ['train', 'val']}

class_names = image_datasets['train'].classes


device = torch.device("cuda:0" if torch.cuda.is_available() else "cpu")

20. torchvision.utils.make_grid

  • 참고 문서 : torchvision.utils.make_grid

  • 참고 파일 2개

    1. 4.tensorbord.ipynb

    2. 6.Transfer Learning for Computer Vision Tuto.ipynb

  • 예제 코드 1

  • 예제 코드 2 : 그냥 이거 항상 이용하기

        
          def imshow(inp, title=None):
        
              """Imshow for Tensor."""
        
              inp = inp.numpy().transpose((1, 2, 0))
        
              mean = np.array([0.485, 0.456, 0.406])
        
              std = np.array([0.229, 0.224, 0.225])
        
              inp = std * inp + mean
        
              inp = np.clip(inp, 0, 1)
        
              plt.imshow(inp)
        
              if title is not None:
        
                  plt.title(title)
        
              plt.pause(0.001)  # pause a bit so that plots are updated
        
          # Get a batch of training data
        
          inputs, classes = next(iter(dataloaders['train']))


          # Make a grid from batch
        
          out = torchvision.utils.make_grid(inputs)


          imshow(out, title=[class_names[x] for x in classes])


21. copy.deepcopy

  • reference : https://wikidocs.net/16038
  • python은 변수값이 메모리에 먼저 적히고, 객체가 그 메모리 위치를 기억하는 형태의 동적 언어인 것을 잊지 말자.
  • copy의 종류는 3가지가 있다고 생각하자. (1) shallow copy, (2) deep copy 가 아니라, (1) just shallow copy, (2) slicing shallow copy, (3)deep copy.
  • 내용 정리
    1. mutable
    2. 중요 파이썬 기본 함수
      • id(object) : 메모리 공간 번호
      • == : 서로 내용이 같은 값을 가지는 가?
      • is : 객체가 서로 같은 메모리 공간 번호를 가지나?
    3. shallow copy (just copy)
      • a = b
      • a is b » Ture
      • a == b » True
      • a[0] = ‘hi’ » b[0] = ‘hi’
    4. shallow copy (using slicing or copy.copy)
      • 사용법 : a = b[:] or a=copy.copy(b)
        • a is b » False (즉 b에 새로운 id 부여됨)
        • a == b » True
        • a[0] = ‘hi’ » b[0] != ‘hi’
        • 이처럼, a의 ‘원소’가 immutable이면 deepcopy라고 해도 무방하다. 즉 서로 영향없이 안전하다.
            import copy
            a = [1,2,3]
            b = copy.copy(a)
            print(a == b, a is b) >> True, False
            a[0] = 4
            print(b[0]) >> 1
          
      • 하지만!! a의 ‘원소’가 mutable이면 문제가 발생한다. ex) a = [[1,2],[3,4]]
        • a = b[:]
          • a is b » False, BUT!!!
          • a[0] is b[0] » True
        • a[0] 그 자체를 바꾸면 b[0]도 같이 바뀐다. ex)a[0].append(num), a[0].remove/pop(index), del a[0][2]
        • 하지만, a[0] = [1,5] 와 같이 재할당 하면, b[0]은 안바뀐다.
    5. deep copy
      • 그냥 모~~든게 새로 만들어 진다. mutale객체의 ‘원소’들 까지도.
      • b = copy.deepcopy(a)
      • a is b » False
      • a[0] is b[0] » False
      • a == b » True (초기에 서로 내용은 같을 수 있다.)

【Pytorch】Pytorch Tutorial 내용 핵심 정리

  • Pytorch Tutorial 내용을 핵심만 요약 정리 하였습니다.
  • 저 코드와, 한줄한줄 공부한 내용은 /sb_kookmin_googledrive/GCPcode/pytorch 에 있습니다.

1. pytorch document 순서 정리

  1. torch - create, indexing, Math Operation
  2. torch.Tensor - details on the above
  3. torch.autograd - backword, grad
  4. torch.nn - layer, loss
  5. torchvision - dataset
  6. torch.utils.data - Dataloader
  7. torch.optim
  8. torch.utils.tensorboard
  9. torchvision.transforms - data augm
  10. torchvision.models

3NeuralNetworks in 60min learn

  1. Numpy를 이용한 가중치 갱신해보기
    • Numpy 함수들을 이용해서 2층 affine Layer 구성하기
  2. torch.tensor를 사용해서 2층 layer 구성하기
    • Numpy와 거의 동일하지만 매소드 함수 이름이 가끔 다름
  3. Autograd
  4. 새로운 Layer, Function 정의하기
    • torch.clamp라는 함수를 사용하면, relu 처럼 동작 가능 + loss.backward할 때 backward알아서 처리 됨.
    • 하지만 직접 relu를 정의하면?? backward가 안된다.
    • torch.autograd.Function 상속하는 class를 만들어야 한다. (torch.autograd.Function)
  5. nn 모듈 - Sequential과 Module과 같은 container 존재
    • 정의 방법과 사용방법이 다르다.
    • 하지만 zero_grad(). backward(), parameters(), step() 사용법은 모두 같다.
    • 갱신은 param -= learning_rate * param.grd (간단한 고찰 있음)
  6. Optimiaer
    • 갱신은 Optimizer.step()!
  7. 같은 원리로, resnet을 만드는 건 쉽다.
    • model.foward 만 잘 손보면 된다.

4Classiffier.ipynb in 60min learn

  1. Data Load 하기
    • torchvision.transform
    • trainset = torchvision.datasets
    • torch.utils.data.DataLoader
  2. 신경망 정의하기
    • class (torch.nn.module)
    • __init__, forward
  3. Loss, Optimizer 정의
    • criterion/loss = torch.nn.LOSS_FUNC
    • optimizer = torch.optim.OPTIM_FUNC
  4. 신경망 학습 시키기
    • for epoch
      • for i, data in enumerate(trainloader) # data = [label, img]
        • optimizer.zero_grad()
        • outputs = net(inputs)
        • loss = criterion(outputs, labels)
        • loss.backward()
        • optimizer.step()
  5. Test하기
    • outputs = net(images)
    • with torch.no_grad():
      • for data in testloader:
        • outputs = net(images)
        • _, predicted = torch.max(outputs.data, 1)
        • correct += (predicted == labels).sum().item()
    • class별 accuracy 분석은 코드 참조
  6. 신경망 저장, load하기
    • torch.save # 신경망 저장, 변수 저장 모두 가능, .pt 파일
    • nn.module.state_dirt()
  7. GPU 사용하기
    • net.to(device)
    • data[0].to(device), data[1].to(device) # label, data

3.WhatIsTorch.nnReally.ipynb

깨달은점들

  • Torch basic operation 정리 해놓은 사이트
  • 그냥 단순 무식하게 함수 찾아서 공부하지 말자. 예제 코드를 보면서 그 코드에서 어떻게 사용되고 있는지를 보고, 공부하자. 예를 들어서, 지금 TensorDataset이 뭔지 모른다. 하지만 지금 알 필요는 없다. 나중에 Detection, Segmentation 코드 공부할 때, 나오면 깨달으면 된다.
  1. MNIST Data download
    • 새로운 모듈
      • from pathlib import Path = os.path
      • import requests = wegt역할
      • import pickle = File loading
      • import gzip = 압축 안 풀고 읽기
    • map(torch.tensor, *datas)
  2. tensor만 사용해서 신경망 구현
    • loss = -input[range(target.shape[0]), target].mean() # 배월 원소 특정 부분
    • preds = torch.argmax(preds_before, dim=1)
  3. Using torch.nn.functional
    • loss_func = F.cross_entropy
  4. Refactor using nn.Module
    • class Mnist_Logistic(nn.Module)
    • self.weights = nn.Parameter(torch.randn(784, 10)
    • for p in model.parameters():
  5. Refactor using nn.Linear
  6. Refactor using optim
  7. Refactor using Dataset
    • torch.utils.data.TensorDataset
  8. Refactor using DataLoader
    • train_ds = TensorDataset(x_train, y_train)
    • train_dl = DataLoader(train_ds, batch_size=bs)
    • for (xb, y) in train_dl:
  9. Add validation
    • model.eval()
    • with torch.no_grad(): valid_loss 출력해보기
  10. 지금까지 했던 것을 함수로 만들기!
    • for epoch in range(10):
      • model.train()
      • for xb, yb in train_dl:
      • model.eval()
      • with torch.no_grad():
  11. nn.linear말고, CNN 사용하기
    • def forward(self, xb):
      • xb = xb.view(-1, 1, 28, 28)
      • return xb.view(-1, xb.size(1))
  12. nn.Sequential
    • nn.Sequential에는 nn.Module을 상속하는 layer들이 들어가야 함. (Ex. nn.Conv2d, nn.ReLU() 등 init에서 사용하는 함수들)
  13. Wrapping DataLoader
    • 모델에서 데이터 전처리 하지 말고. 전처리한 데이터를 모델에 넣기 위해.
    • train_dl = WrappedDataLoader(train_dl, preprocess)
    • class WrappedDataLoader 구현
    • def __iter__(self): batches = iter(self.dl); for b in batches: yield (self.func(*b))
  14. Using GPU
    • model.to(dev)
    • Input data.to(dev)
    • 항상 이 2개!

4.tensorbord.ipynb ⭐

  1. DataLoader, Net, Loss, Optim - Define
  2. writer = torch.utils.tensorboard.SummaryWriter()
  3. DataLoader
    • DataLoader는 __iter__가 잘 정의된 하나의 단순 class일 뿐이다. -“3.what torch.nn”에서 WrappedDataLoader 도 참조
    • DataLoader사용 방법은 3가지 이다.
      1. for x,y in DataLoader:
      2. x, y = iter(DataLoader).next()
      3. x, y = next(iter(DataLoader))
      4. PS: return되는 type은 list[ x_torch.tensor_batch, y_torch.tensor_batch ] 이다.
  4. torch.utils.tensorboard.SummaryWriter()의 대표 매소드 함수
    • writer.add_image(“title=tag”,img_grid) : input img_grid 보기
      • img_grid = torchvision.utils.make_grid( torch.tensor( 몇장, depth, w, h) ) : ‘몇장’ 에 대해서 grid_image를 만들어 tensor로 뱉어줌.(torch_module_research.ipynb 꼭 참조)
    • writer.add_graph(model,input_data) : model Architecture 보기
    • writer.add_embedding() : 고차원 Data 3차원으로 Visualization 하기
  5. Train
    • torch.max(arr, dim= 제거할 차원)
    • np.squeeze(np.arry) : shape에서 1은 다 없애 버린다. 2차원으로 감지되는 행렬을, 1차원으로 바꿔주는 역할도 한다.
    • torch.shape, np.shape : if 2차원이라고 감지되고 있다면, (1,4)와 (4,1)은 완전히 다른거다.
    • torch.nn.functional.softmax(input, dim=None) : Ex) dim=1 일 때 arr[1,:,2] = 1차원! 이 1차원 백터에 대한 모든 원소 softmax
    • 학습 도중 writer.add_scalar, writer.add_figure
        for epoch in range(2):  
            for i, data in enumerate(trainloader, 0):
                if i % 1000 == 0:
                    writer.add_scalar("title=tag", scalar_value, global_step) - Loss plot
                    writer.add_figure
      
  6. Test
    • torch.cat : concatenation
    • torch.stack : list to tensor
    • 각 class에 대한 precision-recall curve 그리기
      • writer.add_pr_curve(class이름, TrueOrFalse, PositiveOrNagative)

5.torchvision_finetuning_instance_segmentation.ipynb

  • 6.transfer_learning_tutorial.ipynb를 먼저 공부하고, 여기 보는게 낫다.
  1. 새로운 Dataset 정의하는 방법
    • torch.utils.data.Dataset을 상속하는 클래스.
    • __len__ and __getitem__ 정의하기
    • __getitem__ (self, idx) 은 [image, target]을 return해야한다.
    • 자세한 내용은 파일 참조
  2. Dataset을 새로 정의하는 Class 만들기
    • os.path.join, os.listdir
    • target[“masks”]를 정의하기 위한 변수 만들기
      • broadcastion 적용 : masks = (mask == obj_ids[:, None, None])
  3. torchvision.models를 사용한 model 정의하기
    • 아래의 내용은 필요할 때! Tuto 코드 & Torch Git 코드 꼭 봐야 함.
      1. torch Git, torchvision Git의 함수나 클래스 호출하는 방법 (헷갈리면 읽어보기!)
      2. model의 마지막 단에 나오는 class 갯수만 바꾸고 싶을 때.
      3. model의 class갯수와 backbone network를 모두 바꾸고 싶을 때
      4. 2번 방법으로 get_model_instance_segmentation함수 정의하기.
  4. train과 evaluation 하기
    1. dataset = PennFudanDataset(위에서 내가 만든 클래스)

    2. 하나의 데이터를, train set, validation set으로 나누는 방법
       indices = torch.randperm(len(dataset)).tolist()
       dataset = torch.utils.data.Subset(dataset, indices[:-50])
       dataset_test = torch.utils.data.Subset(dataset_test, indices[-50:])
      
    3. data_loader = torch.utils.data.DataLoader(dataset, batch_size=2 … )

    4. model.to(device)

    5. optimizer정의 후 lr_scheduler = torch.optim.lr_scheduler.StepLR(optimizer …)

      • optimizer.step,() 후 lr_scheduler.step() 또한 해줘야 함.
    6. epoch 돌면서 Git의 vision.reference.detection.engine의 train_one_epoch, evalate 사용해서 log 출력

6.transfer_learning_tutorial.ipynb ⭐

  1. Import Modules, Dataloader Define
    • datasets.ImageFolder(root, transforms)
    • dictionary구조를 이용한, datasets, dataloaders 정의 -Ex) dataloaders[‘train’], dataloaders[‘test’]
  2. dataloader가 잘 정의 되었나 확인

    • torchvision.utils.make_grid 를 완벽하게 사용하는 방법 - imshow 함수 정의(np.transpose, 정규화, np.clip, show)
  3. Train과 Validation 전체를 하는 함수 정의

    • def train_model(model, criterion, optimizer, scheduler, num_epochs=25):
      • return model.load_state_dict(best_model_wts)
    • best_model_wts = copy.deepcopy(model.state_dict())
    • time_elapsed = time.time() - since
    • 전체 순서 정리(원본은 ipynb 파일 참조)
      image
  4. Define Function (visualizing the model predictions)
    • def visualize_model(model, num_images=6):
      • ax = plt.subplot(num_images//2 , 2, images_so_far )
  5. model 정의하고, Train 및 validation 해보기
    1. Finetuning the conv_Net
      • 직접 torch git 에서 전체 코드를 꼭 봐야 함.
      • 요약
          model_ft = models.resnet18(pretrained=True)
          model_ft.fc = nn.Linear(num_in_features, 2)  
          model_ft = train_model(model_ft, criterion, optimizer_ft, ...)
          visualize_model(model_ft)
        
    2. Conv_Net as fixed feature extractor
      • 요약
          model_conv = torchvision.models.resnet18(pretrained=True)
          for param in model_conv.parameters():
              param.requires_grad = False
          num_ftrs = model_conv.fc.in_features
          model_conv.fc = nn.Linear(num_ftrs, 2)
          model_conv = train_model(model_conv, criterion, optimizer_ft, ...)
          visualize_model(model_conv)
        

【LinearAlgebra】선형대수 정리 2 (한글강의)

쑤튜브 선형대수 강의내용 정리 24강~44강

youtube 강의 링크 : 쓔튜브 선형대수 강의 링크

선형 결합과 선형독립

  • 24강 선형결합(Linear combination)과 생성(Span)
    • 데카르트 좌표계(2차원 직교 좌표계) : 하지만, 좌표계는 꼭 직교(직각)이어야만 하는 것은 아니다. 평행이 아닌 두 직선으로 좌표계를 표현할 수도 있다.
    • 3차원 이상의 좌표계를 표한하려고 할때, 주어진 백터 n개가 n차원 좌표계의 좌표축이 될 수 있는지 없는지를 판단하는 것이, 선형독립 판단이다.
    • Linear combination (선형 결합) : v1,v2,v3의 각각의 스칼라곱의 합에 의해서 v를 표현할 수 있다면, v를 v1,v2,v3의 선형결합이다. 라고 한다. Ex) v = a*v1+ b*v2 + c*v3
    • Span(v1, v2, v3, v4, v5 … )이란 v1, v2, v3, v4, v5 …이 만들 수 n차원 공간을 말한다. 백터들이 서로 독립이면 n공간 그대로 가진다. 하지만 종속이면 n미만의 공간이다.
  • 25강 선형독립(linearly independent)
    • 선형 독립의 정의
    • image-20201120172426393
    • 영백터는 모든 백터들과 독립이 아니다. (위의 정의에 그대로 대입해서 생각해보기)
    • 선형독립의 집합은 공집합을 제외한 모든 부분집합은 선형독립 집합이다.
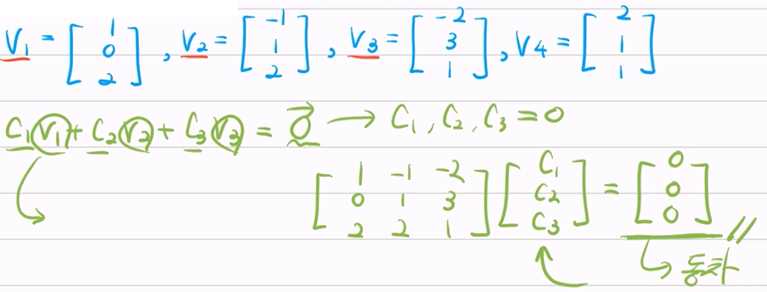
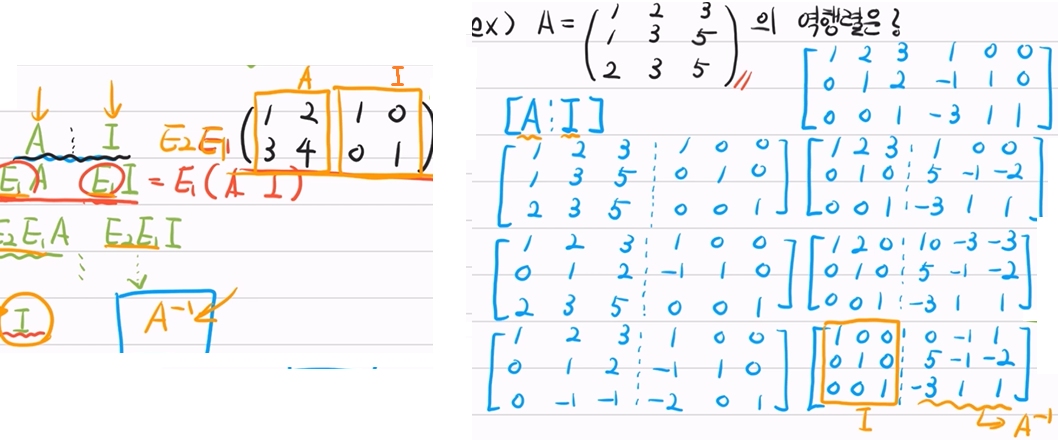
    • 3차원 열백터 4개에 대해서, 3x4행렬의 확장행렬을 만들고, 왼쪽 3x3 블락에 대해서 기약행사다리꼴 모양으로 만들어준다.(기양행사다리꼴로 구하는 해는 c1, c2, c3이다.) 이때 왼쪽 3x1의 값이 0이 아니라면 선형종속이다. (consisitent) 반대로 왼쪽 3x1의 값이 0이라면 선형독립이다.
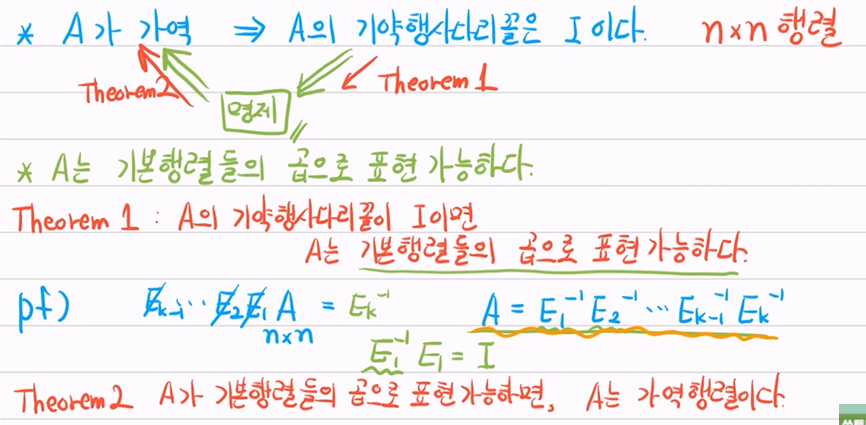
    • n차원 열백터 n개를 묶은 n x n 행렬의 역행렬이 존재한다 = 그 행렬의 기약행사다리꼴 단위행렬 이다. = n차원 열백터 n개는 서로 독립니다.
    • 선형 독립 판별법 : 동차 연립 선형 방정식(이전 강의 참조)이 자명해만을 가지면, 독립이다. 즉! 열백터로 만든 행렬이 가역행렬이면, 그 열 백터들은 독립이다.
    • 그 열백터 n개로 n차원 좌표계를 표현할 수 있다. Span(v1, v2, v3, v4, …vn ) = R^(n) 이다.
    • image-20201120173335391
  • 26강, 27강 해집합의 성질
    • column space, row space : 행렬을 열 백터, 행 백터의 관점으로 봤을 때, 만들수 이는 span(A) 차원의 공간
    • A의 열백터가 선형독립이면 A는 가역행렬이다. 그렇다면, transe(A)의 행백터가 선형독립이다. A가 가역행렬이면 transe(A)도 가역행렬이다. 따라서 B의 행백터가 선형독립이면, B는 가역행렬이다.
    • 행렬 A의 열백터가 선형독립이면, 열백터의 일차 계수 선형결합으로 span(A)차원 백터 V가 있을 때, 그 일차 계수들(x1,x2,x3,x4…) 는 유일하다. AX = V -> X = inverse(A) x V 는 유일하므로.
    • AX = 0가 자명해 만을 가지면 A의 열백터는 선형독립니다. = transe(A)도 가역이다. A의 행백터도 선형독립이다.

LU decomposition

  • 29강 LU decomposition
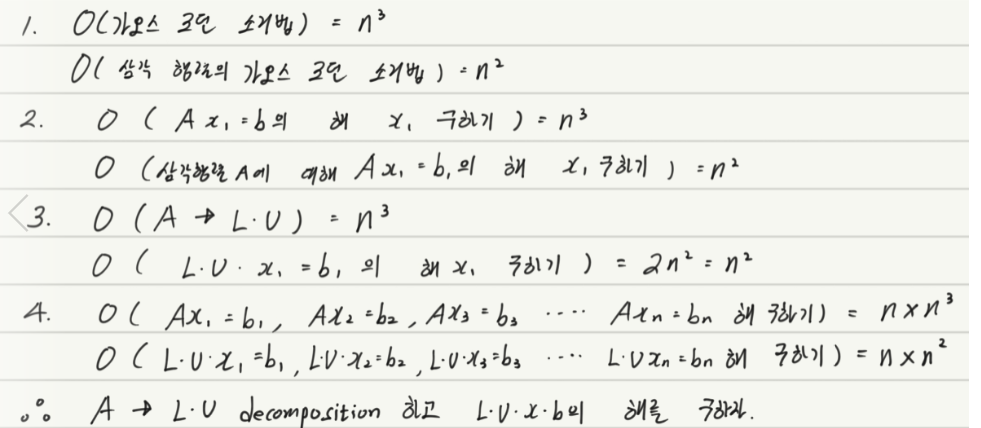
    • AX = b에서 X를 구하는 방법은, 확장행렬 변환후 기약형사다리꼴로 바꾸는 방법이 있다. 하지만 다른 좋은 방법은 없을까?
    • 대각 행렬 : 대각선의 성분을 제외한 모든 부분이 0인 행렬. 대각행렬은 가역행렬이다. 대각행렬의 역행렬은 대각 성분을 모두 역수 취해준 행렬이다. 하지만 대각 성분 중 하나라도 0이 존재한다면 역수를 취하는 게 불가능하다. 따라서 대각행렬의 대각 성분 중 하나라도 0이 존재하면 비가역행렬이다.
    • 삼각행렬 : 대각성분을 기준으로 위(Lower) or 아래(Upper)가 모두 0인 행렬이다. 대각 행렬은 삼각행렬의 한 원소이다. 이 삼각행렬의 대각성분 중 0이 존재하지 않는다면, 가오스조던 소거법에 의해서 (forward, backward 둘 중 하나만 해서) 기약형사다리꼴로 바꿀 수 있다. 즉 가역행렬이다.
    • A = LxU (Lower triangular matrix) x (Upper triangular matrix)
    • image-20210106160928953
  • 30강, 31강 LU분해의 이론적인 근거와 계산법
    • 가우스 소거법(forward)을 시행할 때 사용되는 모든 기본행렬은 항상 Lower triangular matrix(하삼각행렬)이다. (행교환 제외. 행교환 기본행렬은 하삼각행렬이 아니다.)
    • 하삼각행렬꼴의 기본행렬의 역행렬은 하삼각행렬이다.
      • image-20210106161532372
    • 하삼각행렬 x 하삼각행렬 = 하삼각행렬 이다.
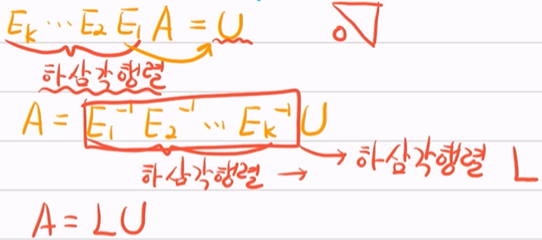
    • 위의 3가지 이론을 근거로 아래와 같이 표현할 수 있다 . 여기서 A에 대한 가오스 소거법(forward)과정은 Ek… E2 E1 (기본행렬 곱)이라고 표현할 수 있다.
      • image-20210106162215984
    • 따라서 LU를 구하는 방법은 아래와 같다.
      1. A에 대한 [가오스 소거법을 모아놓은 기본행렬들(행교환 제외)]을 찾는다.
      2. (그 기본행렬들의 곱) x A = U이다. U를 구했다.
      3. inverse(그 기본행렬들의 곱) = L이다. L을 구했다.
    • 하지만! LU분해를 해서 나오는 L,U는 유일하지 않다. 여러개가 나올 수 있다.
  • 32강 PLU분해
    • A에 대한 [가오스 소거법을 모아놓은 기본행렬들]을 찾을 때 행교환이 꼭 필요하다면 어떡하지??
    • 그렇다면! A에서 필요한 [행교환 기본행렬들(!= 하삼각행렬)]을 모두 찾아놓고, 그것들의 곱을 P라고 하면 된다.

Determinant (33강~39강)

  • 33강 행렬식,판별식
    • 2차 행렬의 판별식 공식을 구하는 방법
    • 3차 행렬의 판별식 공식을 구하는 방법(크래머의 공식) -> 동영상 참조
    • 4차 행렬의 판별식 공식을 구하는 방법
  • 특수한 경우의 determinant
    • 대각행렬, 삼각행렬의 determinant = 대각원소의 곱이다.
    • 영행, 영열을 포함하는 행렬의 determinant는 0이다.
  • 나머지 강의는 나중에 필요하면 보자.

Eigen value & Eigen vector

  • 40강 고유값과 고유벡터
    • 관점(좌표축)을 달리해서 보이지 않던 것을 찾아보자.
    • Ax = λx 이때, λ = Eigen value, x = Eigen vector A = invertible
    • n개의 고유백터는 서로 독립이다. 그리고! n개의 고유백터는 서로 orthogonal (백터의 내적은 0)하다.
  • 41강, 42강 특성방정식 (Characteristic Equation)
    • Ax = λx -> (A-λI)x = 0, 이때 det(λI-A) = |(λI-A)|를 특성 방정식이라고 한다.
    • 그리고 이 특성방정식의 해(λ)들이 고유값들(λ)이다.
    • (A가 n차 정사각행렬일때) 특성방정식의 해가 n개 이면, 선형독립인 고유백터 n개를 찾아낼 수 있다. (증명은 동영상 참조 굳이 알 필요 없음)
  • 43강, 44강 특수한 행렬들의 고유값
    • 대각행렬 : 대각원소가 결국 고유값이다.
    • 삼각행렬 : 대각원소가 결국 고유값이다.
    • nxn 행렬 A의 고유값을 λ1, λ2, λ3 — λn 이라 하면, 아래와 같이 정의할 수 있다. (증명은 43강44강 참조)
      • det(A) = λ1 x λ2 x λ3 x — x λn
      • trace(A) 대각합 = λ1 + λ2 + λ3 + — + λn

【Python】Convert Images(PNGs,JPGs) to PDF using Python

In this short guide, you’ll see how to convert images to PDF using Python

In this short guide, you’ll see how to convert images to PDF using Python

reference : https://datatofish.com/images-to-pdf-python/

PNG,JPG-To-PDF-Python

PNG,JPG-To-PDF Python Code

Precaution

  1. The number of images must be 100 less.
  2. The index must be written at the end of the file name.
    • Ex) firstimage1.png, firstimage2.png, firstimage3.png …. firstimage99.png
    • Ex) img1.jpg, img2.jpg, img3.jpg …. img80.jpg

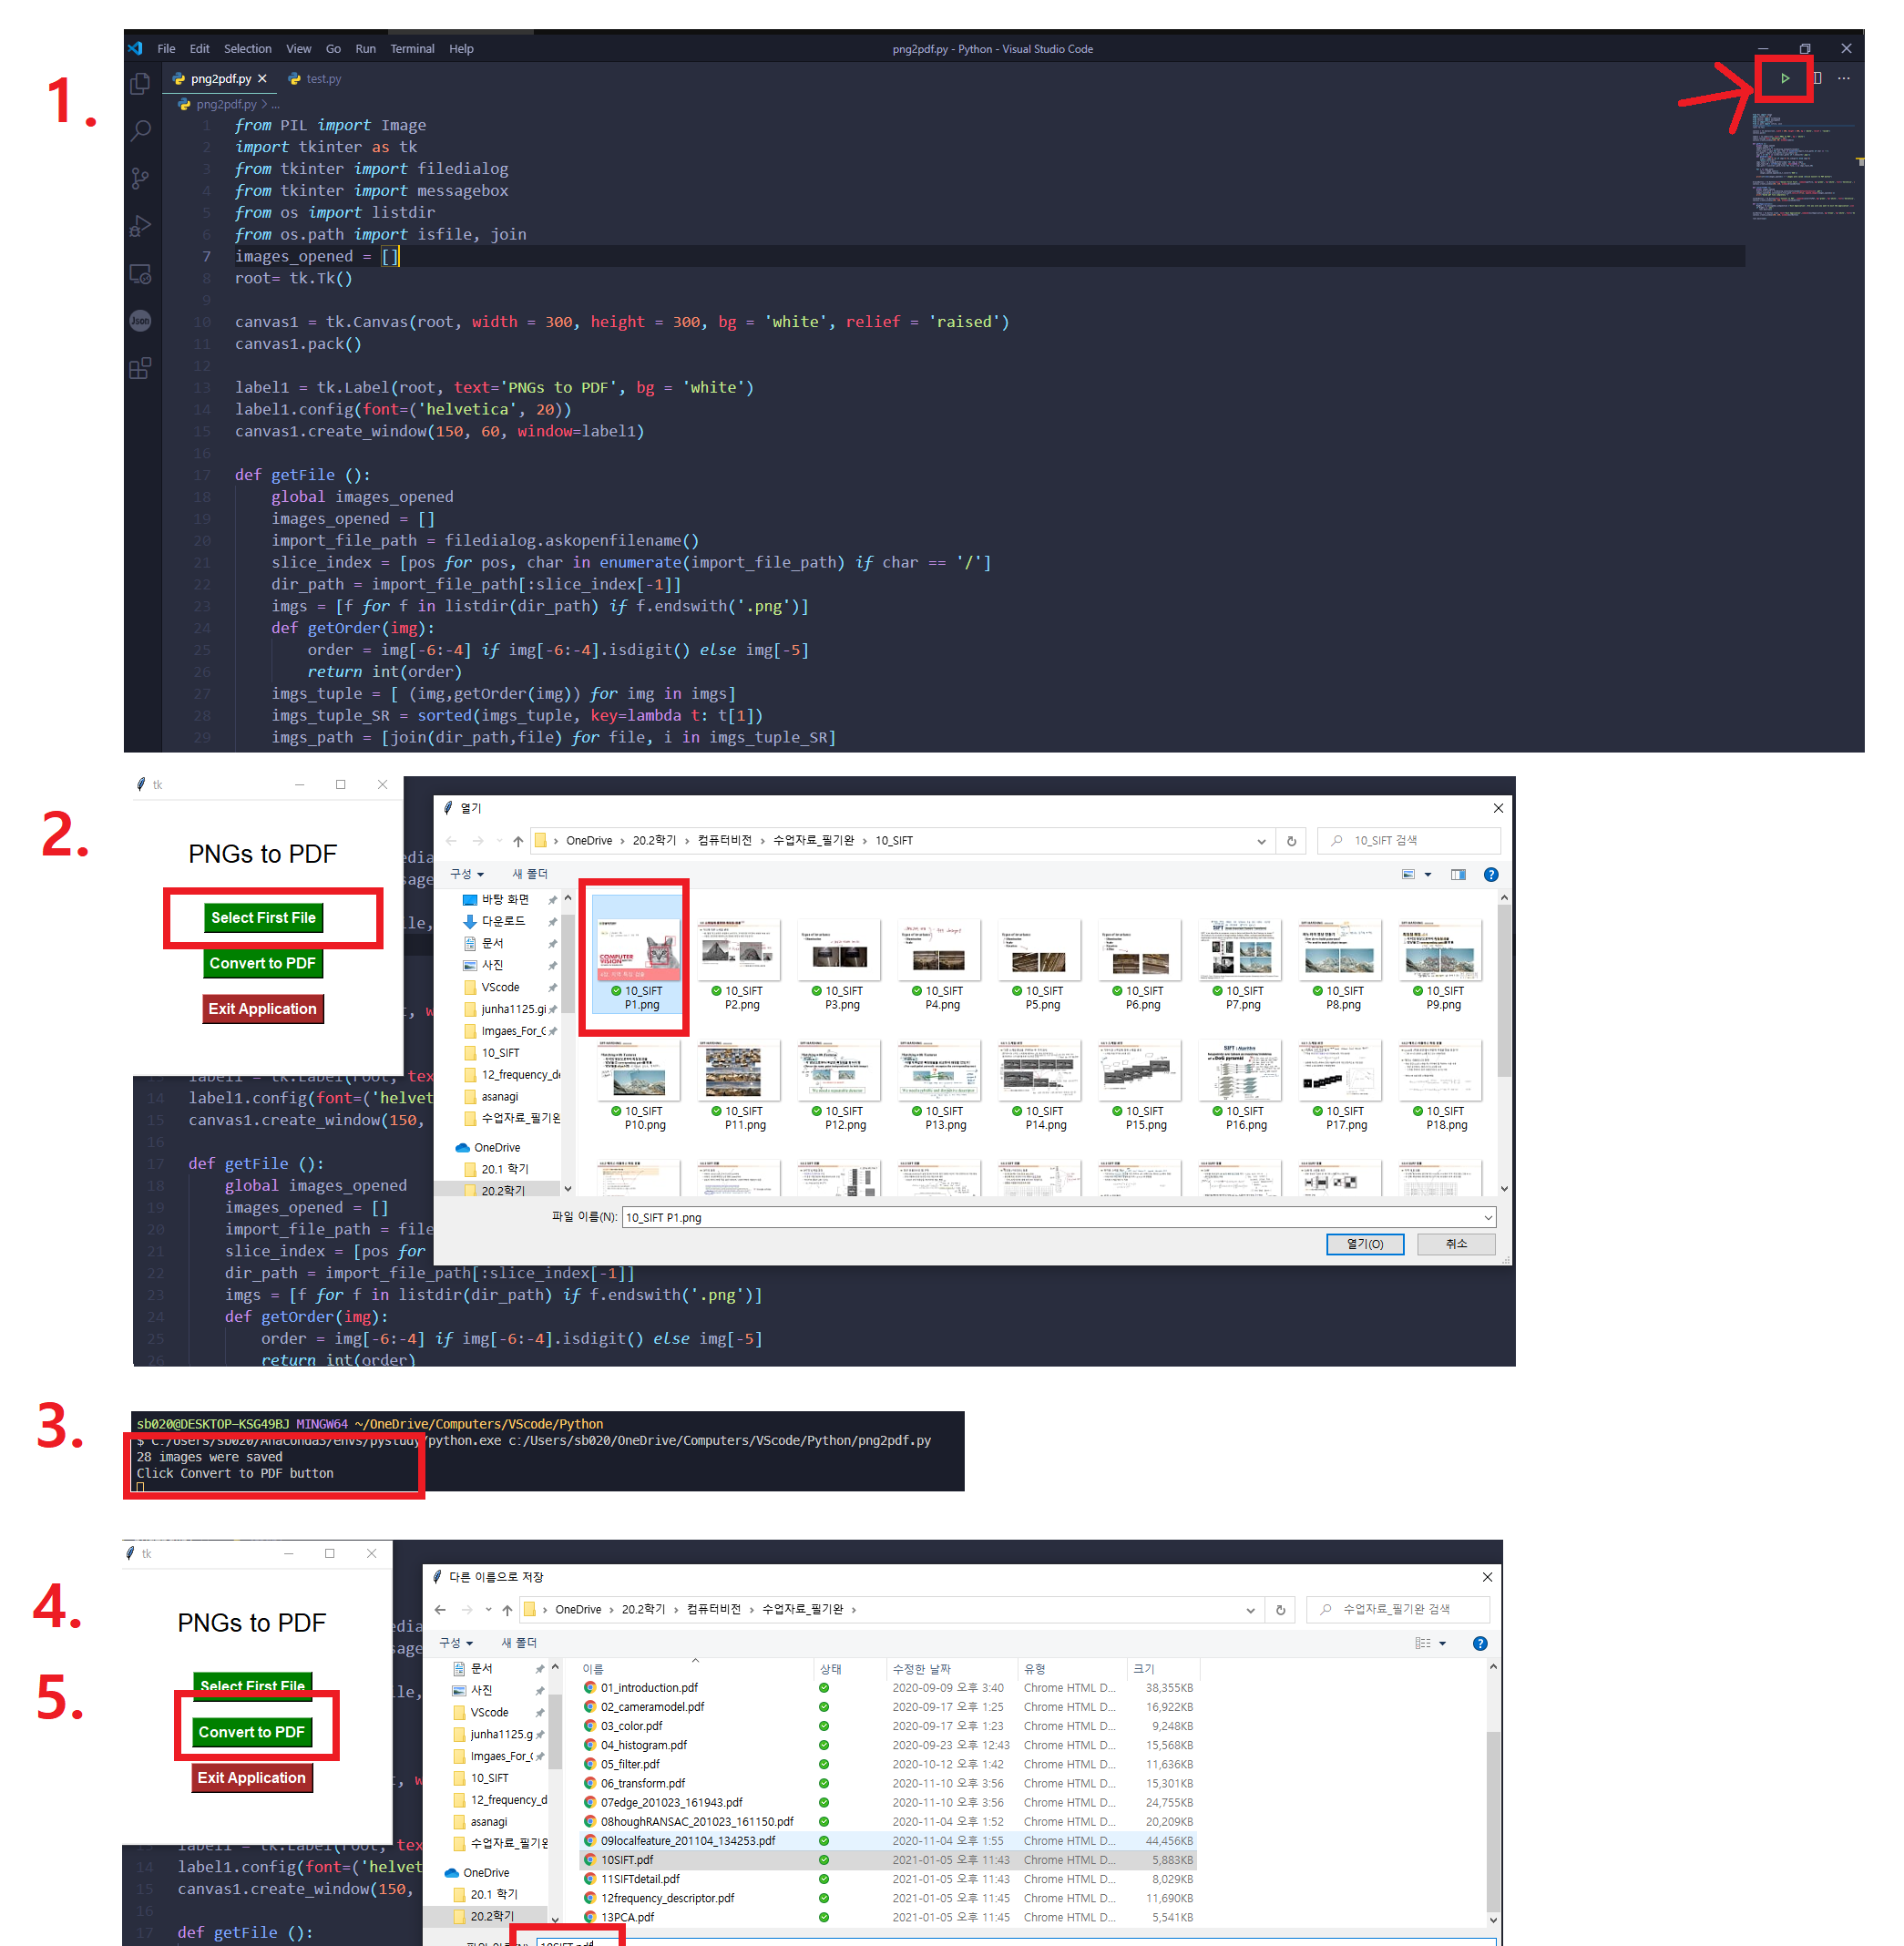
How to use

  1. Run python code “png2pdf.py” with VScode
  2. Click “Select First File”
  3. Check print output
  4. Click “Convert to PDF”
  5. Input PDF file name
  6. Check print ouput

img

Python Code

from PIL import Image
import tkinter as tk
from tkinter import filedialog
from tkinter import messagebox
from os import listdir
from os.path import isfile, join
images_opened = []
root= tk.Tk()

canvas1 = tk.Canvas(root, width = 300, height = 300, bg = 'white', relief = 'raised')
canvas1.pack()

label1 = tk.Label(root, text='PNGs to PDF', bg = 'white')
label1.config(font=('helvetica', 20))
canvas1.create_window(150, 60, window=label1)

def getFile ():
    global images_opened
    images_opened = []
    import_file_path = filedialog.askopenfilename()
    slice_index = [pos for pos, char in enumerate(import_file_path) if char == '/']
    dir_path = import_file_path[:slice_index[-1]]
    imgs = [f for f in listdir(dir_path) if f.endswith('.png')]
    def getOrder(img):
        order = img[-6:-4] if img[-6:-4].isdigit() else img[-5]
        return int(order)
    imgs_tuple = [ (img,getOrder(img)) for img in imgs]
    imgs_tuple_SR = sorted(imgs_tuple, key=lambda t: t[1])
    imgs_path = [join(dir_path,file) for file, i in imgs_tuple_SR]
    
    for i in imgs_path:
        im_t = Image.open(i)
        images_opened.append(im_t.convert('RGB'))

    print(str(len(images_opened)) + " images were saved \nClick Convert to PDF button")
        
    
browseButton = tk.Button(text="Select First File", command=getFile, bg='green', fg='white', font=('helvetica', 12, 'bold'))
canvas1.create_window(150, 130, window=browseButton)

def convertToPdf ():
    global images_opened
    export_file_path = filedialog.asksaveasfilename(defaultextension='.pdf')
    images_opened[0].save(export_file_path,save_all=True, append_images=images_opened[1:])
    print("Saved pdf file completely ")

saveAsButton = tk.Button(text='Convert to PDF', command=convertToPdf, bg='green', fg='white', font=('helvetica', 12, 'bold'))
canvas1.create_window(150, 180, window=saveAsButton)

def exitApplication():
    MsgBox = tk.messagebox.askquestion ('Exit Application','Are you sure you want to exit the application',icon = 'warning')
    if MsgBox == 'yes':
       root.destroy()
     
exitButton = tk.Button (root, text='Exit Application',command=exitApplication, bg='brown', fg='white', font=('helvetica', 12, 'bold'))
canvas1.create_window(150, 230, window=exitButton)

root.mainloop()

【Pytorch】Pytorch internal에 대한 탐구

  • Pytorch internal에 대한 탐구를 해본다.
  • Pytorch와 C와의 연결성에 대해 공부해본다.

1. where is torch.tensor.item() defined at the Github?

  • stackoverflow에 이와 같이 질문을 남겼다. stackoverflow LINK
  • 나는 Link에 나와 있는 것처럼 답변을 받았다.
  • 하지만 완벽히 이해를 하지 못해서 공부해서 다시 답변을 이해해 보려고 한다,
  • 그래서 나는 아래의 사이트를 공부하기로 하였다.
    1. https://pytorch.org/blog/a-tour-of-pytorch-internals-1/
    2. https://pytorch.org/blog/a-tour-of-pytorch-internals-2/
    3. https://medium.com/@andreiliphd/pytorch-internals-how-pytorch-start-211e0d57ad26

2. PyTorch internals. How PyTorch start?

  • torch/csrc/Module.cpp 이 python과 C++를 연결해준다.
  • Medium Link
    1. import torch를 하는 순간 torch/init.py를 읽고 from torch._C import *를 실행한다. 이 작업을 통해서 Pytorch 속 C 모듈을 실행한다.
    2. torch._C에는 pyi라는 python 파일들이 있고, 이것이 torch/csrc/Module.cpp와 연결되어 있다.
    3. torch/csrc/Module.cpp를 보면
    • THP란?
      • 간단하게, 리눅스의 메모리 관리 시스템
      • what THP? : https://docs.mongodb.com/manual/tutorial/transparent-huge-pages/
      • TLB란 : https://ossian.tistory.com/38 0. PyObject 라는 자료형이 원래 어딘가 저장되어 있는 듯 하다. (나중에 VScode에 전체 페키지를 올리고 go to definition 해볼것.) 1. THPModule_initExtension라는 함수가 정의 되어 있다.
        - torch::utils::initializeLayouts(); // torch/csrc/utils/tensor_qschemes.h
        - torch::utils::initializeMemoryFormats();
        - torch::utils::initializeQSchemes();
        - torch::utils::initializeDtypes();
        - torch::tensors::initialize_python_bindings(); // torch/csrc/tensor/python_tensor.h
      
      • 이 함수는 파이썬 클래스의 추가적인 초기화(C를 사용한 tensor 맴버함수들을 사용할 수 있게끔 Ex.item())를 위해 사용된다.
    1. Tensor storage(tensor 저장공간)은 이 코드에 의해서 메모리 공간이 생성된다.

       auto module = THPObjectPtr(PyImport_ImportModule("torch"));
      
       THPDoubleStorage_postInit(module);
       THPFloatStorage_postInit(module);
       THPHalfStorage_postInit(module);
       THPLongStorage_postInit(module);
       ...
       ...
      
    2. THPModule_initNames 라는 함수에 의해서 메모리 공간 이름이 정의 된다.(?)
    3. PyObject* initModule() 이 함수에 의해서, torch._C의 python이 csrc 내부의 C++파일들을 사용할수 있게 만들어준다.
    4. static struct PyModuleDef torchmodule 이 부분에 의해서 torch._C 를 위한 메모리 공간을 잡아준다.

3. A Tour of PyTorch Internals (Part I)

  • document link
  • 우선 지금 이게 급한게 아니라서 나중에 하도록 하자.

4. PyTorch Internals Part II - The Build System

【캡스톤2】 자율주행 RC카 - 장애물 회피 및 곡선 주행

rplidar, IMU, 아두이노, 라즈베리파이를 이용한 자율주행 RC카 제작하기.

  • rplidar, IMU, 아두이노, 라즈베리파이를 이용한 자율주행 RC카 제작하기.
  • 코드는 현재 github에 private repository로 관리 중 입니다. 필요하신 분은 따로 연락주세요.

0. 주행 완성 동영상

  • 주행영상 1 (아래 이미지를 클릭!)

self-RCcar2

  • 주행영상 2 (아래 이미지를 클릭!)

self-RCcar

1. 큰그림 간결 손코딩

  • 주의사항
    1. 추후에 하나하나의 함수에 대한 손코딩 꼭 하고 코딩하기
    2. 추후에 어떤 식으로 모듈화하고 이용할 건지 정하고 코딩 하기

To Do list

  • PPT 발표준비하기
  • 11월 4일 이후에 팀원에게 코드 설명해주기
  • 11월 13일 이후에 아래의 내용들 시작하기 그 전까지 쉬자. 힘들어 죽겠다.
    • IMU ROS에 연동시키고 subscribe하는 line 추가하기
    • IMU값이 오차 없이 거의 일정한지 확인해보기.(정확하다면 두 직선의 기울기의 평균을 사용할 필요 없음)
    • 아래의 손코딩 주행 알고리즘 코딩하기
      1. 2개의 class에 대한 전처리 맴버변수 4개 정의하기. (팀원과 같이 하기)
      2. 주행 알고리즘 맴버변수 정의하기. (팀원과 같이 하기)
    • theta1, theta2 정확한 값 찾아서 적어놓기

0. 대표 상수 및 전역 벽수

  • theta1 : 첫 직선 기준 각도
  • theta2 : 곡선 후 직선 기준 각도
  • wall_c_l_count : wall_c_l가 발견된 갯수

1. Lidar Point Clouds를 2D 이미지로 변환하기.

  • 이때 중요한 점은 차가 회전해도 이미지는 회전하지 않도록 아래 중 하나 이용.
    1. 따로 이미지 변수를 만든다. 이것은 차가 회전하면 이미지도 회전하는 이미지. 여기서 감지되는 벽의 기울기가 theta1이 되도록, 회전하지 않는 이미지 만들기.
    2. theta1과 현재 IMU에서 나오는 차량 각도의 차이를 반영하기(IMU오차 걱정됨)

2. 변환된 이미지를 아래의 처리 순서대로 하기.

아래의 과정을 통해, 오차 없이 장애물 및 벽이 감지되도록 노력한다.

  1. 가오시안 필터
  2. Threshold로 binary 이미지로 변환
  3. canny edge 알고리즘 적용
  4. hough Transform으로 장애물, 벽 감지

3. 감지된 직선이 벽 VS 장애물 판단하기

  1. 장애물 : 50cm 이상 20cm 이상의 직선 만. 차량 뒤에 있는 장애물은 감지 하지 않기 위해, 장애물의 y축 좌표 중 큰 값이 차 앞에 있을 때 만 고려하기.
  2. 벽 : 1m 이상의 직선 만. theta1, theta2와 -5~5도 차이의 기울기를 가지는 직선
    • 위에서 탐지한 객체는 다음 중 하나로 labeling을 한다.
    1. obstacle_r : right
    2. obstacle_l : left
    3. wall_l : theta1
    4. wall_r : theta1
    5. wall_c_r : theta2 curve right
    6. wall_c_l : theta2 curve left
      • 한계점 : - 한 lebel에 대해서 여러개의 직선이 검출된다면? 하나만 선택? 평균값 이용? - left, right 벽이 잘 검출되지 않는다면? 직선이 겨우겨우 검출된다면? threshold 낮춰서 직선 검출하기. 꼭 필요한게 검출되지 않는다면 그 순간은 속도 0하기.(?)

4. 주행 알고리즘 설계하기

  • 경우1 : 장애물과의 거리가 충분히 멀 때
    • 점과 직선사이 거리 이용
    • 속도 上
    • 직선 주행 방법
      1. 두 직선과의 거리가 같도록, 두 직선의 기울기의 평균 기울기가 theta1이 되도록 주행하기. (X)
      2. 두 직선과의 거리가 같도록, 그리고 차량각이 theta1을 가지게 주행하기. (X)
      3. theta1(혹은 두 직선의 기울기의 평균 기울기)를 가지고, 두 직선 중심의 좌표점을 지나는 직선 (혹은 두 직선의 중앙 직선 구하는 방정식 찾기) 위의 한 점을 path point를 설정하고, 차량이 그 point를 향해 주행하도록 설정하기. (V)
  • 경우2 : 장애물과의 거리가 가까울 때
    • 점과 직선사이 거리 이용
    • 전면에 있을 때, 측면에 있을 때 모두 가능
    • 속도 下
    • 주행 방법
      1. 더 큰 벽을 선택한다? NO. 별로 좋은 방법 아닌듯.
      2. obstacle_l, obstacle_r를 선정하는 알고리즘에 두 직선의 중앙에 대해 어디에 있는가를 이용한다.
      3. 그리고 obstacle의 위치 반대편 벽을 따라서 주행한다.
      4. theta1(혹은 두 직선의 기울기의 평균 기울기)를 가지고, 한 벽에 대해 일정 거리의 좌표점을 지나는 직선 (혹은 일정 거리를 가지는 직선의 방정식 찾기) 위의 한 점을 path point로 설정하고, 차량이 그 point를 향해 주행하도록 설정하기
  • 경우3 : 곡선 주행 하기
    • 가까이 있는 wall_c_l(우회전일 경우)이 일정 count 이상 탐지가 됐다면.
    • bool 변수를 switch로써 on 하고 다른 함수 실행 시작하기.
    • wall_c_r이 감지되지 않으면, wall_c_l을 기준으로 경우2 알고리즘을 사용해서 곡선 주행.
    • wall_c_r이 감지되기 시작하면, 경우1 알고리즘을 사용해서 직선 주행.
  • 최종 조향에서! 차가 이미 많이 비틀어진 상태라면 반대방향으로 조향하도록 상수값의 steering 값 return.(경우1,2. 경우3에 대해 다른 상수값 적용)


2. PseudoCode in detail

0. To DO List

  1. 가상의 line이 그려져 있는 이미지 만들기
  2. c++ class 공부하기
  3. 그 이미지를 통해서 class 만들고 테스트 해보기

1. class의 종류와 맴버변수와 맴버함수

  1. class Line
    • 맴버변수
      1. x1
      2. y1
      3. x2
      4. y2
      5. length - cm
      6. dis_center - cm
      7. slope - degree
      8. label/class - 1(obstacle_l),2(obstacle_r),11(wall_l),12(wall_r),21(wall_c_r),22(wall_c_l)
      9. position - 1(back or left),2(front or right)
    • 맴버함수
      1. lengh 계산하기
      2. dis_center 계산하기
      3. slope 계산하기
  2. class Cal_lines
    • 맴버변수
      1. 현재 검출된 line의 갯수
      2. 검출되는 line 최대 18개
      3. lebel 별 갯수 - 6개의 객체
    • 맴버함수
      1. wall 검출하기
      2. obstacle 검출하기
      3. 갯수 변수에 값 저장해 두기
      • 경우1 주행알고리즘
      • 경우2 주행알고리즘
      • 경우3 주행알고리즘

Basic Code - step1

#include <opencv2/opencv.hpp>
#include <unistd.h>
#include <istream>

using namespace cv;
using namespace std;

// Class Line --------------------------------
class Line{
public:
	int x1,y1,x2,y2;
	float length, dis_center;
	double slope;
	int label;

	Line();
	Line(int _x1, int _y1, int _x2, int _y2);
	float cal_length();
	float cal_center();
	double cal_slope();
};

Line::Line(){
	x1 = 1;
	y1 = 1;
	x2 = 1;
	y2 = 1;
}

Line::Line(int _x1, int _y1, int _x2, int _y2){
	x1 = _x1;
	y1 = _y1;
	x2 = _x2;
	y2 = _y2;
	length = this->cal_length();
	dis_center = this->cal_center();
	slope = this->cal_slope();
}

float Line::cal_length(){
	return 1;
}

float Line::cal_center(){
	return 1;
}

double Line::cal_slope(){
	return 1;
}

// Class Cal_lines --------------------------------
class Cal_lines{
	public:
		int num_lines;
		Line line[18];
		int num_1, num_2, num_11, num_12, num_21, num_22; 

		void append(Line line_t);
		void labeling_wall();
		void labeling_obstacle();
		void howmany_num();
		Cal_lines();
};

Cal_lines::Cal_lines(){
	num_lines = 0;
	num_1 = num_2 = num_11 = num_12 = num_21 = num_22 = 0;
}

void Cal_lines::append(Line line_t){

}

void Cal_lines::labeling_wall(){

}
void Cal_lines::labeling_obstacle(){

}
void Cal_lines::howmany_num(){

}


// Main --------------------------------

int main()
{
	// 컬러 이미지를 저장할 Mat 개체를 생성합니다.

	cv::Mat img(1200, 1200, CV_8UC3, cv::Scalar(0,0,0));
	line(img, Point(450,400), Point(450,750), Scalar(255,255,255),1);
	line(img, Point(750,400), Point(750,750), Scalar(255,255,255),1);
	line(img, Point(630,450), Point(680,450), Scalar(255,255,255),1);
	line(img, Point(630,450), Point(630,420), Scalar(255,255,255),1);
	line(img, Point(450,300), Point(1100,300), Scalar(255,255,255),1);

	Line temp_line(450,400,450,750);
	cout << temp_line.slope << endl;

	Cal_lines Cal;
	cout << Cal.num_lines << endl;
	
	imshow("result", img);
	waitKey(0);
}

Basic Code - step2

// 실행하기 전에 꼭 아래의 문구 터미널에 치기!!
// $ export DISPLAY=:0.0
// circle : https://webnautes.tistory.com/1207
// opencv setup : https://webnautes.tistory.com/933
// shortcut : billd : Ctrl + b
// shortcut : excute : Ctrl + r
// 하지만 반드시 실행은 terminal 에서 하도록 해라!! ./opencv
// last sentence : waitKey(0); 필수이다!
// for is going to iterate only if there is keyboard input!


#include <opencv2/opencv.hpp>
#include <unistd.h>
#include <istream>
#include <math.h>
#define PI 3.14159265

using namespace cv;
using namespace std;

// Class Line --------------------------------
class Line{
public:
	int x1,y1,x2,y2;
	float length, dis_center;
	double slope;
	int label;
	int position;

	Line();
	Line(int _x1, int _y1, int _x2, int _y2);
	float cal_length();
	float cal_center();
	double cal_slope();
	int cal_position();
};

Line::Line(){
	x1 = 1;
	y1 = 1;
	x2 = 1;
	y2 = 1;
}

Line::Line(int _x1, int _y1, int _x2, int _y2){
	x1 = _x1;
	y1 = _y1;
	x2 = _x2;
	y2 = _y2;
	length = this->cal_length();
	slope = this->cal_slope();
	dis_center = this->cal_center();
	position = cal_position();
}

float Line::cal_length(){
	return sqrt(pow(x2 - x1, 2) + pow(y2 - y1, 2));
}

float Line::cal_center(){
	// By https://en.wikipedia.org/wiki/Distance_from_a_point_to_a_line
	int center_x = 600;
	int center_y = 600;
	float dis = abs(((y2-y1)*center_x - (x2-x1)* center_y + x2*y1 - y2*x1) / (this->length));
	return dis;
}

double Line::cal_slope(){
	// return degree {-180 ~ +180}
	return atan2((y2 - y1),(x2 - x1)) * 180 / PI ; 
}

int Line::cal_position(){
	return 1;
}

// Class Cal_lines --------------------------------
class Cal_lines{
	public:
		int num_lines;
		Line line[18];
		int num_1, num_2, num_11, num_12, num_21, num_22; 

		Cal_lines();
		void append(Line line_t);
		void labeling_wall();
		void labeling_obstacle();
		void howmany_num();
};

Cal_lines::Cal_lines(){
	num_lines = 0;
	num_1 = num_2 = num_11 = num_12 = num_21 = num_22 = 0;
}

void Cal_lines::append(Line line_t){
	// Have to change IF condition 85~95...
	// if(line_t.slope == 90 || line_t.slope == 0){
		if(num_lines<18){
			line[num_lines] = line_t;
			num_lines++;	
	}
	// }
}

void Cal_lines::labeling_wall(){

}

void Cal_lines::labeling_obstacle(){

}

void Cal_lines::howmany_num(){

}


// Main --------------------------------
int main()
{
	// 컬러 이미지를 저장할 Mat 개체를 생성합니다.

	cv::Mat img(1200, 1200, CV_8UC3, cv::Scalar(0,0,0));
	int arr[5][4] = 
					{ {450,400,450,750}, //0
				    	{750,400,750,750}, //1
				    	{630,450,680,450}, //2
				    	{700,420,700,700}, //3
				    	{1100,300, 450,300} //4
					};
	
	line(img, Point(arr[0][0],arr[0][1]), Point(arr[0][2],arr[0][3]), Scalar(255,255,255),1);
	line(img, Point(arr[1][0],arr[1][1]), Point(arr[1][2],arr[1][3]), Scalar(255,255,255),1);
	line(img, Point(arr[2][0],arr[2][1]), Point(arr[2][2],arr[2][3]), Scalar(255,255,255),1);
	line(img, Point(arr[3][0],arr[3][1]), Point(arr[3][2],arr[3][3]), Scalar(255,255,255),1);
	line(img, Point(arr[4][0],arr[4][1]), Point(arr[4][2],arr[4][3]), Scalar(255,255,255),1);
	circle(img, Point(600,600),2,Scalar(255,0,0),2);
	

	Cal_lines lines;
	for(int i = 0; i < 5; i++ ){
		Line temp_line(arr[i][0],arr[i][1],arr[i][2],arr[i][3]);
		lines.append(temp_line);
	}

	cout << lines.num_lines << endl;
	cout << lines.line[0].dis_center << endl;


	imshow("result", img);
	waitKey(0);
	//waitKey(1);
}

Intermediate Code - step3

// 실행하기 전에 꼭 아래의 문구 터미널에 치기!!
// $ export DISPLAY=:0.0
// circle : https://webnautes.tistory.com/1207
// opencv setup : https://webnautes.tistory.com/933
// shortcut : billd : Ctrl + b
// shortcut : excute : Ctrl + r
// 하지만 반드시 실행은 terminal 에서 하도록 해라!! ./line_test
// last sentence : waitKey(0); 필수이다!
// For(including waitkeyy_function) is going to iterate only if there is keyboard input!


#include <opencv2/opencv.hpp>
#include <unistd.h>
#include <istream>
#include <math.h>
#define PI 3.14159265

using namespace cv;
using namespace std;

// 1. Class Line ----------------------------------------------------------------------------------------------------------------------------
class Line{
public:
	int x1,y1,x2,y2;
	float length, dis_center;
	double slope;
	int label; // 1,2,11,12,21,22
	int position;

	Line();
	Line(int _x1, int _y1, int _x2, int _y2);
	float cal_length();
	float cal_center();
	double cal_slope();
	int cal_position();
};

Line::Line(){
	x1 = 1;
	y1 = 1;
	x2 = 1;
	y2 = 1;
}

Line::Line(int _x1, int _y1, int _x2, int _y2){
	x1 = _x1;
	y1 = _y1;
	x2 = _x2;
	y2 = _y2;
	length = this->cal_length();
	slope = this->cal_slope();
	dis_center = this->cal_center();
	position = this->cal_position();
}

float Line::cal_length(){
	return sqrt(pow(x2 - x1, 2) + pow(y2 - y1, 2));
}

float Line::cal_center(){
	int center_x = 600;
	int center_y = 600;
	float dis = abs(((y2-y1)*center_x - (x2-x1)* center_y + x2*y1 - y2*x1) / (this->length));
	return dis;
}

double Line::cal_slope(){
	// return degree {-180 ~ +180}
	slope = atan2((y2 - y1),(x2 - x1)) * 180 / PI;  
	slope = (slope >= 0)? slope : 180 + slope; // 0~180 degree
	return slope; 
}

int Line::cal_position(){  // ***********
	/*
	front, right = return 2
	back, left = return 1
	*/
	if((slope > 90-3 && slope < 90+3 )){ // vertical
		return (x1>600)? 2:1; // 1: left,  2: right
	}
	else if(slope > (0-3)+180 || slope < 0+3){  // horizontal
		int y_min = min(y1,y2);
		return (y1>600)? 2:1; // 1: back,  2: front
	}
	else return 0; // not (vertical or horizontal)
	
} 

// 2. Class Calculate_lines ----------------------------------------------------------------------------------------------------------------------------
class Cal_lines{
	public:
		int num_lines;
		Line line[18];
		int num_1, num_2, num_11, num_12, num_21, num_22; 

		Cal_lines();
		void append(Line line_t);
		void labeling_wall();
		void labeling_obstacle();
		void howmany_num();

		// Driving Algorithm
		int what_case(); 
		void drive_case1(int *velocity, int *steering, int case_is);
		void drive_case2(int *velocity, int *steering, int case_is);
		void drive_case3(int *velocity, int *steering, int case_is);
};

Cal_lines::Cal_lines(){
	num_lines = 0;
	num_1 = num_2 = num_11 = num_12 = num_21 = num_22 = 0;
}

void Cal_lines::append(Line line_t){  
	// Have to change IF condition 85~95...
	if( (line_t.slope > 90-3 && line_t.slope < 90+3 ) || (line_t.slope > (0-3)+180 || line_t.slope < 0+3) ){
		if(num_lines<18){
			line[num_lines] = line_t;
			num_lines++;
		}
	}
}

void Cal_lines::labeling_wall(){ // ***********
	for (int i = 0; i < num_lines; i++)
	{
		line[i].label= 0; //??

	}
}

void Cal_lines::labeling_obstacle(){ // ***********
	for (int i = 0; i < num_lines; i++)
	{
		line[i].label= 0; //??

	}
}

void Cal_lines::howmany_num(){ 
	for (int i = 0; i < num_lines; i++)
	{
		if(line[i].label == 1)       num_1++;
		else if(line[i].label == 2)  num_2++;
		else if(line[i].label == 11) num_11++;
		else if(line[i].label == 12) num_12++;
		else if(line[i].label == 21) num_21++;
		else if(line[i].label == 22) num_22++;
		else cout << "line[i]'s label has to be 1,2,11,12,21,22";

	}
}

int Cal_lines::what_case(){ // ***********
	return 1;
}

void Cal_lines::drive_case1(int *velocity, int *steering, int case_is){ // ***********

}

void Cal_lines::drive_case2(int *velocity, int *steering, int case_is){ // ***********

}

void Cal_lines::drive_case3(int *velocity, int *steering, int case_is){ // ***********

}


// 3. Class detected_lines ------------------------------------------------------------------------------------------------------------------------
class Detected_lines{
	public:
		Line line_1[3];
		Line line_2[3];
		Line line_11[3];
		Line line_12[3];
		Line line_21[3];
		Line line_22[3];
		int counted_1, counted_2;
		int counted_11, counted_12;
		int counted_21, counted_22;
		void append(Line line_t);
		Detected_lines();

};

Detected_lines::Detected_lines(){
	counted_1 = counted_2 = counted_11 = counted_12 = counted_21 = counted_22 = 0;
}

void Detected_lines::append(Line line_t){
	switch (line_t.label){
		case 1:
			line_1[counted_1] = line_t;
			counted_1++;
			if (counted_1 == 3) counted_1 = 0;
			break;
		case 2:
			line_2[counted_2] = line_t;
			counted_2++;
			if (counted_2 == 3) counted_2 = 0;
			break;
		case 11:
			line_11[counted_11] = line_t;
			counted_11++;
			if (counted_11 == 3) counted_11 = 0;
			break;
		case 12:
			line_12[counted_12] = line_t;
			counted_12++;
			if (counted_12 == 3) counted_12 = 0;
			break;
		case 21:
			line_21[counted_21 %3] = line_t;
			counted_21++;
			if (counted_21 == std::numeric_limits<int>::max()) counted_21 = 300;
			break;
		case 22:
			line_22[counted_22 %3] = line_t;
			counted_22++;
			if (counted_22 == std::numeric_limits<int>::max()) counted_22 = 300;
			break;
		default:
			cout << "line's label must be one of 1,2,11,12,21,22" << endl;
	}
}

Detected_lines global_lines;

// Main -------------------------------------------------------------------------------------------------------------------------------------------------------------
int main()
{
	// 컬러 이미지를 저장할 Mat 개체를 생성합니다.

	cv::Mat img(1200, 1200, CV_8UC3, cv::Scalar(0,0,0));
	cv::Mat img_fliped(1200, 1200, CV_8UC3, cv::Scalar(0,0,0));
	int arr[5][4] = 
					{ {450,800,450,450}, //0
				    	{750,800,750,450}, //1
				    	{630,750,680,750}, //2
				    	{610,780,630,750}, //3
				    	{1100,900, 450,900} //4
					};
	
	line(img, Point(arr[0][0],arr[0][1]), Point(arr[0][2],arr[0][3]), Scalar(255,255,255),1); // 0
	line(img, Point(arr[1][0],arr[1][1]), Point(arr[1][2],arr[1][3]), Scalar(255,255,255),1); // 1
	line(img, Point(arr[2][0],arr[2][1]), Point(arr[2][2],arr[2][3]), Scalar(255,255,255),1); // 2
	line(img, Point(arr[3][0],arr[3][1]), Point(arr[3][2],arr[3][3]), Scalar(255,255,255),1); // 3
	line(img, Point(arr[4][0],arr[4][1]), Point(arr[4][2],arr[4][3]), Scalar(255,255,255),1); // 4
	circle(img, Point(600,600),2,Scalar(255,0,0),2);
	

	Cal_lines lines;
	for(int i = 0; i < 5; i++ ){
		Line temp_line(arr[i][0],arr[i][1],arr[i][2],arr[i][3]);
		lines.append(temp_line);
	}

	lines.labeling_wall();
	lines.labeling_obstacle();

	int velocity = 1111;
	int steering = 2222;
	int case_is = lines.what_case();
	if(case_is == 1)      lines.drive_case1(&velocity, &steering, case_is);
	else if(case_is == 2) lines.drive_case2(&velocity, &steering, case_is);
	else if(case_is == 3) lines.drive_case3(&velocity, &steering, case_is);
	else if(case_is == 4) lines.drive_case1(&velocity, &steering, case_is);
	else if(case_is == 5) lines.drive_case2(&velocity, &steering, case_is);
	else if(case_is == 6) lines.drive_case3(&velocity, &steering, case_is);
	else cout << "case_is is not valid";

	
	float data = float(velocity) + float(steering+1) / 10000;
	cout << fixed;
	cout.precision(5);
	cout << "Final ToArduData.data is :" << data << endl;

	cout << lines.num_lines << endl;
	cout << lines.line[0].position << endl;

	flip(img,img_fliped,0);
	imshow("result", img_fliped);
	waitKey(0);
	//waitKey(1);
}

【LinearAlgebra】선형대수 정리 1 (한글강의)

쑤튜브 선형대수 강의내용 정리 1강~22강

youtube 강의 링크 : 쓔튜브 선형대수 강의 링크

1강~5강까지는 매우 기초적인 내용이라 정리하지 않았습니다.

6강 Systems of linear equations

  1. 확장 행렬(Augmented matrix)이란? 선형연립방정식을 행렬로 표현한 것.

    image-20201111204926141

  2. reduced row echelon form (기약 행 사다리꼴)

    • 해가 이미 구해진 형태의 확장 행렬
    • x3 = 2라고 한다면 확장행렬의 한 row는 0 0 1 2가 될 것이다.
    • 아래의 4가지 규칙을 만족할 때 reduced row echelon form이라고 부를 수 있다.
      1. 영 행이 아니라면, 각 행에서 처음 등장하는 영이 아닌 수는 1이고, 이를 leading 1이라고 부른다.
      2. 영행은 항상 맨 아래에 모여있다.
      3. leading 1의 위치는 항상 한 칸 이상 뒤로 밀린다.
      4. leading 1이 포함된 열은 leading 1을 제외하면 모두 0이다.

Gauss Jordan Elimination (7강)

  • 일반적인 연립선형의 확장행렬을 reduced row echolon form(기약행사다리꼴)으로 바꿔주는 방법

    1. Elementary row operations(기본 행 연산)

      • 한 행에 상수배(=! 0) 하는 방법
      • 한 행의 상수배(=! 0)를 다른 행 더하기
      • 행 교환
    2. 가오스 소거법

      확장행렬을 기약 행 사다리꼴(row echelon = leading 1 아래로 0인 행렬)로 바꾸는 알고리즘

      • (1행부터 아래로) 기본 행 연산을 통해서 행 사다리꼴을 만들어 주는 과정
      • leading1 앞을 0으로 만들어주는 과정
      • 여기까지는 가오스 소거법이다.
    3. reduced (기약) 형태(leading1 뒤도 0인 행렬) 만들어 주기

      • 이게 가오스 조던 소거법이다.
      • (마지막행부터 위로 back substitution) 기본 행 연산을 통해서 기약(reduced) 행 사다리꼴을 만들어 주는 과정
  • 이 알고리즘을 통해서 컴퓨터로 해를 구하는 과정이 매우 쉬워졌다. 가감법 대입법을 사용해서 해를 구하면 엄청 오래 걸린다.

  • (8강 Gauss Jordan Elimination의 고찰) 가오스 조던 소거법은 왜 가능할까? 가오스 소거법이 연립 일차방정식의 가감법이다. 가오스 조던 소거법이 연립 일차방정식의 대입법이다.

행렬의 기본 연산과 이론

  • 13강 Identity matrix (항등행렬) - 행렬의 곱샘 항등원이다.

  • 14강 역행렬(inverse matrix, invertable (역행렬 존재하는 행렬=가역행렬))

    • 곱샘의 항등원에 대한 역원)
    • 귀류법을 이용한 증명에 의해, 한 행렬의 역행렬은 유일하다 (1개만 존재한다).
    • 영인자(zero divisor) - 0이 아닌 두 행렬을 곱해서 0이 나올 수 있다.
    • 가오스 조던 소거법을 이용한 역행렬 구하는 방법
      • image-20201113213128976
      • 파랑색 행렬에 대해서, 가오스 조던 소거법을 사용해 x,y,z,w를 구하면 우리에게 익숙한 2차 정사각행렬의 역행렬 공식을 구할 수 있다.
  • 15강 역행렬의 성질

    • invertable (역행렬 존재하는 행렬=가역행렬)을 판단하는 방법? determinent(행렬식)=0 인지를 판단
    • non-invertible한 행렬? singular matrix. determinent(행렬식)=0인 metrix
    • 역행렬의 지수곱. 역행렬의 역행렬은 자기자신. 스칼라배는 역수.
    • image-20201113222625212
  • 16강 전치행렬(transposed matrix)

    • 덧셈의 분배법칙 성립. (모든 증명은 동영상에 있다)
    • 곱셉의 분배법칙은 위와 같이 위치가 뒤바껴야 한다.
    • A가 invertable이면 transe(A)도 invertable이다.
    • inverse(trace(A)) = trace(inverse(A)) 이다.
  • 17강 대각합(trace)

    • n차 정사각행렬 A에 대해서, 대각성분들의 합을 대각합이라 한다.
    1. dot product와 행렬곱 사이의 관계
      • 열백터 -> 백터로 취급 가능하다.
      • dot product( • ) - 백터와 백터, 열백터와 열백터 (EX. (AB)ij => transe(Ai) • (Bj))
      • A : nxn, (n,v는 열백터) u : nx1, v : nx1 일때, Au • v = u • transe(A)v , u • Av = transe(A)u • v

기본 행렬과 가역행렬의 관계

  • 18강 기본행연산의 행렬화 (강의 꼭 한번 더 보기)

    • 열백터 -> 백터로 취급하기
      • 열백터의 행교환 = 백터의 좌표 뒤바꿈 -> 선형변환=선형사상(linear transformation) -> 이 변환식을 행렬로 표현(행렬화)할 수 있다.
        • 선형사상은 행렬로 표현할 수 있다.
        • 기본행 연산도 행렬로 표현할 수 있다.
      • y = f(x)의 함수로써 그 함수가 열백터의 행을 바꾸는 함수하면, 그 함수의 확장행렬은 아래와 같다.
      • image-20201113225645176
      • 즉 열백터의 행교환을 하고 싶으면 I의 행교환 시킨 행렬을 곱해주면 되고
      • 행렬 행백터의 열교환을 하고 싶으면 I의 열교환 시킨 행렬을 곱해주면 된다.
      • 스칼라곱을 하는 linear transformation으로, 한 행에 상수배를 해주고 싶으면, I의 i행에 상수배를 한 행렬이 변환행렬이다. (행렬화)
      • 이와 같은 기본 행연산(행변환, 열변환, 상수배, 행or열이 일차 결합)을 행렬화 할 수 있다. = 기본행렬
  • 19강 기본행렬(elementary matrix)과 기약행사다리꼴의 역행렬

    • 기본행렬 - 1. 행교환 2. 행의 상수배 3. 행의 상수배를 다른 행의 더하기. 이러한 역할을 하는 행렬을 의미한다. 이 3가지 역할 중 2개 이상을 수행하는 행렬은 기본행렬이라고 하지 않는다.(기본행렬 2개를 곱해주면 2개의 역할을 수행할 수 있긴 하지만. 그렇게 곱해서 나온 행렬은 기본행렬이라 하지 않는다.)
    • 기본행렬의 특징
      • n차 정사각행렬.
      • 선형사상이다(정의역과 치역의 Space가 동일하다. 다르거나 일부분이라면 선형사상이 아니다.) = 기본행렬은 항상 가역행렬이다. = 역행렬이 항상 존재 한다.
      • 항상 항등행렬을 이용해서 만든다(18강 처럼) = 그렇다면 그 행동과 완전히 반대대는 역할을 하는 행렬이 당연히 반드시 존재할 것이다. (ex, I의 i행과 j행을 행교환한 행렬 <-> I의 j행과 i행을 행교환한 행렬) 즉! 역행렬이 항상 존재한다.
    • 기약행사다리꼴 중 영행을 포함하는 행렬은 determinent=0 이다.(증명 나중에) 따라서 기약행사다리꼴 중 역행렬이 존재하는 행렬은 단위행렬 뿐이다.
    • 따라서! A가 가역행렬(역행렬이 존재하면)이면 A를 가오스 조던 소거법을 행하여 구한 기약행사다리꼴은 단위행렬이다!! = A에 가오스 조던 소거법을 적용하는 것이, “기본행렬 연산을 여러번 수행”하는 것이다. 따라서 A의 역행렬이 존재한다면, A에 가오스 조던 소거법을 취하면 단위행렬 형태가 되고, A의 역행렬은 위에서 적용한 “기본행렬 연산의 여러번 수행”이 역행렬 그 자체이다.
  • 20강 분할행렬과 역행렬 알고리즘

    • n차 정사각행렬 A에 대해서

    • 위의 명제의 역도 성립한다. A의 (가오스 조던 소거법을 적용해 구한) 기약행렬사다리꼴이 I라면, A는 가역행렬이다.

    • 이때 나오는 명제는 이것이다. A가 역행렬이 존재하면, A는 기본행렬들의 곱으로 표현가능하다.

    • 따라서 삼각형으로 연결된 3개의 명제는 서로서로 필요충분조건이다. 서로 동치(사실상 같은 말)이다.

    • image-20201115194429022

    • 행동치(row equivalent)를 이용한 A의 역행렬 구하기

      • Ek x … x E2 x E1 (기본 행 연산들) x A = B 에서 A와 B는 행동치이다.

        • = A에서 기본행 연산을 몇개 수행하면 B가 나온다
        • = B에서 기본행렬산을 몇개 수행하면 A가 나온다.
      • A와 I는 행동치이다.

        • = A에서 기본행 연산의 곱으로 표현가능하다.
        • = A는 가역이다.
        • 결론 : A와 I가 행동치이면, A를 항등행렬로 바꿔주는 “기본행 연산의 행렬들을” 그대로 항등행렬에 곱해주면, A의 역행렬이 나온다
        • A = Ek x … x E2 x E1 (기본 행 연산들) 일 때,
          • Ek x … x E2 x E1 (기본 행 연산들) x inverse(A) = I
          • I x inverse(A) = inverse( Ek x … x E2 x E1 (기본 행 연산들) ) x I 이므로, 아래와 같이 하면 된다.
        • 블록행렬(분할행렬) = A의 역행렬 구하기
          1. Ek x … x E2 x E1 (기본 행 연산들) = 가오스 조던 소거법을 위한 기본행 연산들
          2. 이 연산들을 I에다가도 적용해 주기
          3. 따로따로 계산하지 말고 블록으로 묶어서 한번에 연산하기
          4. image-20201120124739888

연립선형방정식과 행렬의 관계

  • 21강 연립선형방정식과 행렬의 관계1
    • A x = B (nxn) (nx1) (nx1)
    • consistent : 해가 적어도 한 개가 있는 경우
    • inconsistent : 해가 전혀 없는 경우
    • homogeneous : 동차 연립선형방정식 (B=0인 경우. A에 역행렬이 존재하면 자명해 만을 가진다.)
  • 22강 연립선형방정식과 행렬의 관계2
    • 선형함수/선형사상 - ‘선형적인 곱과 덧셈으로만 이루어진 식’ 말고 수학적 정의
      1. 가산성 f(x+y) = f(x) + f(y)
      2. 동차성 a * f(x) = a * f(x)
    • 행렬연산: A(x+y) = Ax+Ay , A(ax) = aAx -> 선형 사상이다!
    • 연립성형방정식과 역행렬과의 관계
      • A x = B (nxn) (nx1) (nx1)
      • A가 가역이면(b!=0), 방정식의 해는 존재하고 유일하다. (유일해를 가진다)
        • Y는 x의 유일해.
        • augmented matrix(A:b) –가오스조던소거법–> (I:Y)
        • (위에 참조) A와 I는 행동치이다 = A는 가역행렬이다.
    • AB가 가역행렬이면 A와 B도 각각 가역행렬이다. (증명은 22강 참조)
      • 내가 만든 명제 : AB가 가역행렬이면, AB를 기본행연산들의 곱으로 표현가능하다. 그 기본행 연산들을 나눠서 한쪽을 A, 다른 한쪽을 B라고 할 수 있을 것이다. A와 B 또한 기본행 연산들의 곱이므로, 가역행렬이다.

【기본수학】자연상수 e, 오일러 공식, 복소수의 곱셈과 덧셈, 테일러 급수, 퓨리에 급수(삼각합수)

수학의 기본적인 내용인 자연상수 e, 오일러 공식, 복소수의 곱셈과 덧셈, 테일러 급수, 퓨리에 급수(삼각합수) 와 같은 내용을 찾아서 공부한 내용들을 기록해 놓았습니다.

  • 공부한 내용: 자연상수 e, 오일러 공식, 복소수의 곱셈과 덧셈, 테일러 급수, 퓨리에 급수(삼각합수)
  • 이용한 테블릿 : 갤럭시 탭 s7+
  • 느낀점 : 고등수학은 잘했지만, 대학수학은 관심없었다. 하지만 생각보다 꿀잼이다. 근데 이거를 딥러닝에 쓸지는 모르겠지만 그래도 언젠간을 위해 알아두자.
  • 참조 좋은 사이트

1. 자연상수 e

공돌이의 수학 정리노트 & 쑤튜브 선형대수 P1.png

공돌이의 수학 정리노트 & 쑤튜브 선형대수 P4.png

2. 오일러 공식

공돌이의 수학 정리노트 & 쑤튜브 선형대수 P2.png

3. 복소수의 곱셈과 덧셈

공돌이의 수학 정리노트 & 쑤튜브 선형대수 P3.png

4. 테일러 급수

공돌이의 수학 정리노트 & 쑤튜브 선형대수 P5.png

5. 퓨리에 급수(삼각합수)

공돌이의 수학 정리노트 & 쑤튜브 선형대수 P6.png

다음 공부

  • 복소 평면에서의 퓨리에 급수에 대해서 공부할 예정이다.

【기계학습】 기계학습 핵심정리 chap1, chap2, chap3, chap4

기계학습 책을 공부하고, 핵심만 기록해 놓는다. 구체적인 그림 및 설명은 최소화 하고, 꼭 필요한 설명은 1줄 이내로 적는다. 마음가짐 : ‘책 100번 볼거다. 또 보면 된다. 핵심만 정리해라’

기계학습 책 핵심 정리 chapter 1,2,3,4

Chapter 01 - 소개

  • 1.1절 - 기계학습이란

  • 1.2절 - feature(input) demention의 가시화 생각해보기

  • 1.3절 - 특징 공간 변환 공식 찾기 = 신경망 학습 알고리즘

  • 1.4절 - 기계 학습 알고리즘 - Θ = argmin_Θ loss(Θ)

  • 1.5절 - 모델선택
    1. 1d -> 1d로 이해하는 underfitting과 overfitting
    2. bias와 variance
      • Train Data set의 변화에 따른 모델들 간의 관계
    3. validation set과 cross-validation
      • validation 알고리즘 흐름 참조(50p 알고리즘1-4)
  • 1.6절 - 규제
    1. data augmentation
    2. weight decay
      • Loss = L1(x,y) + wights
  • 1.7절 - 기계 학습 유형
    1. 지도, 비지도, 준비도, 강화
    2. oneline/offline
      deterministic/stochastic
      discriminative/generative
  • 1.8절 - 기계학습의 과거, 현재, 미래
    • 다층퍼셉트론 -> SVM -> Deep learning
    • 쫄지말자. 복잡도만 다를 뿐 기본 원리는 같다.

Chapter 02 - 수학

2.1절 - 선형대수

  • Norm, 단위백터, Cosine similarity(코사인 유사도=단위백터화 후 내적)
  • 퍼셉트론과 행렬곱 Output(cx1) = Weight(cxd) x Input(dx1)
  • 행렬에서 행백터들(혹은 열백터들)이 선형 결합, 선형독립과 선형종속
  • mxn행렬에 대해 rank가 d(<= n)이면 행백터들에 대해, d차원 백터공간을 표현할 수 있다.
  • mxn행렬에 대해 최대 rank는 n(=행백터의 차원) 이다.
  • 역행렬이 없는 행렬 = singular matrix
  • 역행렬을 가진다 = 최대 계수 = 모든 열 선형 독립 = 고윳값은 모두 0이 아니다.
  • 모든 행렬은 (1)양의 정부호, (2)양의 준 정부호, (3)음의 정부호, (4)음의 준 정부호, (5)부정부호 행렬 5가지로 분류 할 수 있다. 분류 방법은 88p
  • 이 부호를 가지는 행렬은 각각 고윳값이 (1)모두 양수, (2)0이거나 양수, (3)음수, (4)0이거나 음수, (5)양수와 음수, 이다.
  • 고윳값과 고유백터, 그리고 고유윳값 분해(약수분해, 인수분해 처럼! 정사각행렬일때), 특잇값 분해(정사각행렬이 아니어도)
  • 모든 고유 백터는 orthogonal(직교)한다.

2.2절 - 확률과 통계

  • 확률분포, 합과 곱의 법칙, 조건부 확률, 두 사건의 독립
  • 베이즈 정리
    • 하얀 공이 나왔다는 사실만 알고 어느 병(a,b,c)에서 나왔는지 모르는데, 어느 병인지 추정해라.
    • 사후 확률(사건이 벌어진 후 확률) = P( Label | 데이터,Input Feature ) = 알기 어려움
  • 우도(likelihood) = P( 알고있음,데이터 | 추정해야함,모델/Label ) = 그나마 쉬움.
  • 최대 우도법(Maximum likelihood) = argmaxP( 데이터x | 모델 )
    데이터 x가 주어졌을 때, x를 발생시켰을 가능성을 최대로 하는 매개변수(모델)
  • 최대 로그 우도 추정
  • 평균과 분산 공식, d차원 feature에 대한, d개의 평균, dxd 차원 공분산 행렬(105p)
  • 가우시안 분포(=정규 분포), 베르누이 분포(1번 실험) -> 이항분포(m번 실험)
  • 정보이른 : 메세지가 가진 정보량을 수량화하여 ‘수’로 나타낼 수 있을까?
    발생활 확률이 적은 사건일 수록, 정보량이 크다!
  • 엔트로피 : 한(P) 확률분포의 무질서도, 불확실성 측정 = 클 수록 예측하기 어렵다.(윷놀이«주사위)
    • Cross 엔트로피 : 두(P,Q) 확률분포의 무질서도. -> 아래와 같이 분리가능 (교환법칙 성립)
    • P와 Q의 Cross 엔트로피 = P의 엔트로피(얼마나 예측하기 힘든지) + P와 Q사이의 KL diversence
    • KL diversence : 두 확률분포가 얼마나 다른지? 다를 수록 큰 수 (교환법칙 성립 안함)
    • cross 엔트로피 장점은 (Mean Squared제곱 Error 에서 처럼) 더 큰 오류에 더 낮은 벌점 주는 경우가 발생하지 않음(5장 추가 참조)

2.3절 - 최적화 이론

  • global optimal solution(전역 최적해)/ local optimal solution(지역 최적해)
  • 미분/ 편미분/ 독립변수(가중치)와 종속변수(Loss)/ 연쇄법칙
  • 아코비안(각 가중치에 대한 편미분 행렬)과 헤시안(각 가중치에 대한 2차 편미분 행렬)
  • 테일러 급수 - 함수는 모르고, 함수값과 미분값을 알 때.
  • BGD(batch gradient decent) : 전체 데이터에 대한(1 epoch 전체) ‘가중치의 편미분 값’을 평균하여 가중치 갱신
  • SGD(stochastic gradient decent) : 데이터 하나(1장) or 배치 묶음(1 epoch 전체 X)에 대해서 ‘가중치의 편미분 값’을 가지고 가중치 갱신 반복

chap3 - multi perceptron

  • 여기 내용은 차라리 밑바닥 시리즈로 공부하는게 낫겠다.
  • 3.1절 - 신경망 기초
    1. deterministic/stochastic 신경망 : 계산식에서 난수를 사용하나 안하나? 출력이 항상 같나 다르나?
  • 3.2절 - 퍼셉트론

  • 3.3절 - 다층 퍼셉트론
    1. 활성화 함수
      • 계단함수 - 1층 퍼셉트론
      • 로지스틱 시그모이드, 하이퍼볼릭 탄젠트 - Gradient Vanishing 문제
      • 소프트플러스, Relu
  • 3.4절 - 오류 역전파 알고리즘

  • 3.5절 - 미니배치 SGD
    1. 데이터 집합에서, t개의 샘플을 무작위로 뽑아 미니배치를 구성. 미니배치에 속한 샘플로 gredient 평균 후 가중치 갱신
  • 3.6절 - 다층 퍼셉트론에 의한 인식
  • 3.7절 - 다층 퍼셉트론의 특성
    1. 휴리스틱의 중요성
      • 아키텍처, 초깃값, 학습률

chap4 - Deep Learning

  • 넘어간 부분은, 궁금하면 나중에 다시 공부하자. 지금은 아니다.
  • 4.1절 - 딥러닝의 등장
  • 4.2절 - 깊은 다층 퍼셉트론
  • 4.3절 - 컨볼루션 신경망

  • 4.4절 - 컨볼류션 신경망 사례연구
  • 4.5절 - 생성 모델
  • 4.6절 - 딥러닝은 왜 강력한가? 1.

Pagination


© All rights reserved By Junha Song.