【Python-Module】 Module, Function research of Pytorch tuto
Pytorch tutorial을 공부하면서, 새로운 함수나 모듈이 나왔을 때 고찰해보고 공부해본 내용을 담아 놓았다.
- 너무 깊이 들어가지 말자. 1단계만 타고 들어가자.
- 2단계 초과로 타고 들어가지 말자!!! 나는 너무 끝도 없이 타고 들어간다.
1. torch.max()
!ls -al
total 16
drwxr-xr-x 1 root root 4096 Dec 21 17:29 .
drwxr-xr-x 1 root root 4096 Jan  5 07:34 ..
drwxr-xr-x 1 root root 4096 Dec 21 17:29 .config
drwxr-xr-x 1 root root 4096 Dec 21 17:29 sample_data
꼭 먼저 아래의 사진 부터 보기
n차원 행렬 array에 대해서 array[1,2,:,1] , array[:,2,3,1] , array[1,2,:,1,5] 를 출력해보면 1차원 백터이다!
이 1차원 백터에 대해서 가장 큰 값 (max)를 찾는다
import torch
arr = torch.randint(1,100,(3,6,9))
max_value0, index0 = torch.max(arr,0)
max_value1, index1 = torch.max(arr,1)
max_value2, index2 = torch.max(arr,2)

print(max_value0.shape) # 3빠지고 -> index는 0~2 중 하나겠군
print(max_value1.shape) # 6빠지고 -> index는 0~5 중 하나겠군
print(max_value2.shape) # 9빠지고 -> index는 0~8 중 하나겠군

# 아래처럼 x,y의 위치가 그대로 대응된다.
arr[0,:,0], torch.max(arr[0,:,0]), max_value1[0,0]
arr[1,:,2], torch.max(arr[1,:,2]), max_value1[1,2]
torch.Size([6, 9])
torch.Size([3, 9])
torch.Size([3, 6])


(tensor([53, 34, 59, 48, 90, 34]), tensor(90), tensor(90))

2. np.shape, torch.shape
- if 2차원이라고 감지되고 있다면, (1,4)와 (4,1)은 완전히 다른거다.
- 2차원이라고 감지되는 상태와, 1차원이라고 감지되는 상태는 완전 다르다.
output = torch.randint(1,100,(4,10))
preds = torch.randint(1,10,(4,1)) # 1,4 를 하면 아래의 zip이 잘 동작 안한다.

# i.shape = 1
# ei.shape = 1,10

for i, el in zip(preds, output):
    print(el, el.shape, i)
tensor([26, 78,  9,  1, 81, 82, 82, 51, 28, 41]) torch.Size([10]) tensor([3])
tensor([36, 80, 87, 30, 26,  8,  3, 89, 96, 83]) torch.Size([10]) tensor([3])
tensor([62, 35, 60, 90, 20, 84, 32, 72, 64, 83]) torch.Size([10]) tensor([7])
tensor([81, 23, 72, 88, 43, 79, 59,  2, 12, 40]) torch.Size([10]) tensor([4])
import numpy as np
a = np.random.randn(1,4)
b = np.random.randn(4,1)
print(a.shape, b.shape)

c = torch.randn(1,3)
d = torch.randn(3,1)
print(c.shape, d.shape)
(1, 4) (4, 1)
torch.Size([1, 3]) torch.Size([3, 1])
- np.sqeeze는 2차원으로 감지되는 행렬을, 1차원으로 바꿔주는 역할도 한다.
# https://note.nkmk.me/en/python-numpy-ndarray-ndim-shape-size/
a = np.squeeze(a)  # (4,)는 원소 4개의 tuple을 의미한다. 즉 2차원 행렬이 아니라고 감지하고 있는 상태. 즉 백터.
b = np.squeeze(b)
print(a.shape, b.shape)

c = torch.squeeze(c)  # (4,)는 원소 4개의 tuple을 의미한다. 즉 2차원 행렬이 아니라고 감지하고 있는 상태. 즉 백터.
d = torch.squeeze(d)
print(a.shape, b.shape)
(4,) (4,)
(4,) (4,)
3. torch.nn.functional
- nn.module이란 무엇일까?
- nn document에 Containers에 Module, Sequential, ModuleList 등이 있다. 이것은 “Layer를 담는 그릇” 이다. 즉 “신경망 전체 그릇”이라고 표현하면 좋다.
- 그리고 nn document 여기에, 이 그릇에 들어갈 층(Layer)들이 들어가 있다. 또한 Loss Function도 들어가 있다.
- 위의 nn document 와는 다르게, Layer 하나하나를 독단적으로 사용할 수 있게 하는 것이, torch.nn.functional as F 이다.
- torch.nn.functional 의 return은 해당 layer를 통과하고 나온 tensor가 나온다. (def -> Tensor)
- F.relu() 이와 같이 GIt에 저장되어 있다.
- F.softmax
- return : -> Tensor
- input의 shape가 어떤 것이라 할지라도, 하나의 dim만 바라보면 1차원 백터가 된다.
- Ex) dim=1 일 때 arr[1,:,2], arr[5,:,2,1] = 1차원! 백터 ()
- 그 1차원 백터에 대해서 모든 index값의 softmax값을 구한다.
filters = torch.randn(8,4,3,3) # 몇장 depth 행 열

inputs = torch.randn(1,4,5,5) # 몇장 depth 행 열

out_tensor = F.conv2d(inputs, filters, padding=1)

out_tensor.shape
torch.Size([1, 8, 5, 5])
# `junha <https://devguide.python.org/documenting/>`_


# A Foolish Consistency is the Hobgoblin of Little Minds [1]

# [1]: http://www.python.org/dev/peps/pep-0008/#a-foolish-consistency-is-the-hobgoblin-of-little-minds
import torch
import torch.nn.functional as F
output = torch.randn((4,10))
preds = torch.randint(0,9,(4,))

# 2차원이라고 인지한 상태
temp1 = torch.randint(1,100,(1,10))
print(temp1.shape)
temp2 = torch.randint(1,100,(10,1))
print(temp2.shape)

# 여기서 el은 2차원이 아니라, 1차원으로 인지되어 나온다.
for i, el in zip(preds, output):
    print(type(i), type(i.item()))
    print(el, el.shape)
    break

for i in zip(preds, output):
    print(type(i), len(i), "elements : ",i[0].item(), i[1].tolist())
    break
torch.Size([1, 10])
torch.Size([10, 1])
<class 'torch.Tensor'> <class 'int'>
tensor([-0.1235,  1.0481, -0.3385, -0.6615,  1.2481, -1.0524, -0.3961,  0.7990,
         1.6359, -0.3628]) torch.Size([10])
<class 'tuple'> 2 elements :  3 [-0.12354857474565506, 1.0481327772140503, -0.3384615480899811, -0.6614770889282227, 1.248133897781372, -1.0524193048477173, -0.3961334228515625, 0.7990166544914246, 1.635870337486267, -0.36283737421035767]
# [F.softmax(el, dim=0)[i].item() for i, el in zip(preds, output)]
# [F.softmax(torch.squeeze(el), dim=0)[i.item()].item() for i, el in zip(preds, output)]
[F.softmax(el, dim=0)[i].item() for i, el in zip(preds, output)]

# pred_index : 4장의 사진 각각의 해당하는 index
# softmax_result : 1장의 사진에 대한 labels 10개의 softmax결과 값 중. 그 index가 가지는 softmax값
4. torch.cat
- Concatenates (tensors (sequence of Tensors), Dimension)
- document
- Concatenates 되기 위해, 들어가는 tensor들의 dimention이 적절해야한다.
x = torch.randn(2, 3)
print('x :',x)
cat_dim0 = torch.cat((x, x, x), 0) # (**2**, 3) * 3개 = (**6**, 3)
print('cat_dim0 :\n',cat_dim0)
cat_dim1 = torch.cat((x, x, x), 1) # (2, **3**) * 3개 = (2, **9**)
print('cat_dim1 :\n',cat_dim1)
5. torch.stack
- list나 tuple을 이용해서, sequence of Tensors로 표현되어 있는 것을 tensor로 묶어 준다.
- 아래와 같은 경우. len of list(3) + tensor_x(2,3) -> tensor(3,2,3)
x = torch.randn(2, 3)
print('x :',x)
stack_dim0 = torch.stack([x, x, x], 0)
print('stack_dim0 :\n',stack_dim0, stack_dim0.shape)
stack_dim1 = torch.stack((x, x, x), 1)
print('stack_dim0 :\n',stack_dim1, stack_dim1.shape)
x : tensor([[-0.6724,  0.4038,  1.3529],
        [ 0.1946,  1.9841, -0.4614]])
stack_dim0 :
 tensor([[[-0.6724,  0.4038,  1.3529],
         [ 0.1946,  1.9841, -0.4614]],

        [[-0.6724,  0.4038,  1.3529],
         [ 0.1946,  1.9841, -0.4614]],

        [[-0.6724,  0.4038,  1.3529],
         [ 0.1946,  1.9841, -0.4614]]]) torch.Size([3, 2, 3])
stack_dim0 :
 tensor([[[-0.6724,  0.4038,  1.3529],
         [-0.6724,  0.4038,  1.3529],
         [-0.6724,  0.4038,  1.3529]],

        [[ 0.1946,  1.9841, -0.4614],
         [ 0.1946,  1.9841, -0.4614],
         [ 0.1946,  1.9841, -0.4614]]]) torch.Size([2, 3, 3])
6. PIL.Image
- depth checking
- PIL 기초
- R_image = PIL.Image.open(‘path’)
- R_image.size = 행렬
- R_image.mode = depth
try :
    from PIL import Image
    import os
    # PIL 간단하게 사용해보기.
    root = "/home/sb020518/tutoPytorch/data_for_5/PennFudanPed"
    mask_path = os.path.join(root, "PedMasks", "FudanPed00001_mask.png")
    mask1 = Image.open(mask_path)
    print(type(mask1),mask1.size, mask1.mode) # L은 gray scale image = 8 bit 이미지

    root = "/home/sb020518/tutoPytorch/data_for_5/PennFudanPed"
    mask_path = os.path.join(root, "PNGImages", "FudanPed00001.png")
    img1 = Image.open(mask_path)
    print(img1.size, img1.mode)
except :
    pass
7. np.unique + objs - broadcast + np.where
- np.unique
- 중복되는 원소들을 제거해준다.
- np.unique document
[1 2 1 1 2 2 3] -> [1,2,3]
- torch에서 broadcast를 이용한 COC O형식의 Mask 결과 추출하기
(5.torchvision_finetuning_instance_segmentation의 내용중 일부)
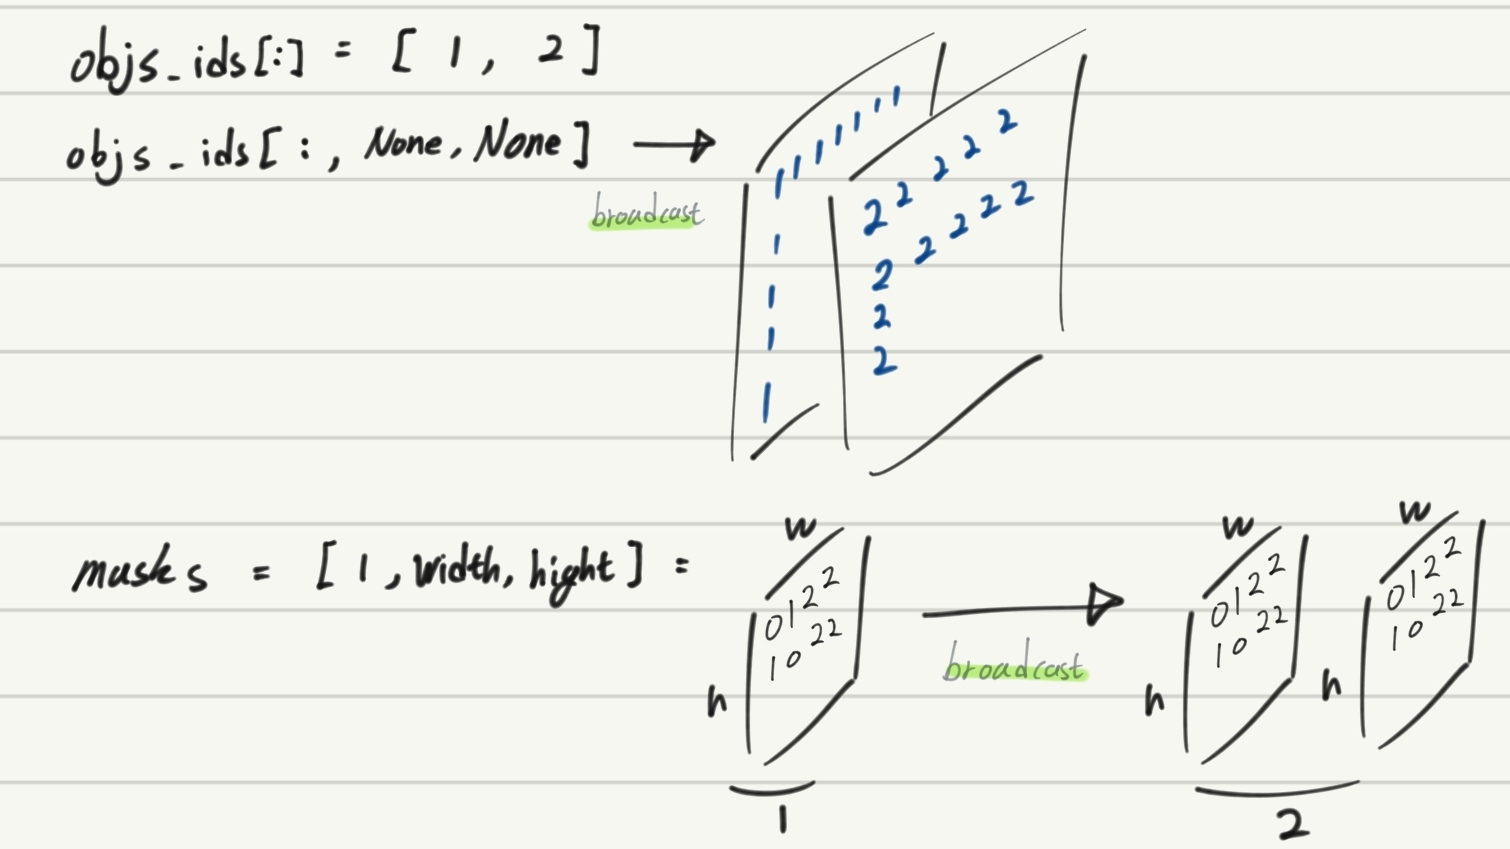
obj_ids = [1 2] => shape : (2,)
objs_ids[:] => array([1, 2], dtype=uint8)
obj_ids[:, None, None] = not defiend 이라고 하지만, –broadcast—> (2, width, hight) 가 되겠다.
masks = [1,width, hight] ———————————— –broadcast—> (2, width, hight)
masks = ( mask == objs_ids[:, None, None]) ————shape is———> (2, 536, 559)
masks[0,:,:] ==> 원래 1이 있던 자리만 True되어 있음
masks[1,:,:] ==> 원래 2가 있던 자리만 True되어 있음
- np.where
- 원하는 숫자가 어느 위치에 있는지를 찾아 return해주는 모듈 (Find index of a value in a Numpy array (both 1D & 2D))
- where document : https://thispointer.com/find-the-index-of-a-value-in-numpy-array/
- 숫자를 찾고 싶으면 np.where(arr=hope_to_find_num)
- output = 원한 위치의 all indices
- bool에서 ture를 찾고 싶으면 np.where(arr), 단 arr의 data type = bool
import numpy as np
root = "/home/sb020518/tutoPytorch/data_for_5/PennFudanPed"
mask_path = os.path.join(root, "PedMasks", "FudanPed00001_mask.png")
mask1 = Image.open(mask_path)
mask = np.array(mask1)
print('mask\'s shaep : ' , mask.shape)

objs_ids = np.unique(mask)
objs_ids = objs_ids[1:]
print("A number of objects :",objs_ids)
masks = ( mask == objs_ids[:, None, None])
print("masks.shape : ",masks.shape)
print("1번째 객체가 위치하는 곳 :", np.where(masks[0,...]==True))
print("2번째 객체가 위치하는 곳 :", np.where(masks[1,:,:]==True))
import torch
boxes = []
for i in range(objs_ids[-1]):
    pos = np.where(masks[i]) # masks[i] == masks[i,...] == masks[i,:,:] = 2차원 백터 = 여기서 True만 반환
    xmin = np.min(pos[1])
    xmax = np.max(pos[1])
    ymin = np.min(pos[0])
    ymax = np.max(pos[0])
    boxes.append([xmin, ymin, xmax, ymax])
torch.tensor(boxes,dtype=torch.float32)
8. torch.tensor VS torch.as_tensor VS torch.from_numpy()
각각의 document를 읽고 핵심만 정리한다. 참고 stackoverfloar PyTorch memory model: “torch.from_numpy()” vs “torch.Tensor()”
- torch.tensor : list나 numpy를 받아들임 , copy a data = memory overhead = out-place 알고리즘
- tensor_object.new_tensor : 보통 tensor를 받아들임, create a tensor with similar type but different size as another tensor.
- torch.as_tensor: in place 알고리즘, numpy랑 메모리를 공유해서, numpy를 바꾸면 tensor도 바뀜, numpy의 dtype무시 torch.FloatTensor!
- torch.from_numpy() : in place 알고리즘, numpy랑 메모리를 공유해서, numpy를 바꾸면 tensor도 바뀜, numpy의 dtype를 존중
Network에서 사용할 tensor함수
- torch.Tensor.requires_grad_() - inplace 알고리즘
- torch.Tensor.detach() - inplace 알고리즘
쨋든 pytorch에서 말하길 The recommended way to build tensors in Pytorch is to use the following two factory functions: {torch.tensor} and {torch.as_tensor}
9. TORCHVISION.TRANSFORMS
- documentary site 내용 정리 하기.
- img input은 PIL, Tensor image, Tensor images.
- WARNING : batch에서 randoom seed를 그냥 이용하면 backpropa와 잘 양립 되지 않을 수 있으므로, torch.manual_seed(17) 를 이용해 seed 값 맞춰 줘라.
- (torchvision.transroms.)Grayscale, Colorjitter, CenterCrop,Pad 등등.. 또한 하나의 nn모듈이다. 그래서 다 forward가 있고, 그것을 사용하는 것이다.
- compose([list of Transforms]) 내부에는 위와 같은 nn모듈 클래스가 들어가고, 자동으로, forward에 들어가는 input은 img input이 된다. 여기에 들어가야할 자료형은 위에 정리 완료
- scripted_transforms = torch.jit.script(transforms); # 이렇게 script를 사용하기 위해서는 compose말고 nn.Sequential로 묶으라는데 아직 뭔지 모르겠음.
10. Imform Return type or Variable type
def funtion(parameters) -> return_type :
variable : type = value
def add(a,b) -> int:
    return a+b
a : int = 3
b : float = 4
type(b), add(a,b)
11. Object에 새로운 맴버변수 삽입이 가능하다,
- backbone.out_channels??
- ~(nn.Module 로써 정의된 class의 객체는 아니다) nn.sequential로 정의된 (class의) 객체든 뭐든 out_channels라는 맴버변수를 사용하면, 가장 마지막 layer의 out_channels 맴버변수가 자동으로 호출된다.~ -> 개소리 였다. 이거 아니다.
- 결론 : Python 클래스로 정의된 객체에 새로운 맴버변수를 추가하는 것이 가능하다. 맴버함수도 가능하지만 self.Mamber_valuabe이 들어가선 안된다.
# 1. 여기서 1280은 어디서 나온 것 일까??
import torchvision
backbone = torchvision.models.mobilenet_v2(pretrained=True).features
backbone.out_channels = 1280

# 2. 기본 Faster RCNN에서 사용하는 backbone의 out_channels을 확인해보자,
#     하지만 잘 살펴보니, class FasterRCNN(GeneralizedRCNN):; out_channels = backbone.out_channels; 를 해줘서 알아서 out_channels에 맞춰주는 것 같은데...
from torchvision.models.detection.backbone_utils import resnet_fpn_backbone
backbone_2 = resnet_fpn_backbone('resnet50', pretrained=False)
out_channels = backbone_2.out_channels # resnet_fpn_backbone는 nn.Module로 정의된 class지만 out_channels라는 맴버변수 있다.
print(type(backbone), out_channels)
# 3. test
backbone = torchvision.models.mobilenet_v2(pretrained=True).features
print(type(backbone)) # <class 'torch.nn.modules.container.Sequential'>
# backbone.out_channels  # 에러발생!!
backbone.junhaJJang  = 1111 # 이렇게 정의를 해주면?
backbone.junhaJJang # 이거는 사용가능하다.
class junha:
    def __init__(self,a,b):
        self.a=a
        self.b=b
    def add(self,c,d):
        return self.a + self.b + c + d

object = junha(1,2)
dir(object)   # 'a', 'add', 'b'
object.e = 10
dir(object)   # 'a', 'add', 'b', 'e'
pass
object.f = 11

object.junhafuntion = lambda x,y:  x * y
print( object.junhafuntion(2,3) )
object.junhafuntion = lambda x,y: self.a * x * y
# print( object.junhafuntion(2,3) ) -> 에러발생!!
object.junhafuntion = lambda x,y, object_: x * y * object_.a
object.junhafuntion(1,2,object)
11.2 self로 정의한 변수만이 클래스의 attribute (맴버변수)로 인식한다
class junha():
    def __init__(self,a,b):
        self.a = a
        self.b = b
        hihi = 111 # 이건 단지 함수내 변수 일 뿐이다.
        self.hiii = 111
    def add():
        return self.a + self.b

ob = junha(1,2)

>>> ob.hihi
    >>> # 에러발생!!  no attribute 'hihi'!!
>>> ob.hiii
    >>> # 111로 정확하게 인식!
12. 상속과 __init__, super
- maskrcnn.py 여기서 공부하면 좋을 코드를 가져왔다.
- https://junha1125.github.io/docker-git-pytorch/2020-09-04-BalloonMask/ 여기를 보면 super에 대한 작은 정리가 되어 있다.
- 좀더 자세한 설명은 여기를 참고 한다. https://leemoney93.tistory.com/37
try:
    class MaskRCNNPredictor(nn.Sequential):
        def __init__(self, in_channels, dim_reduced, num_classes):
            super(MaskRCNNPredictor, self).__init__(OrderedDict([
                ("conv5_mask", misc_nn_ops.ConvTranspose2d(in_channels, dim_reduced, 2, 2, 0)),
                ("relu", nn.ReLU(inplace=True)),
                ("mask_fcn_logits", misc_nn_ops.Conv2d(dim_reduced, num_classes, 1, 1, 0)),
            ]))

            for name, param in self.named_parameters():
                if "weight" in name:
                    nn.init.kaiming_normal_(param, mode="fan_out", nonlinearity="relu")
                # elif "bias" in name:
                #     nn.init.constant_(param, 0)
except:
    pass
이 코드를 유심히 유심히 보자. 여기서 공부해아할 것은 2개이다.
- nn.Sequential 를 상속한다.
- super().__init__(*parameters)
- OrderedDict 라는 함수를 사용한다.
- super(MaskRCNNPredictor, self) == super() ??
하나하나 알아보자.
- nn.Sequential는 Layer를 담는 Containers역할을 하는 하나의 Class이다. __init__ 말고도 다른 매소드 함수가 구현되어 있다. 그 메소드 함수들은 __init__에서 정의한 맴버변수를 사용할 것이다. nn.Sequential 클래스로 만든 객체 자체에 맴버변수가 정의 되어 있어야 한다.
- nn.Sequential documentary 에서 볼 수 있는 것 처럼, segquential에는 ordered dict도 input 매개변수로 들어갈 수 있다.
- super().__init__(*parameters) 이것이 바로 위의 1번이 잘 동작되도록 만드는 코드이다. nn.Sequential내부의 다른 맴버함수들을 (클래스의 맴버변수가 잘 정의 된 상태에서) 문제 없이 잘 사용하기 위해서 해주는 작업니다.
- 아래의 코드 처럼
- d = dir(); 라고 사용하면 d라는 dictionary 변수가 하나 정의 되는 것이다.
- dir_valable = OrderedDict()를 하면 OrderedDict 변수가 하나 정의 되는 것이다.
- dir과 OrderedDict는 거의 똑같은 동작을 하는 클래스이지만, OrderedDict는 값이 들어온 순서를 더 정확하게 기억해 놓는다.
- 그리고 OrderedDict()내부에 [*(keyname, value)]를 적어 놓는 생성자를 아래에 사용한 것이다. OrderedDict Initialization, constructor에 대한 문서
- super자리에 코드들이 쫘르르륵 들어간다고 생각하라.(마치 해더파일에 있는 함수의 내용이 링크에 의해서 쫘르르 코드가 옮겨 들어가듯)
from collections import OrderedDict

dir_valable = OrderedDict([
                ("conv5_mask", 1),
                ("relu",2),
                ("mask_fcn_logits", 3),
            ])
dir_valable, list(dir_valable.keys()), (dir_valable.values())
(OrderedDict([('conv5_mask', 1), ('relu', 2), ('mask_fcn_logits', 3)]),
 ['conv5_mask', 'relu', 'mask_fcn_logits'],
 odict_values([1, 2, 3]))
13. import와 package
- 공부하던 자료 : /tutoPytorch/5.torchvision_finetuning_instance_segmentation.ipynb
- 이 파일을 공부하면서 생긴 궁금증을 아래와 같이 나열해 해결해나간다.
- Torch Git 내부의 document1 : mask_rcnn.py, document2 : fast_rcnn.py 가능하면 꼭 열어볼 것을 추천
- model = torchvision.models.detection.maskrcnn_resnet50_fpn(pretrained=True)로 정의한 model에서, type(model.box_predictor)를 하면 왜 없는 모듈이라고 뜰까??
111. mask_rcnn에 init가 정의되므로, 자식함수의 함수 오버라이딩이 발생한다. 222. 따라서 fast_cnn의 init의 내용은 전부 무시된다. 333. fast_cnn에서는 box_predictor가 fast_crnn_box_predictor로 정의가 되지만, mask_rcnn에서는 이 내용이 적혀 있지 않으므로, box_predictor로 정의된 맴버변수는 없다.- 위와 같은 개소리가 아니라… no attribute라고 뜨는 이유는… self.box_predictor 라고 정의된게 아니라서!!! 으그…. 유일한 맴버변수는 roi_heads 뿐이었다ㅠㅠ 다른것은 그냥 좆밥들…. (큰 목차 11-2 내용 참조)
- super 덕분에, fast_rcnn의 init 내용이 mask_rcnn의 init에 전부 그대로 들어간다!!! super자리에 코드들이 쫘르르륵 들어간다고 생각하라.(마치 해더파일에 있는 함수의 내용이 링크에 의해서 쫘르르 코드가 옮겨 들어가듯)
- 따라서 이와 같이 접근해야 한다.
 >>> type(model.roi_heads.box_predictor)
 torchvision.models.detection.faster_rcnn.FastRCNNPredictor
 >>> type(model.roi_heads.box_predictor.bbox_pred )
 torch.nn.modules.linear.Linear
- 내가 여기서 신기하다고 생각하는 것은 이거다 : mask_rcnn.py 파일에는 FastRCNNPredictor를 import내용이 전혀없다. 그럼에도 불구하고… from .faster_rcnn import FasterRCNN 를 호출했다는 이유만으로 FastRCNNPredictor가 Mask_crnn의 init의 super에 의해서 호출된다. 이게 가능한 이유가 뭘까??
- 이 코드가 문제 없이 구동 되는 이유가 뭘까?
import torchvision model = torchvision.models.detection.maskrcnn_resnet50_fpn(pretrained=True) # 이거를 그대로 부르면 num_classes = 91 이다. type(model.roi_heads.box_predictor) >>> torchvision.models.detection.faster_rcnn.FastRCNNPredictor # (에러 안남) - 이것에 대해서는 다음과 같은 구조로 실험을 해보면 쉽게 이해할 수 있다. ```python
- init.py
- classes1.py
- class junha1 여기서 junha2에 의해 정의된 객체를 맴버변수로 가지고 있기.
- class junha2
- classes2.py from .classes1 import junha1 junha1을 사용한 객체 생성 이 객체(junha1)의 junha2에 의해 정의된 맴버변수를 호출하면 어찌 될까?
나의 상식과 다르게, 에러가 나지 않는다!!! ```
- 결론 :
- classes2.py에서 from .classes1 import junha2를 해주지 않아도 된다.
- 다른 파일의 class, fun이든 import를 하면, 그 class 내부에 맴버변수나 맴버함수에서 사용되는, (다른 파일의) 다른 class의 객체는 무리 없이 사용가능하다.
- 따라서 User는 내가 원하는 클래스, 함수만 import하면 그 내부에 속한 외부 클래스, fun에 대한 import는 신경쓰지 않아도 된다.
- 이 코드가 문제 없이 구동 되는 이유가 뭘까?
- A파일에서 from B파일 import B함수, Bclass 를 해놓았다면, C파일에서 form A파일 import B함수, Bclass 가능!
- 참고 git line
- 5.torchvision_finetuning_instance_segmentation.ipynb 코드 내부
from torchvision.models.detection.rpn import AnchorGenerator from torchvision.models.detection.anchor_utils import AnchorGenerator # torchvision 0.5.0에서는 rpn.py에 import AnchorGenerator 정의 # torchvision 0.1.5에서는 anchor_utils.py에 import AnchorGenerator 정의 - 하지만 torchvision 0.1.5에서도 from torchvision.models.detection.rpn import AnchorGenerator를 해도 아주 잘 된다.
- 왜냐하면, rpn.py에서 아래와 같이 정의 되어 있기 때문이다.
  # Import AnchorGenerator to keep compatibility.
  from .anchor_utils import AnchorGenerator
14. asset, unittest, logging, debudding
- 테스팅, 디버깅 을 공부한 내용을 아래에 정리해 놓는다.
1. assert
- 파이썬은 동적 특성으로 인해 애플리케이션 대부분에 있어 디버깅보다 테스팅이 매우 중요하다.
- assert <표현식> [, '진단 메시지']
- 여러개의 assert를 확인하기 위해서 import unittest 를 한 test파일을 만드는 방법도 있다.
- test_filename.py를 만든다
- 그 파일 내부에 import unittest 하다.
- unittest.TestCase룰 상속하는 class를 만든다.
- unittest 클래스의 맴버함수로써 self.assetEqual()를 사용해 내가 만든 class를 test해볼 수 있다.
- 위와 같이 복잡하게 self.assetEqual()같은 맴버함수를 사용하지 않고, 직관적으로 asset만으로 test할 수 있는 pytest와 같으 모듈도 존재한다.
- 나중에 pytest를 구글링해서 찾아서 공부해보자.
a = 4
assert a == 4
# assert a != 4 , 'a shoud be 4'
2. logging
- 과거 내가 만든 내용을 참고해서 다시 공부해보자.Blog logging Link : 다시 보니까.. 너무 대충 만듬 감이 있다. 그래서 아주 기초만 다시 공부해보자. 아래 문서도 그리 많은 내용을 담고 있진 않다.
- logging 기초 문서
- 아래와 같은 log객체의 함수를 하용해서 메세지를 발행한다.
# 코드 중간에 이런거 넣으면 된다 logger.debug("debug 하고 싶은 내용 %s", str) logger.info("info하고 싶은 내용") logger.warning("warning해주고 싶은 내용") logger.error("error 내용") logger.critical("critical출력 하고 싶은 내용") log.critical(message [, args]) - 이는 메세지의 심각도 수준이 각기 다르기 때문이다. debug가 가장 낮은 심각도 critical이 가장 심각한 심각도를 의미한다.
- try, except문이 있다면, except문 내부에 위와 같은 log메세지 발행을 위한 코드를 넣어주면 된다.
- 아래와 같은 log객체의 함수를 하용해서 메세지를 발행한다.
3. debugging
- -i 옵션 사용하기
- python3 -i blah.py 와 같이 -i옵션을 사용해 실행한다.
- 터미널에 인터프리터(»>) 가 나타나면서, 충돌이후 여기저기 찔러보며 변숫값과 기타 상태를 확인할 수 있다.
- editor의 파이썬 디버거를 사용하기
15. python decorator 기본만 알기
- decorator 란? 함수 앞뒤에 들어가야할 내용을 자동으로 넣어주는 매크로
- 참조 reference
- Python 으로 작성된 Opensource 의 코드들을 보다 보면, 아래와 같이 @ 로 시작하는 구문 들을 볼 수 있다.
- 대상 함수를 wrapping 하고, 이 wrapping 된 함수의 앞뒤에 추가적으로 꾸며질 구문들을 decorator로 정의한다. 정의한 내용을 바꾸면 손쉽게 재사용이 가능하다.
- decorator 정의 하는 방법 1 : def 사용
- 함수의 구조는 다음과 같다.
def dec_functionName(func): def decorated(): ~~ 함수 이전에 실행되야하는 구문 ~~ func() # 위에 매개변수로 들어간다. ~~ 함수 이후에 실행되야하는 구문 ~~ return decorated - 그리고 원하는 함수(위의 func의 인자로 들어감) 위에 @dec_functionName 를 적어주면 된다.
- 즉! decorator는 원래 작업의 앞 뒤에 추가적인 작업을 손쉽게 사용 가능하도록 도와주는 역할을 한다.
- 함수의 구조는 다음과 같다.
- decorator 정의 하는 방법 2 : class 사용
- class의 call 맴버함수를 다음과 같이 정의한다.
class class_for_decorator: def __init__(self, func): self.func = func def __call__(self, *args, **kwargs): ~~ 함수 이전에 실행되야하는 구문 ~~ self.func(*args, **kwargs) ~~ 함수 이후에 실행되야하는 구문 ~~ - 그리고 원하는 함수(위의 func의 인자로 들어감) 위에 @class_for_decorator 를 적어주면 된다.
- class의 call 맴버함수를 다음과 같이 정의한다.
16. python 주의 할점
- self.variable, variable 분별하기
- 아래의 코드를 살펴보자.
class PennFudanDataset(Dataset): def __init__(self, root, transforms): self.root = os.path.join(root,"data_for_5","PennFudanPed") self.transforms = transforms # root = /home/sb020518/tutoPytorch self.imgs = list(sorted(os.listdir(os.path.join(self.root,"PNGImages")))) - self.root와 root는 완전히 다른 객체이다. 따라서 분리해서 생각해야한다.
- 여기서 코딩 에러가 많이 나오니 주의하자.
- 아래의 코드를 살펴보자.
17. __call__? + T.Compose(transforms) VS transforms.Compose?
- 참고 링크
- Git - T.Compose(transforms) -> __call__을 사용하고 있다. 이게 뭐지??
- Document - torchvision.transforms.Compose(list of transforms to compose)
- 5.torchvision_finetuning_instance_segmentation.ipynb 에서
- T.Compose(transforms) 를 적용한 transform
- transforms.Compose 를 적용한 traansforms_C 을 (내가 직접) 만들었다.
- 그것을 이용해서 각각 dataset, dataset2를 만들었다.
- 그리고 dataloader에 dataset, dataset2를 넣고, next(iter())를 적용해본 결과
- dataset 으로는 잘 동작하는데,
- dataset2 으로는 잘 동작하지 않는다.
- 맨 처음 T.Compose(transforms) 그리고 transforms.Compose 이 코드상의 차이가 무엇인지 살펴보자.
- T.Compose(transforms) :
- transforms.Compose :
- 이건 나중에 필요할 때 공부하자…
18. torch와 numpy의 이미지 차원 차이
- 4Classifier.ipynb 에 이런 코드가 있다.
# torchvision.datasets.CIFAR10.__getitem__(index=4) 라고 사용하면 안되지. 객체 만들고 그 객체로 Attribute 함수 사용해라. image, target =trainset.__getitem__(index=144) # type(image), target, image.size() plt.imshow(np.transpose(image.numpy(),(1,2,0))) # 4Classifier.ipynb에 설명 있으니 참조 plt.title(classes[target]) plt.show() - image.numpy() 필수로 해줘야 한다.
- np.transpose(image.numpy(),(1,2,0)) 를 왜 하는 걸까?
- 중요! 만약 이미지를 어디선가 load해서 가져왔을때.
- tensor에서는 (몇장 ,depth ,행, 열)
- numpy에서는 (행, 열, depth, 몇장)
- tensor에서는 (depth ,행, 열)
- numpy에서는 (행, 열, depth)
- 따라서 바꿔줘야 한다.
from google.colab import files
uploaded = files.upload()
Saving testimage.png to testimage.png
from matplotlib import pyplot as plt
from matplotlib.image import imread
import numpy as np
import os
img = plt.imread('./testimage.png')
tensor = torch.tensor(img)
type(img), img.shape, type(tensor), tensor.shape
(numpy.ndarray, (300, 300, 4), torch.Tensor, torch.Size([300, 300, 4]))
하지만 data를 행렬로 그대로 가져온다면 torch와 tensor의 shape는 동일하게 생각해도 좋다
a = [[[[1,2],

     [4,5],

     [7,8]],

     [[10,11],

     [13,14],

     [16,17]]], ##

     [[[1,2],

     [4,5],

     [7,8]],

     [[10,11],

     [13,14],

     [16,17]]], ##

     [[[1,2],

     [4,5],

     [7,8]],

     [[10,11],

     [13,14],

     [16,17]]], ##

     [[[1,2],

     [4,5],

     [7,8]],

     [[10,11],

     [13,14],

     [16,17]]], ##

     [[[1,2],

     [4,5],

     [7,8]],

     [[10,11],

     [13,14],

     [16,17]]]] ##


import torch

temp1 = torch.randint(1,100,(2,3,4))

t3 = torch.tensor(a)

temp1.shape

temp1


import numpy as np

temp2 = np.random.randint(1,100,(2,3,4))

t4 = np.array(a)
temp1.shape, temp2.shape, t3.shape, t4.shape
(torch.Size([2, 3, 4]), (2, 3, 4), torch.Size([5, 2, 3, 2]), (5, 2, 3, 2))
- 여기서 부터는 6.Transfer Learning for Computer Vision Tuto 참조
19. torchvision.datasets.ImageFolder
5.torchvision_finetuning_instance_segmentation.ipynb를 참고하면, 내가 새로운 dataset을 위한 class를 어떻게 정의하고, __getitem__ 과 같은 함수를 어떻게 정의해야하는지 알 수 있다.
ImageFolder 공식 문서 참고하면 좋다.
만약 나의 데이터가 다음과 같은 구조로 정리 되어 있다면, 이 모듈을 사용하면 된다.
 root/dog/xxx.png

 root/dog/xxy.png

 root/dog/xxz.png


 root/cat/123.png

 root/cat/nsdf3.png

 root/cat/asd932_.png
torchvision.datasets.ImageFolder(root : str, transform : Optional[Callable] = None)
data_dir = 'data/hymenoptera_data'

image_datasets = {x: datasets.ImageFolder(os.path.join(data_dir, x),

                                          data_transforms[x])

                  for x in ['train', 'val']}

dataloaders = {x: torch.utils.data.DataLoader(image_datasets[x], batch_size=4,

                                             shuffle=True, num_workers=4)

              for x in ['train', 'val']}

dataset_sizes = {x: len(image_datasets[x]) for x in ['train', 'val']}

class_names = image_datasets['train'].classes


device = torch.device("cuda:0" if torch.cuda.is_available() else "cpu")
20. torchvision.utils.make_grid
참고 문서 : torchvision.utils.make_grid
참고 파일 2개
4.tensorbord.ipynb
6.Transfer Learning for Computer Vision Tuto.ipynb
예제 코드 1
- 링크 : See this notebook
예제 코드 2 : 그냥 이거 항상 이용하기
      def imshow(inp, title=None):

          """Imshow for Tensor."""

          inp = inp.numpy().transpose((1, 2, 0))

          mean = np.array([0.485, 0.456, 0.406])

          std = np.array([0.229, 0.224, 0.225])

          inp = std * inp + mean

          inp = np.clip(inp, 0, 1)

          plt.imshow(inp)

          if title is not None:

              plt.title(title)

          plt.pause(0.001)  # pause a bit so that plots are updated

      # Get a batch of training data

      inputs, classes = next(iter(dataloaders['train']))


      # Make a grid from batch

      out = torchvision.utils.make_grid(inputs)


      imshow(out, title=[class_names[x] for x in classes])
21. copy.deepcopy
- reference : https://wikidocs.net/16038
- python은 변수값이 메모리에 먼저 적히고, 객체가 그 메모리 위치를 기억하는 형태의 동적 언어인 것을 잊지 말자.
- copy의 종류는 3가지가 있다고 생각하자. (1) shallow copy, (2) deep copy 가 아니라, (1) just shallow copy, (2) slicing shallow copy, (3)deep copy.
- 내용 정리
- mutable
- mutable : list, set, dict
- immutable : 위의 3가지 외 나머지 class(자료형)
- mutable에 대한 작은 고찰, 나의 블로그
- 중요 파이썬 기본 함수
- id(object) : 메모리 공간 번호
- == : 서로 내용이 같은 값을 가지는 가?
- is : 객체가 서로 같은 메모리 공간 번호를 가지나?
- shallow copy (just copy)
- a = b
- a is b » Ture
- a == b » True
- a[0] = ‘hi’ » b[0] = ‘hi’
- shallow copy (using slicing or copy.copy)
- 사용법 : a = b[:] or a=copy.copy(b)
- a is b » False (즉 b에 새로운 id 부여됨)
- a == b » True
- a[0] = ‘hi’ » b[0] != ‘hi’
- 이처럼, a의 ‘원소’가 immutable이면 deepcopy라고 해도 무방하다. 즉 서로 영향없이 안전하다.
  import copy
  a = [1,2,3]
  b = copy.copy(a)
  print(a == b, a is b) >> True, False
  a[0] = 4
  print(b[0]) >> 1
- 하지만!! a의 ‘원소’가 mutable이면 문제가 발생한다. ex) a = [[1,2],[3,4]]
- a = b[:]
- a is b » False, BUT!!!
- a[0] is b[0] » True
- a[0] 그 자체를 바꾸면 b[0]도 같이 바뀐다. ex)a[0].append(num), a[0].remove/pop(index), del a[0][2]
- 하지만, a[0] = [1,5] 와 같이 재할당 하면, b[0]은 안바뀐다.
- a = b[:]
- 사용법 : a = b[:] or a=copy.copy(b)
- deep copy
- 그냥 모~~든게 새로 만들어 진다. mutale객체의 ‘원소’들 까지도.
- b = copy.deepcopy(a)
- a is b » False
- a[0] is b[0] » False
- a == b » True (초기에 서로 내용은 같을 수 있다.)
- mutable
