【Pytorch】 detectron2 teardown reports
detectron2 teardown reports
1. docker build & run
$ cd /path/to/detectron2/docker
$ docker build --force-rm --tag detectron2:4.29 . # 4월 29일
$ sudo docker run -d -it      \
    --gpus all         \
    --restart always     \
    -p 8888:8080         \
    --name "detectron2"          \
    --shm-size 8gb      \
    -v /home/junha/docker:/workspace  \
    -v /hdd1T:/dataset   \
    sb020518/detectron2:4.29
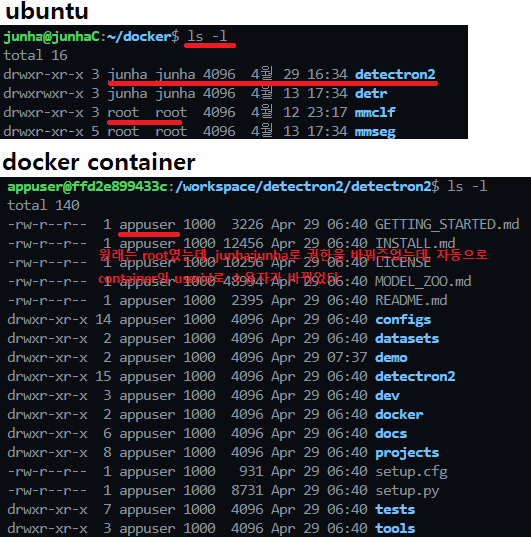
- container 내부에서
$ pip list | grep detectron2해서 나오는 결과가 코드를 수정해야 반영하는 부분이다.>> detectron2 - (version) 0.4 - (path) /home/appuser/detectron2_repo여기를 수정해야 한다.- 현재 내가
(Container path) /workspace/detectron2/detectron2 = (Local path) ~/docker/detectron2/에서 작업을 하기는 희망하지만, 위의 pip이 인식하고 있는 path에서 코드를 수정하지 않으면 반영되지 않는다. - 따라서
/home/appuser/detectron2_repo여기서 먼저 작업한 후, 옮기고 싶은 내용들을(Local path) ~/docker/detectron2/여기로 copy 해놓자.
1.1 “Error: EACCES: permission denied” 해결
- 링크 : Docker - “Error: EACCES: permission denied,
- 나의 해결 방법
- ubuntu에서
ls -l을 처서, 폴더 혹은 파일의 권한을 가진 사용자 알기 $ sudo chown -R junha:junha ./detectron2/폴더의 소유자를 바꿔주기- 그러면 폴더 내부의 모든 파일들도 소유자가 바뀐다.
- 그리고 container에 들어가서 소유자를 확인해보면, container의 userid로 소유자가 바뀌었다.
- ubuntu에서
2. Detectron2 github
간단히 봐야할 파일들
- Getting Started with Detectron2
- documentation
- Detectron2 Model Zoo.
- Detectron2 Dataset setting info
- Colab Notebook
하나하나 자세히
- Getting Started with Detectron2
python demo.py --config-file ../configs/COCO-InstanceSegmentation/mask_rcnn_R_50_FPN_3x.yaml --output ./ --input 544.jpg --opts MODEL.WEIGHTS detectron2://COCO-InstanceSegmentation/mask_rcnn_R_50_FPN_3x/137849600/model_final_f10217.pkltools/train_net.py에서 모든 Training & Evaluation(–eval-only 옵션)을 할 수 있다.
- documentation
- 내가 torch document를 먼저 보지, torch github를 먼저보지는 않잖아?
- 따라서 detectron2도 가능하면 documentation을 봐야한다. (이 함수가 무슨 역할을 하는지, 코드를 읽으면서 이해하는게 아니라, 그냥 document에 써있는 그대로로 이해해야 한다.)
- Detectron2 Model Zoo.
- 위에 글들은 쓸데없고, 그냥 표만 읽으면 된다.
- config file path / model (pth아닌 ptl=pickle 파일) 가 있으니 그대로 사용하면 된다.
- 만약에 pth파일로 만들고 싶다면, 디버깅 과정에서
torch.save(model.state_dict(), model.pth)
- Detectron2 Github 파일 및 폴더 탐구 일지
- 많이 복잡하기는 한다. 하지만 뭐 디버깅 하면 다 거기서 거기다.
- documentation을 보고 하나의 라이브러리로써 공부해야한다.
- 먼저 Demo.py로 디버깅 해보기
detectron2/detectron2/config/defaults.py에서 모든 config 내용들이 다 들어간다.(각 파라메터가 무엇을 의미하는지 정확히 나와있으니 언젠간 꼭 한번 쭉 읽어봐야 할 거다. 링크) 그리고 model_zoo에서 가져온 config파일 내용에 대해서만 일부 수정되는 형식이다.- mm 계열처럼
Refistry를 사용해서, 다중 Architecture의 위치를 기억하고 원하는 걸 가져와서 사용한다.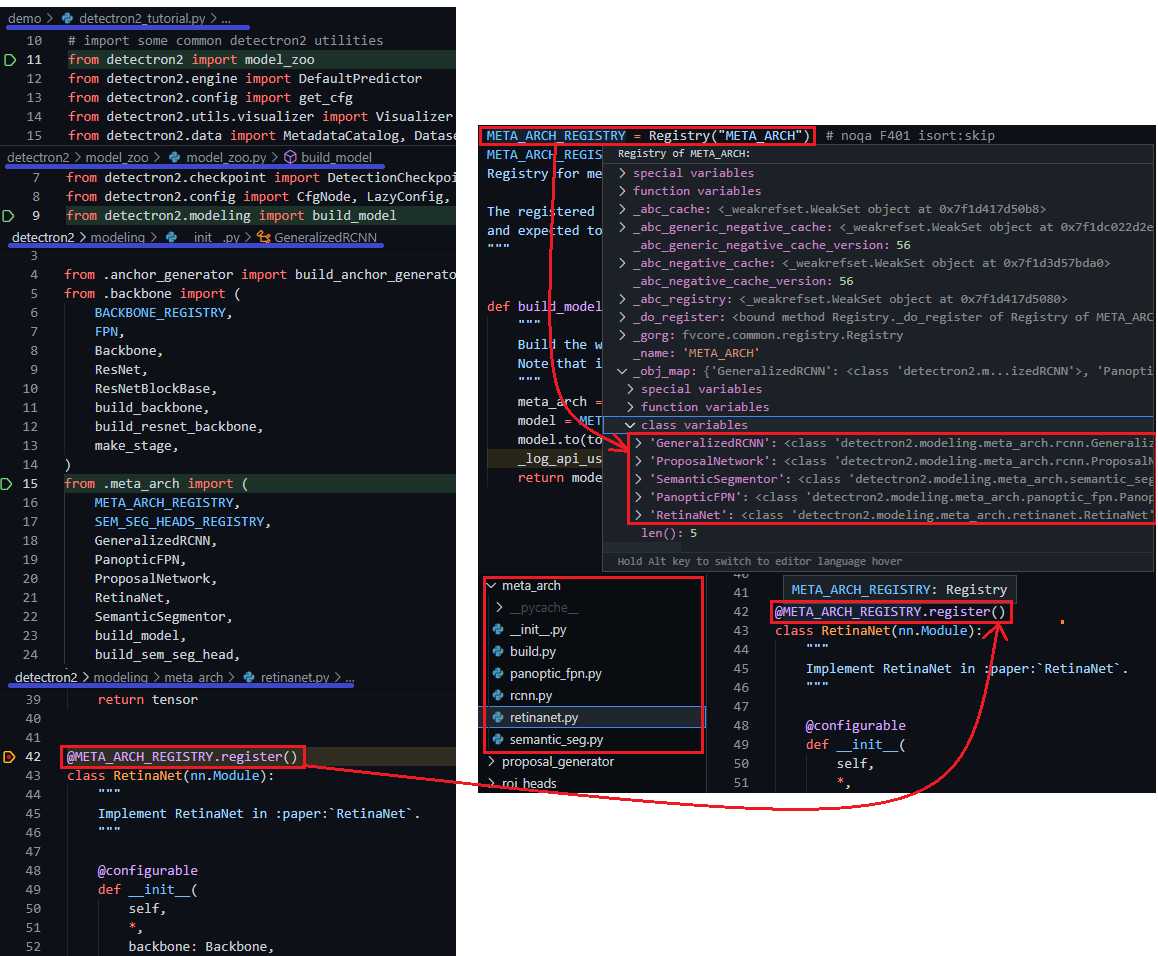
- model의 type은 위의 5개 중 하나이다. 현재 디버깅 하는 중에는
<class 'detectron2.modeling.meta_arch.rcnn.GeneralizedRCNN'>이다. - 이 안에 backbone, neck, head 모두 다 들어가 있다. GeneralizedRCNN 코드 내부에
__init__ & forward이 매우 심플하니 어떤 것들이 들어가 있는지 참고하면 좋다.
- 새로운 데이터셋에 대해서는
from detectron2.data import MetadataCatalog, DatasetCatalog만 잘 정의해주면 된다. 하지만 나는 이미 많은 사람들이 사용하는 오픈 데이터 셋을 사용하기 때문에, 내가 만들 생각하지 말자. detectron2.utils.visualizer(특히draw_instance_predictions맴버함수)이 나중에 개꿀일 것 같으니 알아두자.from detectron2.evaluation import COCOEvaluator를 이용해서 AP coco 결과를 바로 출력하는 방법 있음.- 결론. config 파일을 바꾸는 것 만으로 내가 원하는 모든 작업을 수행할 수 있다.
