【Detection】Understanding RefineDet paper with code
- 논문 : Single-Shot Refinement Neural Network for Object Detection
- 분류 : Object Detection
- 저자 : Shifeng Zhang , Longyin Wen3
- 읽는 배경 : Recognition Basic. Understand confusing and ambiguous things.
- 읽으면서 생각할 포인트 : 코드와 함께 최대한 완벽히 이해하기. 이해한 것 정확히 기록해두기.
- 참고 블로그 : Method Review
- 느낀점 :
1. RefineDet
1-1. 블로그 내용 정리
논문의 핵심은 “Multi-Scale Testing기법” : test 시에도 multi scale을 적용하는 방식
하나의 이미지를 여러 scale에서 학습을 하는 논문
- SSD에서는 여러 scale의 feature map에 대해서 적용을 하였고 학습
- YOLO는 학습 데이터의 해상도를 320x320 부터 608x608까지 다양한 scale로 resize를 하여 학습
RefineDet은 SSD 계열의 모델이다. (아래 model Architecture 사진 참조)
- 1) Anchor Refinement Module(ARM) : Anchor에 대한 binary classification수행. negative anchor들을 걸러내면서, 동시에 anchor들의 위치를 조절(RetinaNet에서 Focal Loss, YOLOv3에서 Objectness score 역할 for class imbalance)
- 2) Object Detection Module
RefineDet의 종류는 (input size) 320, 512, (with Multi-Scale Testing) + 가 있다.
최근 논문인 M2Det에서도 "Multi-Scale Testing기법"을 적극적으로 사용해 성능을 많이 올렸다. 특히 AP_small 에서 훨씬 좋은 성능을 얻어 내었다.
Multi-Scale Testing Algorithm
Filp과 UpScaling, DownScaling을 사용한다. 원본 이미지가 작을 수록 UpScaling을 많이 한다. 이 경우 Small Object 검출 성능을 높히고 FalsePositive(신경망은 객체라고 판단했지만 GT에는 아닐 경우)를 방지하기 위해 일정 크기 이하의 검출 결과만 사용한다.
모든 Scale에서 Inference한 결과를 모아서 NMS를 적용한다.
"""
im_detect(net, im, ratio*targe_size) : im를 ratio만큼 늘리거나 줄여서 inference 수행
마지막 모든 결과를 모아서 NMS 수행
"""
det0 = im_detect(net, im, targe_size)
det0_f = flip_im_detect(net, im, targe_size)

det1 = im_detect(net, im, int(0.6*targe_size))
det1_f = flip_im_detect(net, im, int(0.6*targe_size))

det2 = im_detect(net, im, int(1.2*targe_size))
det2_f = flip_im_detect(net, im, int(1.2*targe_size))

det3 = im_detect(net, im, int(1.4*targe_size))
det3_f = flip_im_detect(net, im, int(1.4*targe_size))

det4 = im_detect(net, im, int(1.6*targe_size))
det4_f = flip_im_detect(net, im, int(1.6*targe_size))

det5 = im_detect(net, im, int(1.8*targe_size))
det5_f = flip_im_detect(net, im, int(1.8*targe_size))

cls_dets = np.row_stack((det0, det_r, det1, det2, det3, det4, det5, det7))
cls_dets = soft_bbox_vote(cls_dets) # nms 적용
1-2 Paper Review
- Conclusion
- ARM (anchor refinement module)
- negative anchors를 필터링 한다. classifier의 search sapce를 줄이기 위해서.
- 거칠게(대충=Coarsely) anchors 사이즈와 location을 조정한다.
- ODM (object detection module)
- refined anchor를 받는다.
- 각 anchor에 대한 적절한 multiclass labels을 예측한다.
- multi-task loss 사용한다.
- ARM (anchor refinement module)
- Abstract, Introduction, Related Work
- ARM과 ODM에 대한 똑같은 설명
- TCB (transfer connection block) : ARM에서 ODM에게 Feature를 보내주는 모듈
- SSD -> DSSD (SSD+Deconvolution) -> DSOD(learn object detectors from ‘scratch’) -> Focal Loss, classification strategies(for class imbalance problem)

- Network Architecture
- 핵심은 이와 같다,
- TCB, ARM, ODM
- Two-step cascaded regression
- Negative anchor filtering
- transfer connection block (TCB)
- Eltw sum = sum them in the element-wise way
- ARM으로 부터 내려오는 Feature는 the feature maps associated with anchors(Anchor에 대한 정보를 담고 있는 feature) 라고 할 수 있다.
- Two-step cascaded regression
- 과거 모델들 단점 : the small objects 검출에 관한 낮은 성능
- ARM에서 Anchors의 size와 location을 조정한다!
- 하나의 cell에 n개의 anchor box를 할당한다. 각 cell에 대해 4개의 offset값, 2개의 confidence score(background=negative, foreground=positive) 값을 예측한다. (총 6개 값이 ARM에서 예측됨 = the refined anchor boxes feature)
- ODM에서는 각 cell에 대해서 c+4의 channel이 output으로 나오게 설정한다.
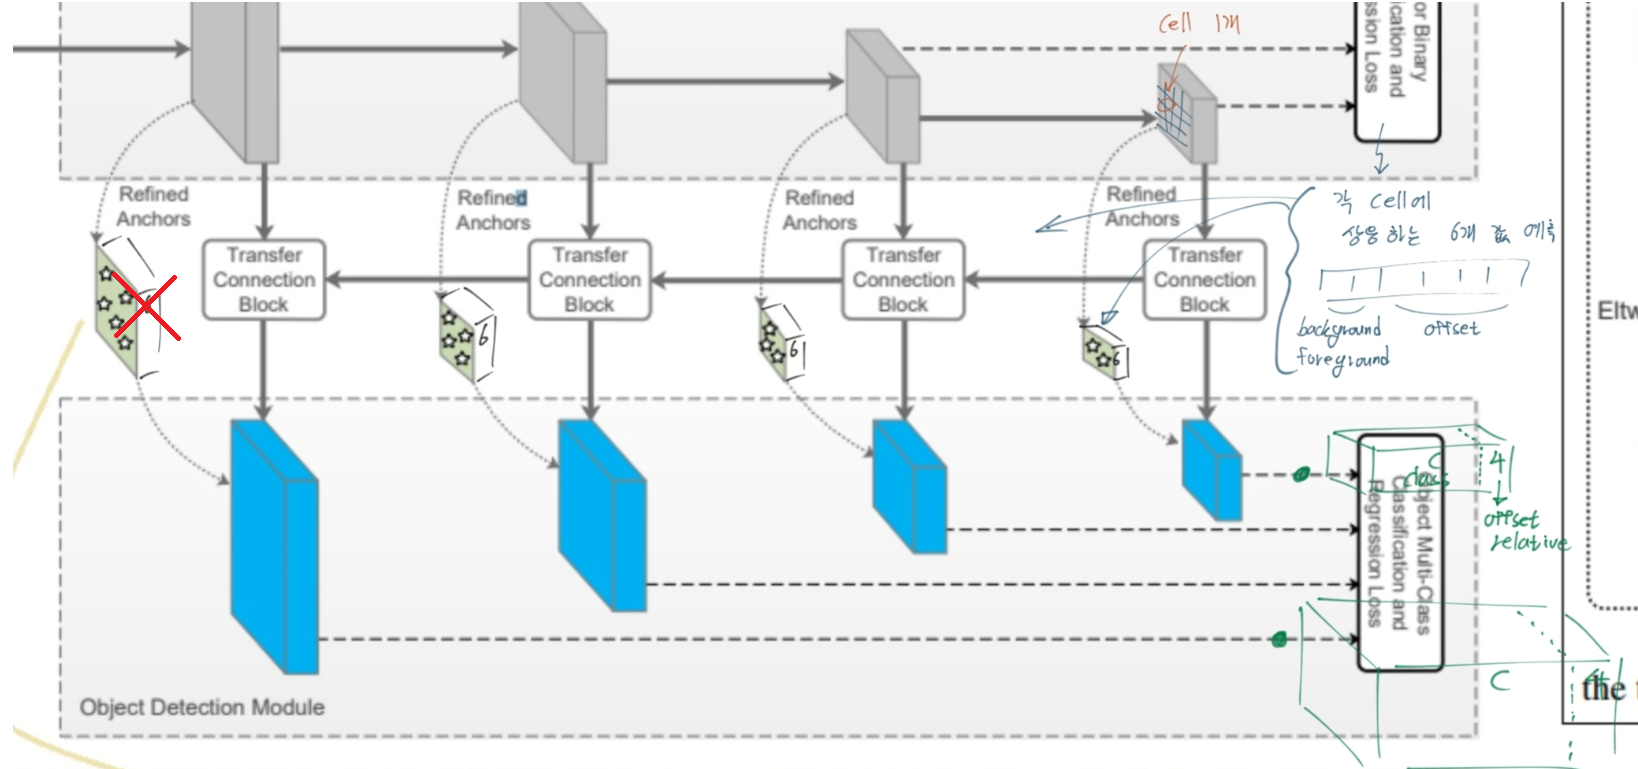
- 빨간색 X의 의미는 틀렸다는 의미다!! celadon parallelogram(청자색 평행사변형) 의 feature가 6 channel로 concat되는게 아니다. 코드를 확인해 보면 다음과 같이 설명할 수 있다.
- “ARM에서 만들어지는 변수 arm_loc, arm_conf는 loss를 계산하는데 사용된다. 이 Loss값을 줄이기 위해 arm_loc, arm_conf는 최대한 정답값에 가까워지기 위해 노력한다. 그 말은 ARM의 Feature map(코드에서 Source변수)들이, arm_loc, arm_conf이 정확하게 나오도록, 값이 유도된다는 뜻이다. 이 과정을 통해 ARM의 Feature map은 ODM에서 Localization, Detection을 하기 위해 필요한, 충분한 정보를 담게 된다는 것을 의미한다.”
- Negative Anchor Filtering
- 2개의 confidence score 중 negative 값이 일정 threshold(=0.99) 이상 보다 크면, ODM training 중에 사용하지 않는다. 이 과정에서 너무 많은 negative anchor가 제외되고, negative anchor box에 대한 loss값은 줄어든다. (Focal Loss 때의 Post 참조)
- inferene 동안에 negative값이 너무 커도, ODM에서의 detection값은 무시된다.
- 핵심은 이와 같다,
Training and Inference
Anchors Design and Matching
- stride : sizes 8, 16, 32, and 64 pixels
- scale : stride x 4
- ratios : three aspect ratios (i.e., 0.5, 1.0, and 2.0)
- GT와 the best overlap score를 가지는 Anchor box를 matching 시킨 후, 그리고 0.5이상의 IOU를 가진 Anchor box를 매칭 시켰다. (?) (그렇다면 Positive, Negative 값의 GT값이 무엇인지 궁금하다. 코드를 봤지만 나중에 필요하면 다시 찾아보는게 좋겠다.)
Hard Negative Mining
- 대부분의 ARM_confidence값이 큰 Negative를 가진다. 너무큰 Negative를 가지는 값은 ODM에서 나오는 c+4값은 무시된다. (즉 Negative값이 Focal loss나 objectness score로 사용된다.)
- training 에서 top loss를 만들어내는 Negative anchor에 대해서만 ODM 학습을 한다.(위의 설명처럼, 예측 negative값이 1에 가깝지 않을수록 negative anchor에 대한 loss가 커진다.) 거기다가 한술 더떠서 SSD의 hard Negative Mining기법을 사용해서, Negative : Positive의 비율을 3:1정도로 유지 되도록 anchor를 준비해 loss값을 계산한다.
Loss Function
ARM을 위한 Loss, ODM을 위한 Loss로 나뉜다.
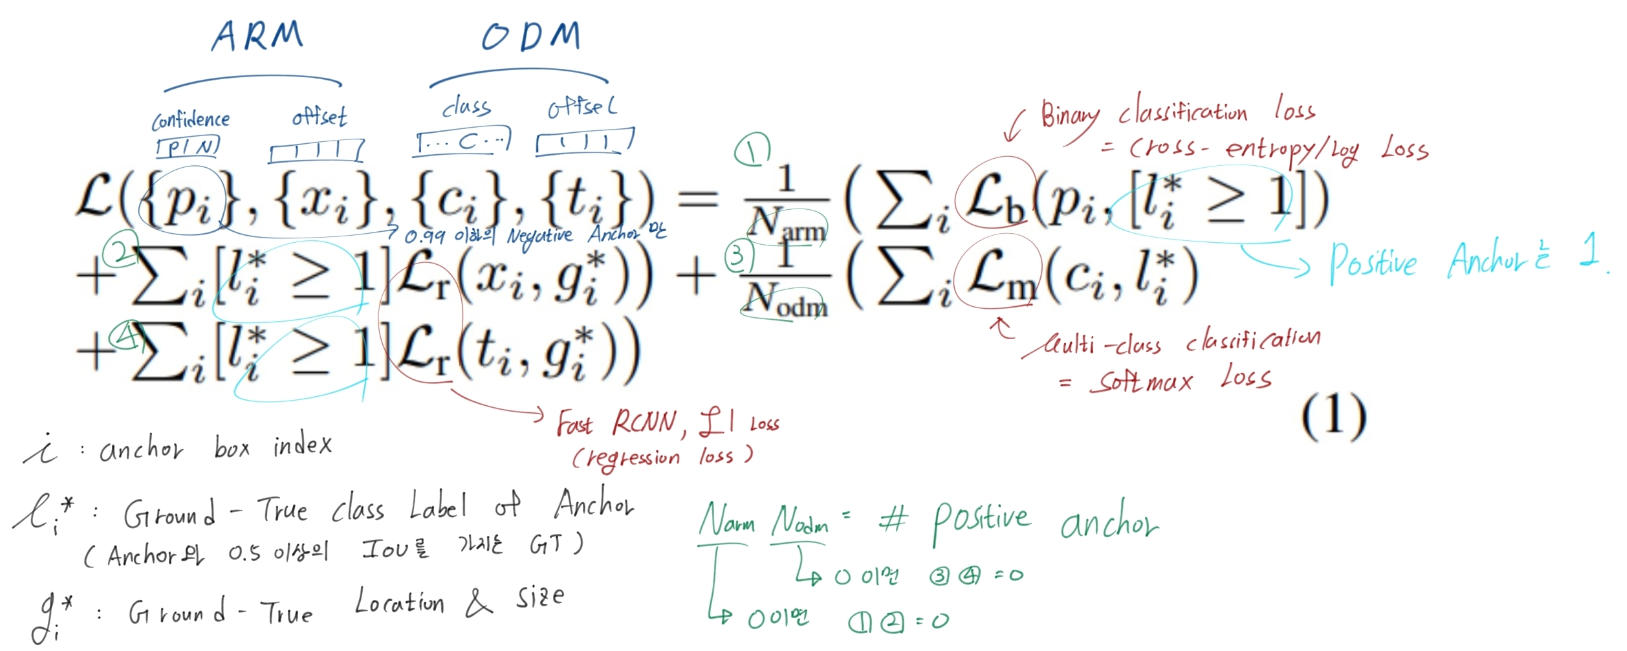
여기서 궁금한것은 (1)번 항에서 Negative(=background)와 Positive(=foreround)에 대한 모든 학습이 이뤄질텐데, 왜 Positive anchor갯수만 사용하는 N_arm으로 나누지? 코드를 봐도 그렇다. 이유는 모르겠다. 하지만 큰 의미는 없는 듯 하다.
num_pos = pos.long().sum(1, keepdim=True)
num_neg = torch.clamp(self.negpos_ratio*num_pos, max=pos.size(1)-1)

N = num_pos.data.sum().float()
#N = max(num_pos.data.sum().float(), 1)
loss_l /= N
loss_c /= N
Optimization
- the “xavier” method to randomly initialize
- batch size = 32
- SGD with 0.9 momentum and 0.0005 weight decay
- initial learning rate to 10−e
- use slightly different learning rate decay policy
Inference
- theta=0.99보다 큰 Negative를 가지는 conf는 ARM에 부터 제거 된다.
- ARM에서 anchor를 refine하고 그거를 다시 ODM에서 anchor refine한 값이 예측 Bounding Box 좌표
- Out으로 나오는 모~든 예측 Bounding box 중에서, confidence가 놓은 순서로 400개의 예측 box를 찾고, 그 400개에 대해서 NMS를 수행한다.
- 좀 더 정확한 사항은 ‘detection_refinedet.py-NMS수행’ 파일 참조. (논문에 이상하게 쓰여 있다)
Experiment
- 모든 데이터에 대해서, multi-scale testing 기법을 사용해서 더 좋은 결과를 얻었다. (블로그와 달리 이 논문에서는 multi-scale testing에 대한 설명은 하나도 없다. “그냥 썼다.”가 끝이다. 몇배를 어떻게 하고~ 에 대한 이야기는 없다. )
luuuyi/RefineDet.PyTorch
Github Link : luuuyi/RefineDet.PyTorch
모듈화가 적어서 아주 이해하기 쉬운 코드
RefineDet.PyTorch/models/refinedet.py
class RefineDet(nn.Module):
    """
    sources = list() : VGG를 통과하고 나오는 중간중간의 faeture map들
    tcb_source = list() : Source에서 (ARM처리를 일단 하고) TCB처리를 하고 나오는 feature map
    arm_loc = list()
    arm_conf = list()
    odm_loc = list()
    odm_conf = list()

	(A)1 내가 신기한것은 odm_loc를 계산한는데, arm_loc를 절대 사용하지 않는다. [(A)2,(A)3 이어서...]
    """
    def __init__(...):
    	self.detect = Detect_RefineDet(num_classes, self.size, ...)
        # arm, odm, tcb 구현에 필요한 layer 등록
    def forward(self, x):
        # 84 ~ 103 Line : Sources 변수에 VGG Conv2D 통과+계산해서 값 넣기
        # 106 ~ 129 Line : ARM처리하고 arm_loc, arm_conf 만들어 내고, tcb_source 변수에 값 넣기
        # 131 ~ 149 Line : ODM처리하고 odm_loc, odm_conf 만들어 넣기
        # 139 ~ ... Line : 아래와 같이 arm_loc, arm_conf, odm_loc, odm_conf 최종값 return 하기
        if self.phase == "test":
            output = self.detect(
                    arm_loc.view(arm_loc.size(0), -1, 4),           # arm loc preds
                    self.softmax(arm_conf.view(arm_conf.size(0), -1,
                                 2)),                               # arm conf preds
                    odm_loc.view(odm_loc.size(0), -1, 4),           # odm loc preds
                    self.softmax(odm_conf.view(odm_conf.size(0), -1,
                                 self.num_classes)),                # odm conf preds
                    self.priors.type(type(x.data))                  # default boxes
                ) # 정제된 값을 결과로 주세요! (최종 Bounding Box, What max conf class)
        else:
            output = (
                    arm_loc.view(arm_loc.size(0), -1, 4),
                    arm_conf.view(arm_conf.size(0), -1, 2),
                    odm_loc.view(odm_loc.size(0), -1, 4),
                    odm_conf.view(odm_conf.size(0), -1, self.num_classes),
                    self.priors # anchor box의 가장 기본 위치 저장되어 있음
                )
        returne output
RefineDet.PyTorch/layers/functions/detection_refinedet.py
class Detect_RefineDet(Function):
    """
    Decode predictions into bboxes.
    test시에 나오는 결과 값은 c+4개 confidence, localization 값이 아니다.
    이렇게 결과를 내보내면 사용자는 이게 뭔 값인지 절대 모른다.
	따라서 max confidnence class값이 무엇인지, 최종 예측 bounding box가 무엇인지 정제해서 값을 던져주어야 한다. 이 클래스는 그런 역할을 한다.

	(A)3 그러면서 Detect_RefineDet함수가 돌아갈때는 '기본 Anchor위치에 arm_loc를 먼저 적용하고, 그 다음에 odm_loc를 적용해서 나오는 예측 bounding box 값'을 정답값으로 사용한다.
    """
    for i in range(num):
        default = decode(arm_loc_data[i], prior_data, self.variance)
     default = center_size(default)
        decoded_boxes = decode(loc_data[i], default, self.variance)
RefineDet.PyTorch/train_refinedet.py
def train():
    """
    (A)2 loss를 계산할 때, '기본 Anchor위치에 arm_loc를 먼저 적용하고, 그 다음에 odm_loc를 적용해서 나오는 예측 bounding box 값'을 가지고 loss를 계산하는 줄 알고 코드를 확인해 봤더니... 그것도 아니다. (내가 잘 못찾는 거일 수도 있다.)
    """
    refinedet_net = build_refinedet('train', cfg['min_dim'], cfg['num_classes'])

    arm_criterion = RefineDetMultiBoxLoss(2, 0.5, True, ...)
    odm_criterion = RefineDetMultiBoxLoss(cfg['num_classes'], 0.5, True, ...)

    net = refinedet_net
    out = net(images)

    optimizer.zero_grad()
    # RefineDetMultiBoxLoss 가 정의된 refinedet_multibox_loss.py 파일을 보면 (A)2 결론을 내릴 수 있다.
    arm_loss_l, arm_loss_c = arm_criterion(out, targets)
    odm_loss_l, odm_loss_c = odm_criterion(out, targets)

    arm_loss = arm_loss_l + arm_loss_c
 odm_loss = odm_loss_l + odm_loss_c
    loss = arm_loss + odm_loss
 loss.backward()
RefineDet.PyTorch/eval_refinedet.py
if __name__ == '__main__':
    net = build_refinedet('test', int(args.input_size), num_classes)
    test_net(args.save_folder, net, args.cuda ...)

def test_net(save_folder, net, cuda, dataset, transform, top_k, ...)
    detections = net(x).data
RefineDet.PyTorch/layers/modules/refinedet_multibox_loss.py
# 구체적으로 설명할 수 없지만, 궁금한게 Loss함수에 많이 구현되어 있다. 자주 볼거다.
defaults = priors.data # Anchor들이 '이미지 위'에 위치하는 위치()를 정확하게 적어놓은 값.
if self.use_ARM:
    refine_match(self.threshold, truths, defaults, self.variance, labels,
                 loc_t, conf_t, idx, arm_loc_data[idx].data)
else:
    refine_match(self.threshold, truths, defaults, self.variance, labels,
                     loc_t, conf_t, idx)
RefineDet.PyTorch/layers/box_utils.py
def refine_match(threshold, truths, priors, variances, ...):
    """
    (A)4 내가 (A)2에서 했던 말이 맞았다!!
    loss를 계산할 때, refine_match라는 함수를 통해서 만약 ODM에 대한 odm_loc_data를 계산하고 싶다면, priors 위치를 한번 arm_loc_data로 offset refine한 후, 다시 odm_loc_data로 offset refine하고 나서 원래 GT-bounding box 위치랑 비교를 한다.
    이 함수에서 그러한 작업을 수행한다.
    """
-
