【Detection】Understanding M2Det paper w/ code, my advice
논문 : M2Det: A Single-Shot Object Detector based on Multi-Level Feature Pyramid Network
분류 : Object Detection
저자 : Qijie Zhao , Tao Sheng , Yongtao Wang∗ , Zhi Tang
읽는 배경 : Recognition Basic. Understand confusing and ambiguous things.
읽으면서 생각할 포인트 : 코드와 함께 최대한 완벽히 이해하기. 이해한 것 정확히 기록해두기.
느낀점 :
- 최근 논문을 많이 읽어서 느끼는 점은, 각 논문은 특별한 목표가 1,2개 있다. (예를 들어 Cascade는 close false positive 객체를 줄이기 위함이 목표이고, FPN는 Multi-scale object detect를 목적으로 한다.) 그리고 그 목표 달성을 위해, 이전 신경망들의 정확한 문제점을 파악한다. 그 문제점을 해결하기 위해 새로운 아이디어를 첨가한다. Cascade에서 배운 것 처럼, 복잡한 아이디어를 마구 넣는다고 성능이 좋아지지 않는다. 핵심은 목표를 확실히 잡고, 문제점을 확실히 분석하고, 그것을 해결하기 위해 아이디어를 넣어보는 일렬이 과정이 정말 중요한 것 같다.
- 가장 이해하기 쉽게 씌여져 있는 논문 같다. 문법이나 용어가 쉽고, 같은 단어가 많이 반복되서 나에게는 너무 편했다. 또한 그림도 이미 완벽해서 더이상 다른 논문 글로 이해할 필요가 없었다. 이런 논문이 Top-Conference논문이 아니라, AAAI 논문이라는게 조금 아쉽다.
1. M2Det Paper Review
1. Conclusoin
- Multi-Level Feature Pyramid Network (MLFPN) for different scales
- New modules
- Multi-lebel features by Feature Fusion Module (FFM v1)
- Thinned U-shape Modules (TUMs) + Fature Fusion Modules (FFM v2s)
- multi-level multi-scale features (= 즉! the decoder layers of each TUM)
- multi-level multi-scale features With the same scale (size) by a Scale-wise Feature Aggregation Module (SFAM)
- SOTA Among the one-stage detectors on MS-COCO
2. Abstract, Introduction
- Scale-variation problem -> FPN for originally classification tast
- MLFPN construct more effective feature pyramids then FPN for Objec Detection tast
3.Introduction
- conventional method for Scale variation
- image pyramid at only testing time -> memory, computational complexity 증가
- feature pyramid at both training and testing phases
- SSD, FPN 등등은 for originally classification(backbone이니까) tast -> 한계가 존재한다.
- 그냥 backbone 중간에서 나온 형태 이용 - 정보 불충분 - object detection 하기 위해 정보 불충분
- FPN의 p1, p2, p3는 Single-Level Feature 이다. 우리 처럼 Multi-Level Feature Pyramid가 아니다.
- Low level feature -> simple appearances // high-level feature -> complex appearances. 유사한 scale의 객체는 complex appearances로써 구별되어야 하는데, Single-Level Feature로는 충분하지 않다.
- Related Work : Faster R-CNN, MS-CNN, SSD, FPN, DSSD, YOLOv3, RetinaNet, RefineDet

- 우리의 진짜 목적은 effective feature pyramid for detecting objects of different scales 이다.
- 우리 모델은 위의 한계를 해결한다. 어차피 뒤에 똑같은 내용 또 나올 듯.
4. Proposed Method
- 꼭 아래의 그림을 새탭으로 열어서 이미지를 확대해서 볼 것. 논문에 있는 내용 중 중요한 내용은 모두 담았다. 정성스럽게 그림에 그리고 필기해놨으니, 정성스럽게 참고하고 공부하기.
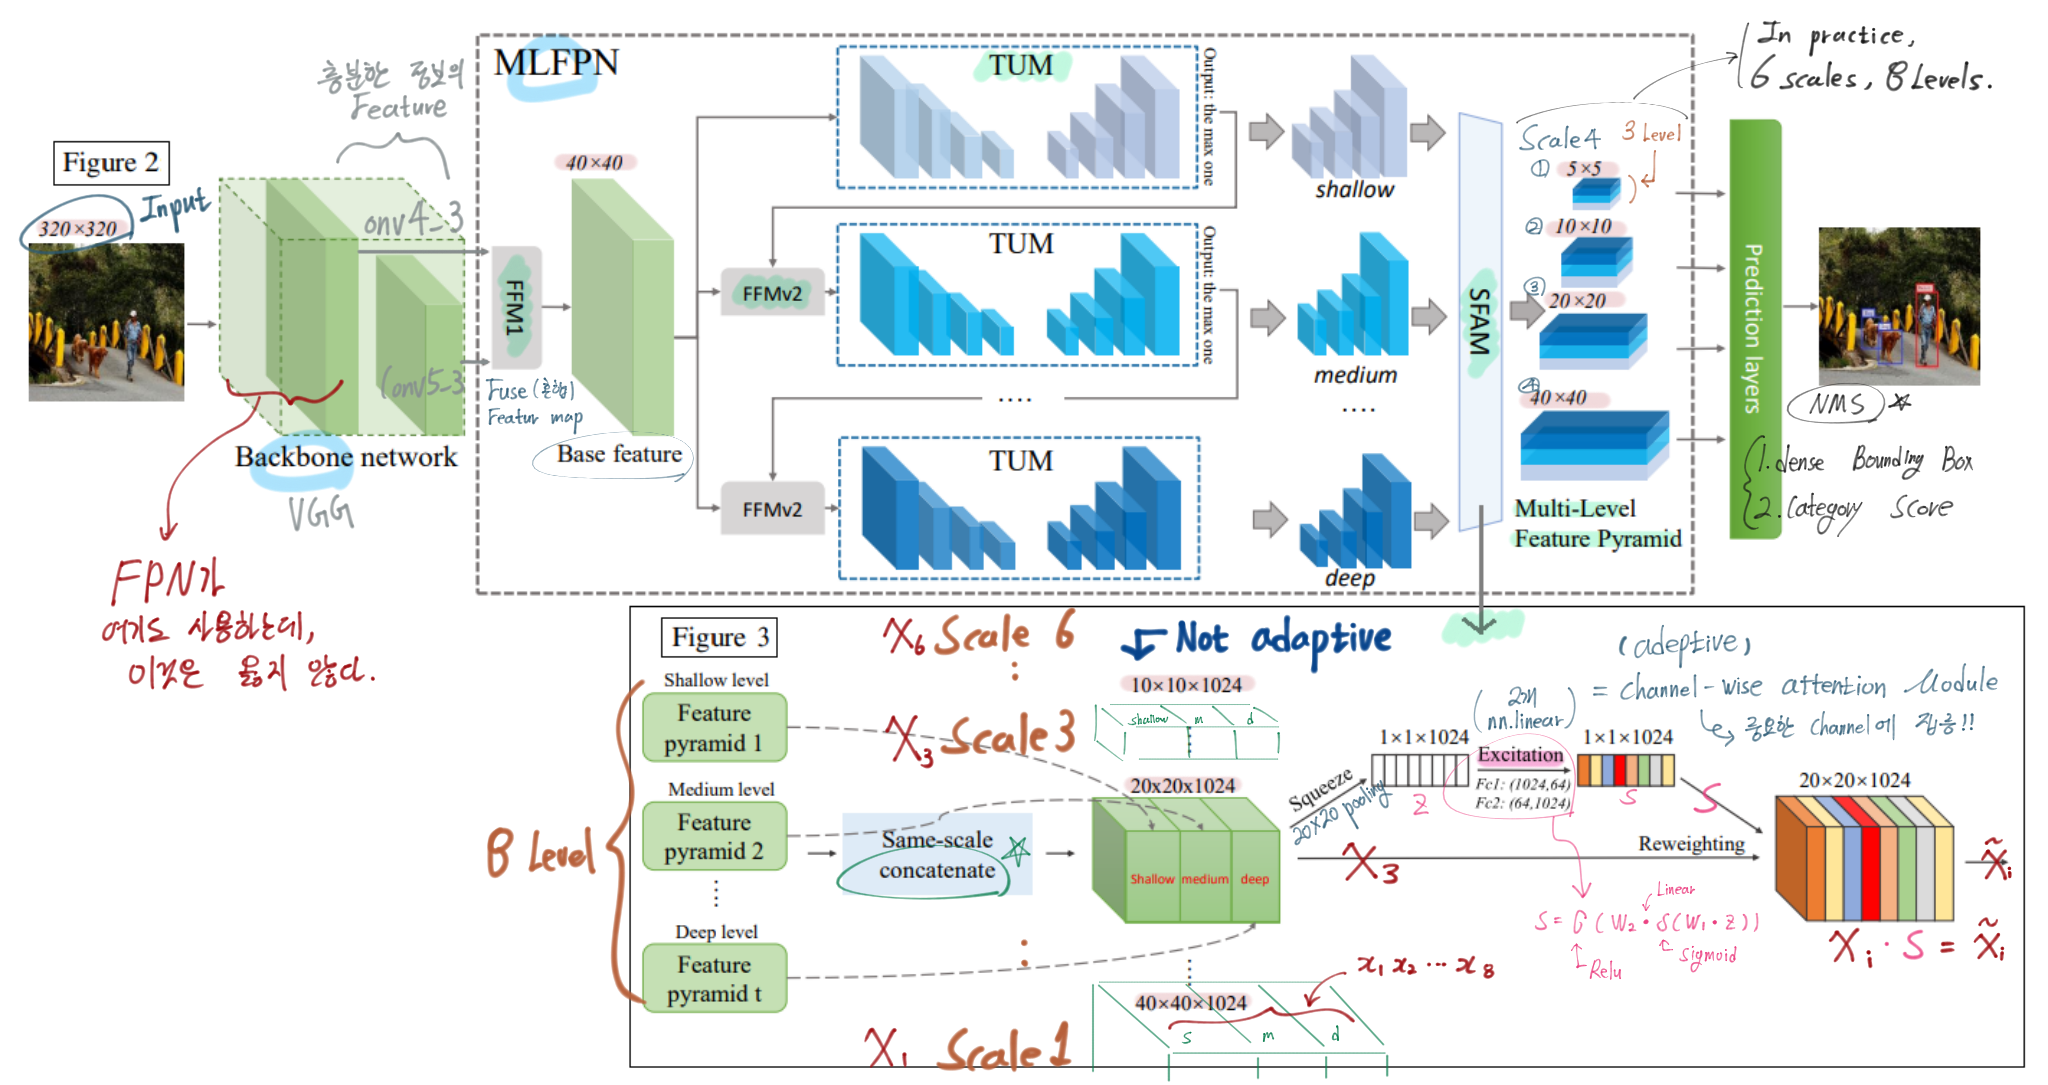
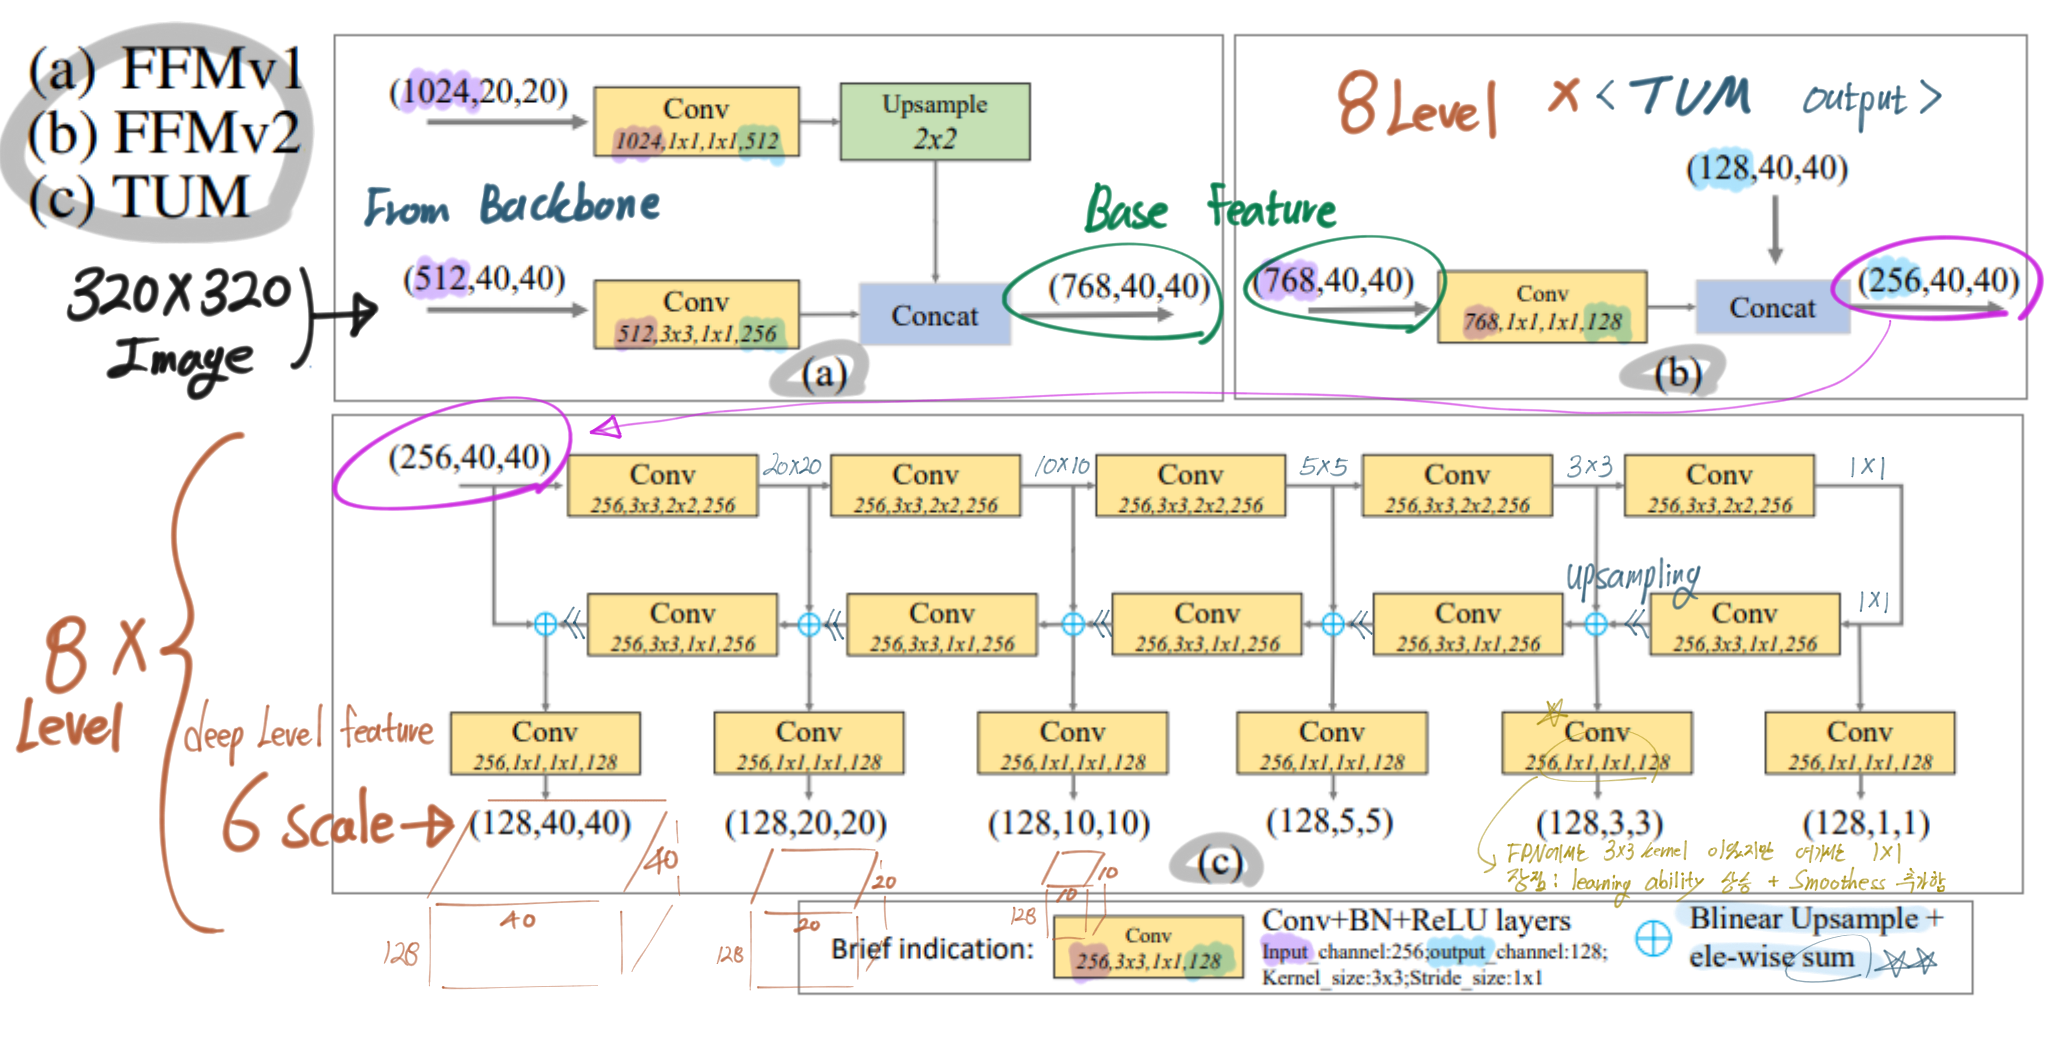
- MLFPN 내용 추가
- FFMv1 : VGG에서 나오는 2개의 semantic Feature map 융합. FPN은 여기서 low feature map data를 사용하는데, 이건 충분한 정보가 아니다. 그 feature map은 classification을 위한 feature이지, object detection을 위한 feature이 아니다.
- TUM : several feature maps 생성
- first TUM : learn from X_base only. AND second … third.. 8th.

- L = # Levels, (=8) = # TUM. 어찌보면 여기가 진짜 FPN와 유사한 작업이 수행된다.
- 마지막에 1x1 conv를 수행해서, smoothness를 추가한다.
- SFAM
- Channel-wise Attention Module (Hu, Shen, and Sun 2017)
- In order to Encourage features to focus on channels (that they benefit most) - 가장 중요한 channel에 집중!
- global average pooling 그리고 excitation step(2개의 nn.Linear Layer)
- Channel-wise Attention Module (Hu, Shen, and Sun 2017)
- Network Configurations
- To reduce the number of parameters, FFMv2를 통과하고 나오는 Channel을 256으로 설정했다. 이 덕분에 GPU로 학습하기 쉬워졌다.
- Original input size는 320, 512, 800 을 받을 수 있게 설정하였다.
- Detection Stage
- 6 scale 즉 Multi-Level Feature Pyramid에서, 2개의 Convolution layer를 통과시켜서, location regression and classification 정보를 얻어 내었다.
- default(anchor) boxes 설정 방법은 SSD를 따랐다. (2개 size + 3개 ratios = 6 Anchor).
- 코드에 의하면, 마지막에 objectness score같은거 사용 안함. 딱 4 * 6 + self.num_classes * 6 값만 나옴.
- Anchor 중에서 (objectness score) 0.05이하의 anchor들은 low score로써 Filter out 시켜버렸다. (아에 Backgound라고 판단하여 이 Anchor로는 학 및 추론에 사용을 안해버리는 방법. 이 작업만으로도 많은 Negative Anchor들을 필터링 할 수 있다고 함.)
- 근데.. 코드를 봤는데 위와 같이 objectness score와 같은 것도 없다. 이상하다. Detect최종 결과에는 위의 (4+#class) x 6 개의 정보 밖에 없다. 그리고 0.05를 기준으로 특별하게 하는 작업도 없다. 0.05를 github repository에서 검색해보면 아무 정보도 없다. 대신 Negative Mining을 적극적으로 사용한다.
- 0.01까지 낮춰 보았지만, 너무 많은 detection results발생으로, inference time에 영향을 크게 주어서 0.05를 사용하였다.
- 그리고 Input size가 800x800이면, scale ranges를 6에서 조금 더 늘렸다.
- 더 정확하게 BB를 남기기 위해서, soft-NMS (Bodla et al. 2017) 를 사용했다.
5. Experiments
- Implementation details
- 5 epoch -> learning rate : 2 × 10^−3
- 2 × 10⁻⁴ and 2 × 10⁻⁵ 까지 감소 그리고 150 epochs에서 stop
- Image 320, 512 size -> Titan X GPUs / Image 800 size -> NVIDIA Tesla V100
- batch size : 32
- VGG-16 backbone 5일 학습, ResNet-101 backbone 6일 학습
- Comparison with State-of-the-art
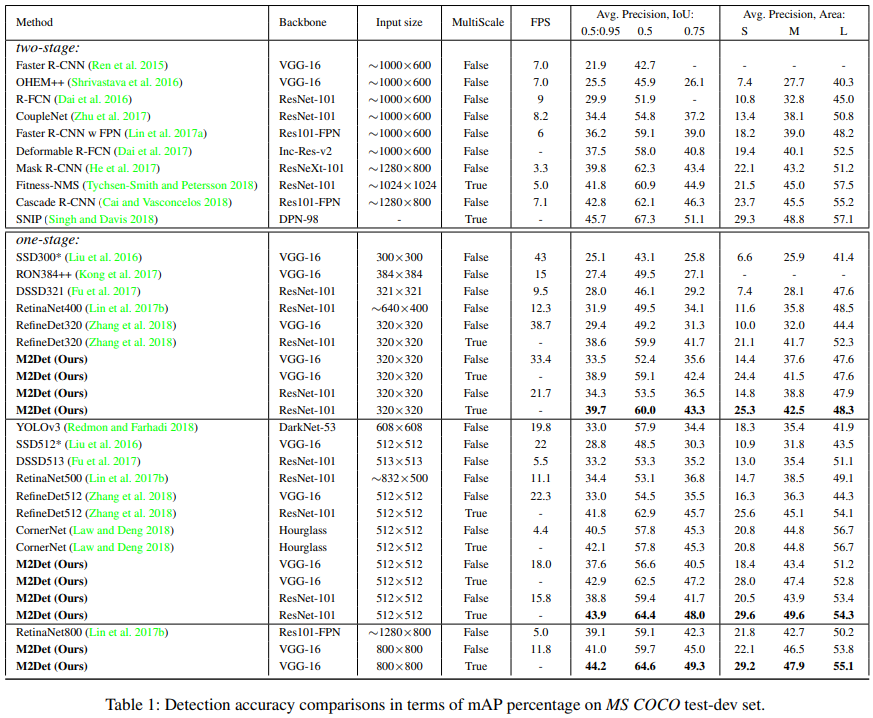
- 성능 비교 표를 보면 확실히 성능은 좋다. 특히나 Small object에 대해서 아주 성능이 좋은 것을 알 수 있다. 다만.. FPS가 좀 떨어진다. 320에서 30, 512에서 15, 800에서 10정도 나온다.
- 특히나 Multi Scale test를 사용하면 훨씬 좋은 성능이 나오는 것을 확인할 수 있었다.
- M2Det가 매우 깊은 depth때문에 좋은 성능이 나오는 것만은 아니라고 한다. 파라미터수를 비교해보면 M2Det 800은 147M이다. ResNetXt-101-32x8d-FPN은 205M, Mask R-CNN은 s 201M parameters인 것과 비교해보면 파라메터 수는 적당하다고 한다.
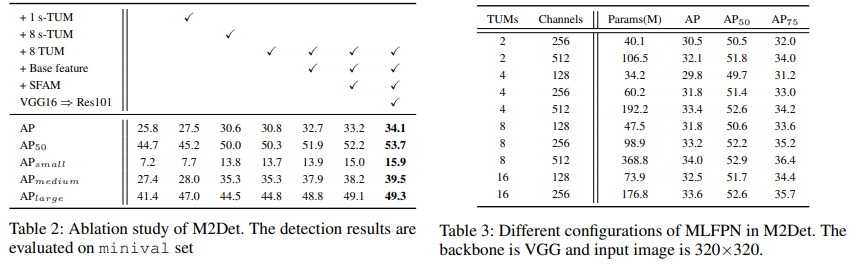
- Ablation study
- Speed
- VGG16- reduced 사용. better speed-accuracy.

- Discussion
- 우리꺼 좋다ㅇㅇ. 라고 말하는 중.
2. qijiezhao/M2Det
Github Link : qijiezhao/M2Det - 저자가 직접 pytorch사용해서 모델 구현
논문의 내용이 충분히 자세했기 때문에… 논문 이해가 잘 안되서 코드에서 찾아보고 싶은 부분이 없다. 위의 논문 내용을 어떻게 구현했는지 코드구현 공부로써는 엄청 좋을 것 같다. torch를 공부하는 개념으로…
적당한 모듈화가 아주 잘 되어 있다.
M2Det/configs/CC.py : config 파일 제작 클래스를 아주 간단하게 직접 제작
class ConfigDict(Dict):
    def __setattr__(self, name, value):
        if isinstance(value, dict):
            value = ConfigDict(value)
        self._cfg_dict.__setattr__(name, value)

        # 이런 함수도 직접 제작함 따라서
        # setattr(self, key, value) 이런식의 함수 사용도 가능.
M2Det/m2det.py : 신경망 구현의 핵심 틀이 다 들어 있음.
"""
from layers.nn_utils import * 에 TUM, SFAM와 같은 핵심 모듈이 구현되어 있있음
여기서 함수를 그대로 가져와서 모델 구현에 사용
"""
class M2Det(nn.Module):

def build_net(phase='train', size=320, config = None):
	return M2Det(phase, size, config)
M2Det/layers/modules/multibox_loss.p
class MultiBoxLoss(nn.Module):
    """
	1. (default threshold: 0.5) 로써 IOU 0.5이상의 BB만을
    Positive로 판단. 나머지는 다 Negative .
    2. Hard negative mining to filter the excessive number of negative examples
    """
negative mining은 어떻게 구현 및 사용한건지는 다음에 필요하면 찾아보자. layers/modules/multibox_loss.py#L94
class MultiBoxLoss(nn.Module):
    """SSD Weighted Loss Function
    Compute Targets:
        1) Produce Confidence Target Indices by matching  ground truth boxes
           with (default) 'priorboxes' that have jaccard index > threshold parameter
           (default threshold: 0.5).
        2) Produce localization target by 'encoding' variance into offsets of ground
           truth boxes and their matched  'priorboxes'.
        3) Hard negative mining to filter the excessive number of negative examples
           that comes with using a large number of default bounding boxes.
           (default negative:positive ratio 3:1)
     """
	# Hard Negative Mining
    loss_c[pos.view(-1,1)] = 0 # filter out pos boxes for now
    loss_c = loss_c.view(num, -1)
    _,loss_idx = loss_c.sort(1, descending=True)
    _,idx_rank = loss_idx.sort(1)
    num_pos = pos.long().sum(1,keepdim=True)
    num_neg = torch.clamp(self.negpos_ratio*num_pos, max=pos.size(1)-1)
    neg = idx_rank < num_neg.expand_as(idx_rank)

# MultiBoxLoss 를 reference하는 코드 부분
# M2Det/utils/core.py
def set_criterion(cfg):
    return MultiBoxLoss(cfg.model.m2det_config.num_classes,
                        overlap_thresh = cfg.loss.overlap_thresh,
                        prior_for_matching = cfg.loss.prior_for_matching,
                        bkg_label = cfg.loss.bkg_label,
                        neg_mining = cfg.loss.neg_mining,
                        neg_pos = cfg.loss.neg_pos,
                        neg_overlap = cfg.loss.neg_overlap,
                        encode_target = cfg.loss.encode_target)
