【Detection】Understanding RetinaNet paper with code
분류 : Object Detection
저자 : Tsung-Yi Lin, Priya Goyal (Facebook AI Research (FAIR))
읽는 배경 : Recognition Basic. Understand confusing and ambiguous things.
읽으면서 생각할 포인트 : 코드와 함께 최대한 완벽히 이해하기. 이해한 것 정확히 기록해두기.
내 블로그 관련 Post : RetinaNet - Focal Loss, FPN
느낀점 :
- 이번에 참고한 코드가 너무 쉽게 잘 되어 있어서 맘에 든다. SSD에서는 Anchor생성을 위해 s라는 개념을 사용했는데, 이 코드와 논문에서는 s의 개념을 사용하지 않는다.
- 그래서 이 anchor 사이즈가 적당한거야? 라는 생각이 들긴 한다. 이 정도 anchor사이즈면 이미지에 어느정도 크기로 (anchor box를) 대보는거지? 라는 생각이 들지만 굳이 그런 수학적 계산을 할 시간은 없다.
- 역시 논문만 봐서는 자세하게 이해못하는게 당연하다. 코드를 봐야 이해가 된다.
1. RetinaNet
- Abstract, Introduction, Related Work
- Class Imbalance :
- one-stage detector는 너무 많은 candidate location을 추론한다.(Faster-RCNN에서는 RPN에서 한번 거리고, 마지막 regression에서 한번 거리즈만..) 하지만 극히 일부만 진짜 object가 들어 있다. 이 이유는 2가지 이다.
- (1) most locations are easy negatives(backgorund 혹은 크고 선병한 객체)-학습에 도움 안됨 (2) the easy negatives가 학습을 압도한다.
- Class Imbalance문제를 focal loss를 사용해서 naturally, handle 하고 자 한다.
- robust loss 라는 방식은 hard example의 loss를 더욱 키우는 방식이지만, focal loss에서는 반대이다. easy example의 loss를 아주 작게 만든다.
- Class Imbalance :
- Focal Loss

- γ는 2~5값을 사용했고, α는 balanced variable 이다. Focal loss의 정확한 형태(정확한 하이퍼파라메터값)은 중요하지 않다. 적당한 어떤 값이하도 효율적으로 작동한다.
- for γ = 2, α = 0.25 works best
- RetinaNet Detector
- 이 논문의 핵심은 Forcal Loss. to eliminates the accuracy gap between easy and hard examples. 따라서 Architecture는 아주 simple.
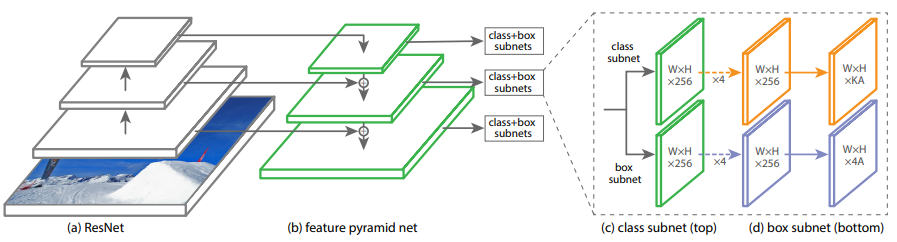
- (c) subnet에 들어갈 Channels = 256 and # Anchor = 9. 그리고 Ryramid간의 parameter share는 안한다.
- Anchors
- On pyramid levels P3 to P7, areas of 32^2 to 512^2 개의 cell에 각각 Anchor가 적용된다.
- Cover the scale range 32 - 813 pixels
- ratios {1:2, 1:1, 2:1}. sizes {2 0 , 2 1/3 , 2 2/3 } -> 9 anchors
- Each anchor -> K of object classes + 4 of box regression target
- loss 계산 위해서
- IoU threshold of 0.5 이상 -> 객체를 가진 Anchor로 판단.
- IoU threshold of 0.4 이하 -> background로 판단
- 1개의 Anchor에서는 많아 봤자 1개의 객체만 검출 -> 한 cell에 대한 multi 객체 탐색 안함
- SSD에서 공부한 것 처럼, anchor에 대해서 GT box로 가기 위해서 어떻게 늘리고 이동해야하는지에 대한 localization 값을 구하기 위해서 Anchor를 사용한다.
- Box Regression Subnet
- 각 Anchor에 대해서 4개의 값을 예측해야 한다. (box가 얼마나 이동해야 하는 regression offset값)
- the purpose of regressing the offset(=the relative offset) from (1) each anchor box to (2) a nearby ground-truth object
- classification subnet과 regression subnet은 구조를 완전히 같이 사용하지만, 파라미터 공유 안함
2. yhenon/pytorch-retinanet
진짜 잘 만든 코드가 “누구든 쉽게 이해 가능한 코드“라면, 정말 잘 만든 코드이다.
lufficc/SSD가 모듈화를 아주 잘 해놓은 코드라고 하지만, 너무 복잡하다. 차라리 이 패키지가 공부하기 아주 좋다.
pytorch-retinanet/retinanet/losses.py : class FocalLoss(nn.Module):
class FocalLoss(nn.Module):
    def forward(self, classifications, regressions, anchors, annotations):
        # predict한 classifications, regressions 결과가 parameter로 들어온다.
        # annotation에 Ground True값이 들어온다.
        alpha = 0.25
        gamma = 2.0
        classification_losses = []
        regression_losses = [] # 나중에 이 loss를 모아서 return

        # 1. compute the loss - 이미지에 객체가 하나도 없을 때

        # 2. compute the loss for classification
        focal_weight = alpha_factor * torch.pow(focal_weight, gamma)
        bce = -(targets * torch.log(classification) + (1.0 - targets) * torch.log(1.0 - classification)) # object, background 모두. targets =[1,0]
        cls_loss = focal_weight * bce

        # 3. compute the loss for regression
        """ L127 ~ L160까지 Anchor box와 GT와의 regression 계산 과정(SSDw/codePost 참조)= target"""
        regression_diff = torch.abs(targets - regression[positive_indices, :])
        regression_loss = torch.where(torch.le(regression_diff, 1.0 / 9.0),  0.5 * 9.0 * torch.pow(regression_diff, 2), regression_diff - 0.5 / 9.0 )

        return torch.stack(classification_losses).mean(dim=0, keepdim=True), torch.stack(regression_losses).mean(dim=0, keepdim=True)
pytorch-retinanet/retinanet/model.py
class PyramidFeatures(nn.Module):# 너무 간단해서 놀랍다.class RegressionModel(nn.Module):# 정말 위의 이미지와 똑같은 5 layer convclass ClassificationModel(nn.Module):# 정말 위의 이미지와 똑같은 5 layer convclass ResNet(nn.Module):- self._make_layer를 완벽하게 정의하여 아주 깔끔.
- RetinaNet이라는 class없다. 이거 자체가 ResNet이다.
def resnet<18,34,50,101,152>(num_classes, pretrained=False, **kwargs):위에서 정의한 class ResNet을 사용한다.
train.py, validation.py 에서 아래와 같이 RetinaNet을 호출한다.
from retinanet import model retinanet = model.resnet50(num_classes=dataset_val.num_classes(), pretrained=True) # retinanet = model.resnet<101,152>(num_classes=dataset_train.num_classes(), pretrained=True)- train.py, validation.py 여기의 코드도 optimizer와 reschedule의 사용을 아주 아름답고 간단하게 했기 때문에, 나중에 꼭 참고하면 좋을 듯 하다.
pytorch-retinanet/retinanet/anchors.py
def generate_anchors(base_size=16, ratios=None, scales=None):
    """
    scales : [   1,   1.259,   1.5874 ]
    ratios : [ 0.5,       1,        2 ]
    base_size : anchor box 한변의 길이
    		= self.sizes = [2 ** (x + 2) for x in self.pyramid_levels(=[3, 4, 5, 6, 7])]
    """
    return (x1, y1, x2, y2) 형태의 9개의 anchors (9 x 4 행렬)

class Anchors(nn.Module):
    def forward(self, image):
        image_shape = np.array(image_shape)
        image_shapes = [(image_shape + 2 ** x - 1) // (2 ** x) for x in self.pyramid_levels] # backbone을 통과하고 나오는 feature map size
        return 이미지 위에 올라갈 모든 Anchor들이 좌표값이 반환된다. 큰것부터 작은것까지.
그리고 model.py의
class ResNet(nn.Module):에서 다음과 같이 사용된다.class ResNet(nn.Module): self.anchors = Anchors() def forward(self, inputs): anchors = self.anchors(img_batch) return self.focalLoss(classification, regression, anchors, annotations)- 잘.. 생각해보면 별거 없다.
