【Pytorch】 DETR code teardown reports / 핵심 배운점 2개
- DETR github : https://github.com/facebookresearch/detr
- Remarks
- Dockerfile 제공 (사용하지 말기)
- Demo code 제공
- 한글 주석 포함 github 링크
- https://github.com/junha1125/DETR-with-Kcomment
- data 폴더 제외 cp 명령하기
$ cd ~/DETR-with-Kcomment && rsync -av --progress /workspace/* ./ --exclude 'coco'
- 의문 정리 (검색하기)
demo에서 0.1을 왜 곱해주지??
coco_evaluator를 어떻게 사용하는건지 패스했다. 나중에 공부해보자.multihead attention에서 width height가 계속 다르게 들어가는데, W(linear)를 어떻게 학습시키지? linear도 input, output dimension을 고정시켜줘야 할 텐데…
굳이 이해하려 하지말고,
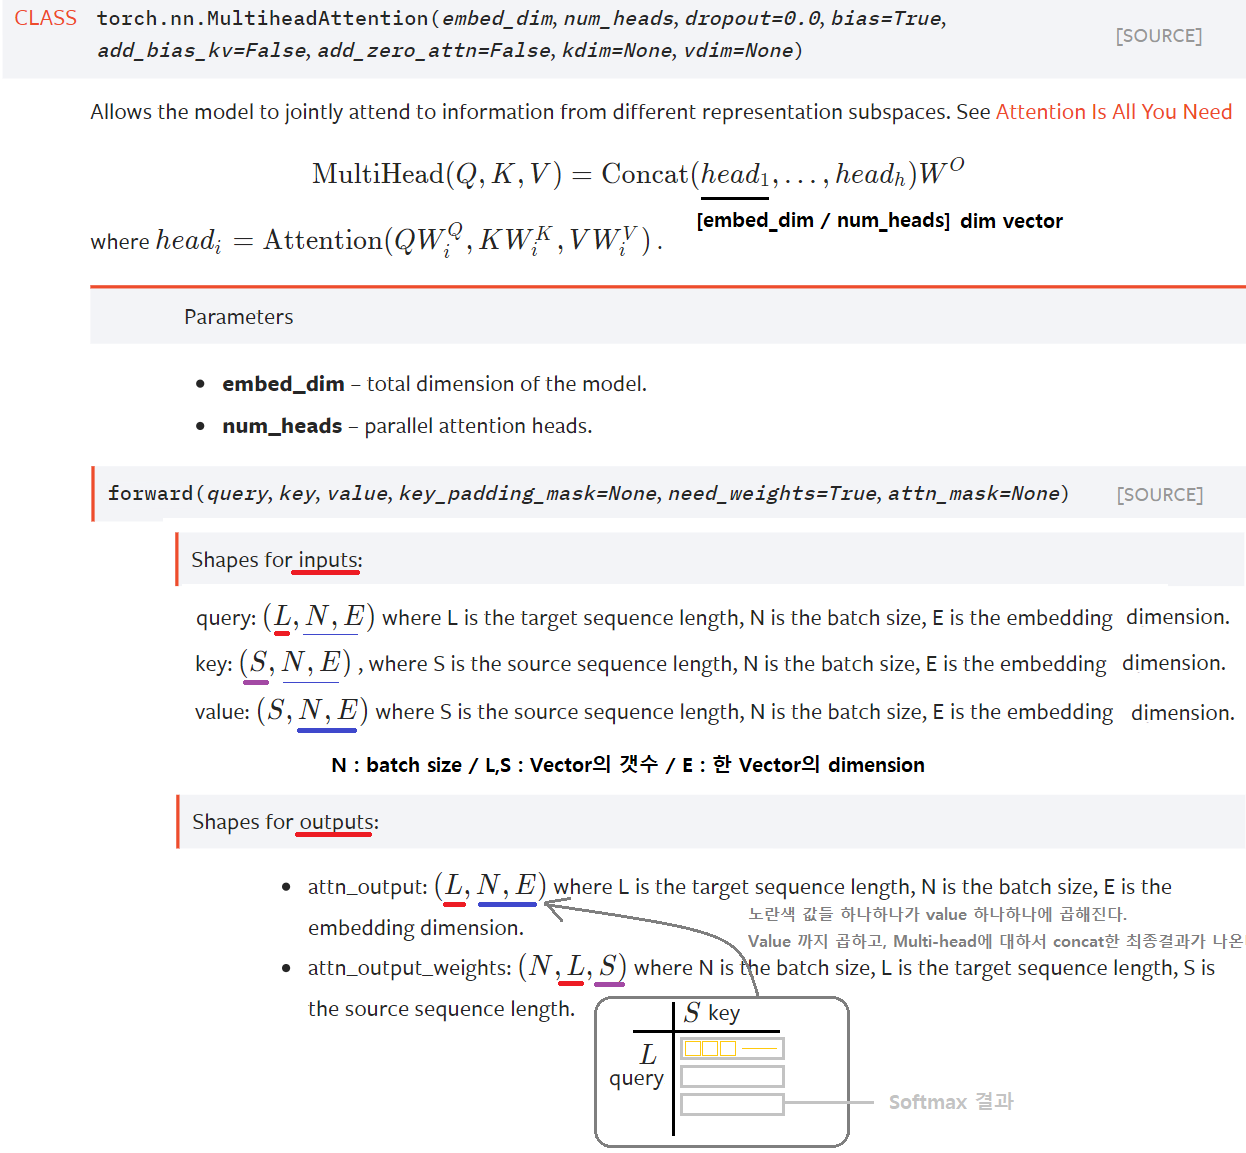
torch.nn.MULTIHEADATTENTION그대로 사용하자.vector의 갯수는 상관없다. 그냥 key, value 적당한 차원으로 넣어주면 된다.
예를 들어서 아래와 같은 코드가 있다. 아래에 주석 참조!
class TransformerEncoderLayer(nn.Module):
    def __init__(self, d_model=512, nhead=8, dim_feedforward=2048, dropout=0.1,
                 activation="relu", normalize_before=False):
        super().__init__()
        self.self_attn = nn.MultiheadAttention(d_model, nhead, dropout=dropout)
        self.linear1 = nn.Linear(d_model, dim_feedforward)
        # (512 -> 2048) x (feature_map width x height) 이 모든 것에 같은 linear 연산이 이뤄진다.
        # self.linear1의 weight.shape = 512x2048

    def forward_post(self,
        q = k = self.with_pos_embed(src, pos)
        src2, score = self.self_attn(q, k, value=src, attn_mask=src_mask,
                              key_padding_mask=src_key_padding_mask)
        src = src + self.dropout1(src2)
        src = self.norm1(src)
        # 2. Feed Forward
        src2 = self.linear2(self.dropout(self.activation(self.linear1(src))))
의문 해결
- detr.py에
num_classes = 91 if args.dataset_file != 'coco' else 20를num_classes = 20 if args.dataset_file != 'coco' else 91로 바꾸면, 왜 main.py 에서 디버깅 실행하면from models import build_model에서 에러가 나는 거지? 에러내용은 아래 사진 (해결 - 반성하자)
- detr.py에
추신
- 아래의 목차 순서 잘 분리해놓았으니, 무시하지 말고 꼭 신경쓰기
0. 핵심 배운점
0.1 디버깅 배운점 (1)
- 나의 현재 문제점
- 코드(main.py)를 처음부터 똑바로 안봤다. torch.utils.data.dataset이 아니라, build_dataset이었는데.. 아무 생각 없이 패스했다.
- dataloader의 파라미터 중에서 collate_fu이 정말 중요했는데, 이것도 무시했다.
- 이건* 나중에 보자!라는 마음으로 패스하고, 나중에 그걸* 안봐서 너무 힘들었다.
- 내가 지금 뭐하지는 모르고 계속 했던거 또하고 했던거 또했다.
- 해결책
- 정말 하나하나! 꼼꼼히! 순서대로! 부셔야 한다.
- 그냥 아무 생각없이 디버깅 하기 전에 아래의 방법** 중 지금의 에러를 해결하기 위해 사용해야하는 방법이 무엇인지 진지하게 생각하고! 들어가자. 손부터 움직이지 말고 머리를 쓰자.
- 좌절하지 말자. 포기하지 말자. 할 수 있다. 아자아자
- 최적의 디버깅 방법**이 무엇인가?
- 코드 직접 수정하기
- pdb 이용하기 / pdb의 interact 이용하기
- python debuger 이용하기 / Watch, Debug console이용하기
- 코드 전체에서 (특정 클래스, 함수) 검색해보기 / VScode의 define(F12)과 reference(shift+F12) 잘 이용하기
- (위의 방법 섞기)
- 코드를 직접 수정하기 + pdb이용하기
- 코드를 직접 수정하기 + Python debuger를 이용하기
- 신경망에 있어서 디버깅 방법
- __init__ 과 forward가 실행되는 시간 차는 매우 다르다. 따라서 분리해서 생각하도록 하자.
- forward는
for x,y in data_loader:이후에 실행이 된다. 그 이전에 model을 build하는 과정에서는 모두 __init__만 실행된다.
- 추가 꿀팁
- 뭔가 안된다면, worker = 1 로 해놓고 디버깅 할 것.
- 왜 안되는지 앞으로 따라가 보고, 앞으로 따라가도 모르겠으면
- 뒤로 가야한다. 뒤로가서 무엇을 하고 나서 이상이 생긴건지.
0.2 개발자로써 배운점 (2)
- 4일 동안 DETR 코드를 하나하나 씹어먹으며 공부하다가, 결국 나는 아래와 같은 큰~~!! 깨달음을 얻었다.
- 코딩 공부는 고등학교 시험공부, 대학교 시험공부 처럼 하는게 아니다.
- Just Do It. 뭐든 만들어 보고, 뭐든 시도해봐야한다. (by nomadcoders 니꼬쌤 . 나의 동기, 선배님!)
- 따라서! 아래와 같은 생각은 틀렸다. 그냥 100프로 틀렸다.
- 모든 것 하나하나 다 부셔버리고, 다 알고 넘어가야 한다.
- 기초부터 차근차근 모두 다 알아야 한다.
- 나중에 내가 스스로 만들 수 있게 충분히 이해해야 한다.
- 언젠간 내가 처음부터 끝까지 만들 수 있어야 한다.
- 이게 아니고! 아래와 같이 생각하는게 정답이다. 이게 무조건 맞다. 100프로 이다.
- 그냥 사용할 수 있으면 장땡이다. 대충 그런것 같은데… 라고 input 넣어서 원하는 output 얻었으면 끝! 더 이상 볼 필요도 없다.
- 왜냐면 어차피 그 함수, 프레임워크 미친듯이 공부하고 완벽히 이해했다고 해도, 곧! 언젠가! 그 함수 프레임워크 보다 좋은게 나온다.
- 그럼 내가 기초부터 쌓았다고 좋아했던 모든 시간들이 쓰레기가 된다.
- 개발자는 기초 따위는 중요하지 않다. 파이썬 쓰면서 C언어 안 보잖아. numpy쓰면서 그 안에 어떻게 돌아가는지 몰라도 되잖아. 기초가 중요하다는 소리는 이제 나에게 필요없는 소리다.
- 빨리 무언가 만들어보고 실험해보는 자세가 앞으로 개발자로써 내가 가져야 하는 진짜 자세이다.
- 패키지는 내가 만드는게 아니다. 내가 해야할 것은 남이 만든 패키지를 이리저리 섞는 것이다. 남이 만든 패키지도 결국 누군가가 만들어 놓은 것을 융합해놓은 것일 뿐이다.
- ‘이러한 기능을 하는 함수/클래스가 필요한데..’ 라는 생각이 들면, 패키지를 처음부터 끝까지 공부하면서 그 함수/클래스를 찾아야 하는게 아니라, 많은 패키지에서 그 함수와 클래스를 (랜덤적으로 뒤져보면서) 결국 찾아내서 사용하기만 하면 끝이다.
- 정신 차려라 개발자가 기초를 생각하기엔 쇠퇴 및 발전 속도는 미치도록 빠르다.
1. detr_demo.py. Inference 흐름 따라가기
Error 해결
$ pip install torch==1.5.0+cu101 torchvision==0.6.0+cu101 -f https://download.pytorch.org/whl/torch_stable.html
# docker Image 그대로 사용했어야 했다. requirements.txt가 개세끼다
$ conda install -c conda-forge ipywidgets
$ pip install pdbpp
주요 코드 설명
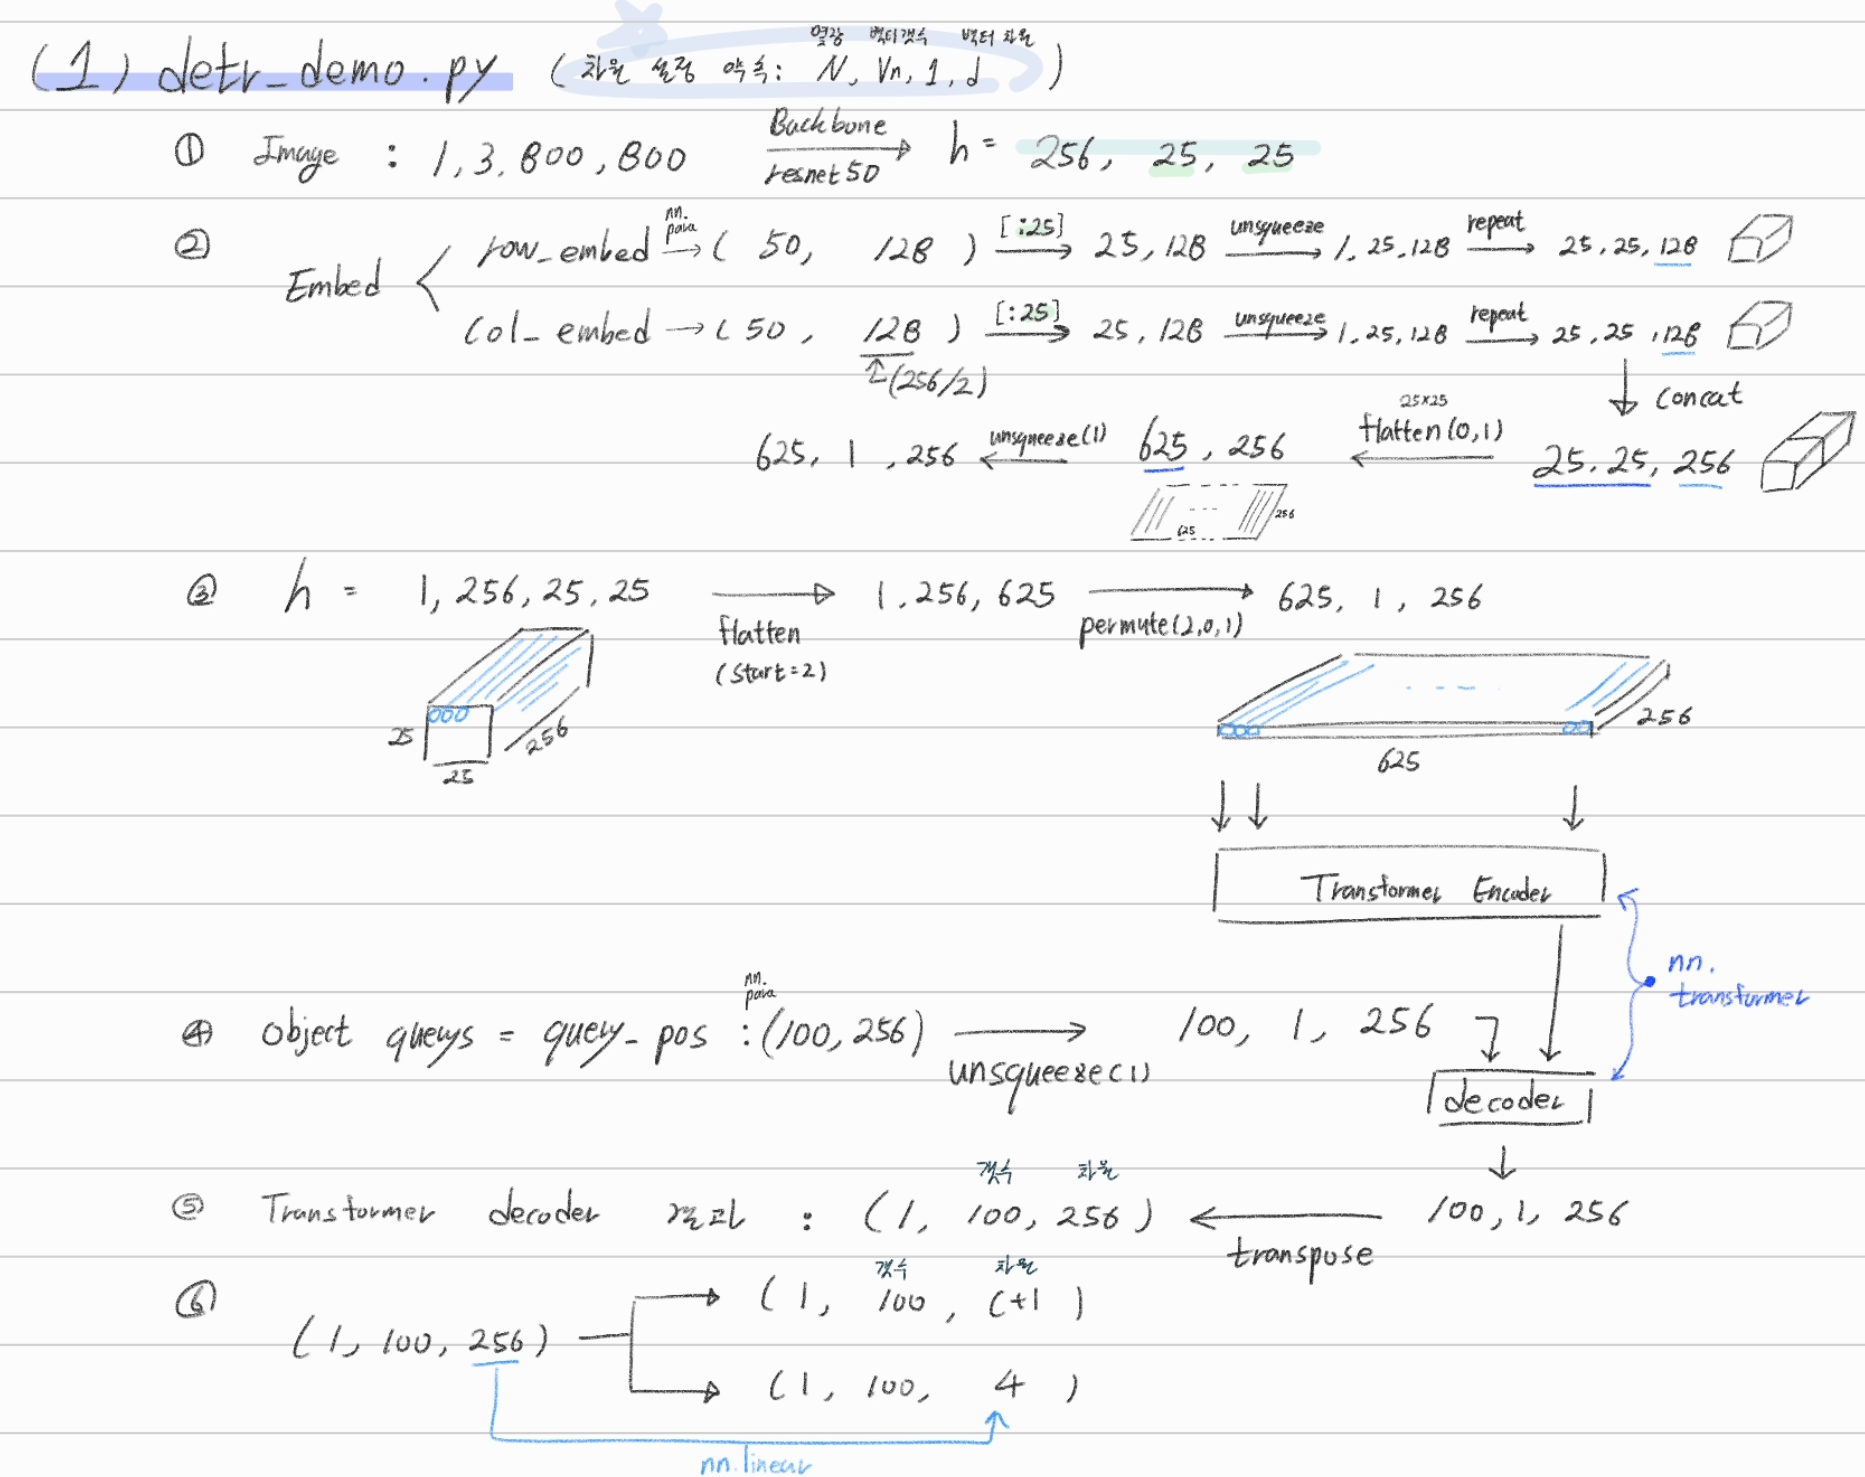
h = self.transformer(pos + 0.1 * h.flatten(2).permute(2, 0, 1), self.query_pos.unsqueeze(1)).transpose(0, 1)- 위의 transformer 함수 내부 : (
(625, 1, 256) + 0.1 * (625(갯수), 1, 256(백터),(100, 1 ,256)) : 0.1을 왜 곱해주지?? - transformer ouput :
(100, 1 ,256) - h.shape : (by transpose) :
(1, 100, 256)
- 위의 transformer 함수 내부 : (
이 코드는 nn.transformer를 그대로 사용하기 때문에.. 여기서 그만 공부..
2. Evaluation. Inference 흐름 따라가기
main.py는 train.py 코드도 되고, test.py 코드도 된다.--eval옵션만 넣고 빼주면 된다.
[Terminal]
$ python main.py \
		--batch_size 1\
        --no_aux_loss\
        --eval\
        --resume https://dl.fbaipublicfiles.com/detr/detr-r50-e632da11.pth
        --coco_path /workspace/coco # /path/to/coco

$ python main.py \
       	--batch_size 2\
        --no_aux_loss\
        --eval\
        --resume checkpoints/detr-r50-e632da11.pth\
        --num_workers 4\
        --world_size 2\
        --coco_path /dataset/coco\
        --output_dir result

[Vscode Debugging]
# ./vscode/launch.json
"args" : ["--batch_size", "2",
        "--no_aux_loss",
        "--eval",
        "--resume", "checkpoints/detr-r50-e632da11.pth",
        "--num_workers", "4",
        "--world_size", "2",
        "--coco_path", "/dataset/coco",
        "--output_dir", "result"]
2.0 main.py 분석해보기
print(args)- Namespace(aux_loss=False, backbone='resnet50', batch_size=1, bbox_loss_coef=5, clip_max_norm=0.1, coco_panoptic_path=None, coco_path='/workspace/coco', dataset_file='coco', dec_layers=6, device='cuda', dice_loss_coef=1, dilation=False, dim_feedforward=2048, dist_url='env://', distributed=False, dropout=0.1, enc_layers=6, eos_coef=0.1, epochs=300, eval=True, frozen_weights=None, giou_loss_coef=2, hidden_dim=256, lr=0.0001, lr_backbone=1e-05, lr_drop=200, mask_loss_coef=1, masks=False, nheads=8, num_queries=100, num_workers=2, output_dir='', position_embedding='sine', pre_norm=False, remove_difficult=False, resume='https://dl.fbaipublicfiles.com/detr/detr-r50-e632da11.pth', seed=42, set_cost_bbox=5, set_cost_class=1, set_cost_giou=2, start_epoch=0, weight_decay=0.0001, world_size=1)코드 순서 요약하기
- args 설정 및 seed 설정
- model, criterion, postprocessors = build_model(args)
- 총 파라메터 갯수 계산 하기
- backbone / Transformer-encoder, decoder / detector head 각각의 learning rate를 다르게 주기
- optimizer와 lr_scheduler 설정
- data_loader 만들어 주기 - 1. dataset 정의 , 2. batchSampler 정의
- coco_api 를 사용한 dataset validation = evaluate AP 계산하는 방법
- Model Parameters load 하기(1) - frozen_weights 경로가 있을 경우 (= panoptic segmentaion 모듈만 학습시키고 싶은 경우)
- Model Parameters load 하기(2.1) - Evaluate 하기 위한 파라메터
- Model Parameters load 하기(2.2) - Train 하기 위한 파라메터
- Evaluation만 하고 코드 종료(return) (1) model infernece하기 (2) coco api로 AP 구하기
- If args.eval=False 이라면, 바로 위 코드 안하고, Traiining 시작하기
2.1 datasets/coco.py /build_dataset()
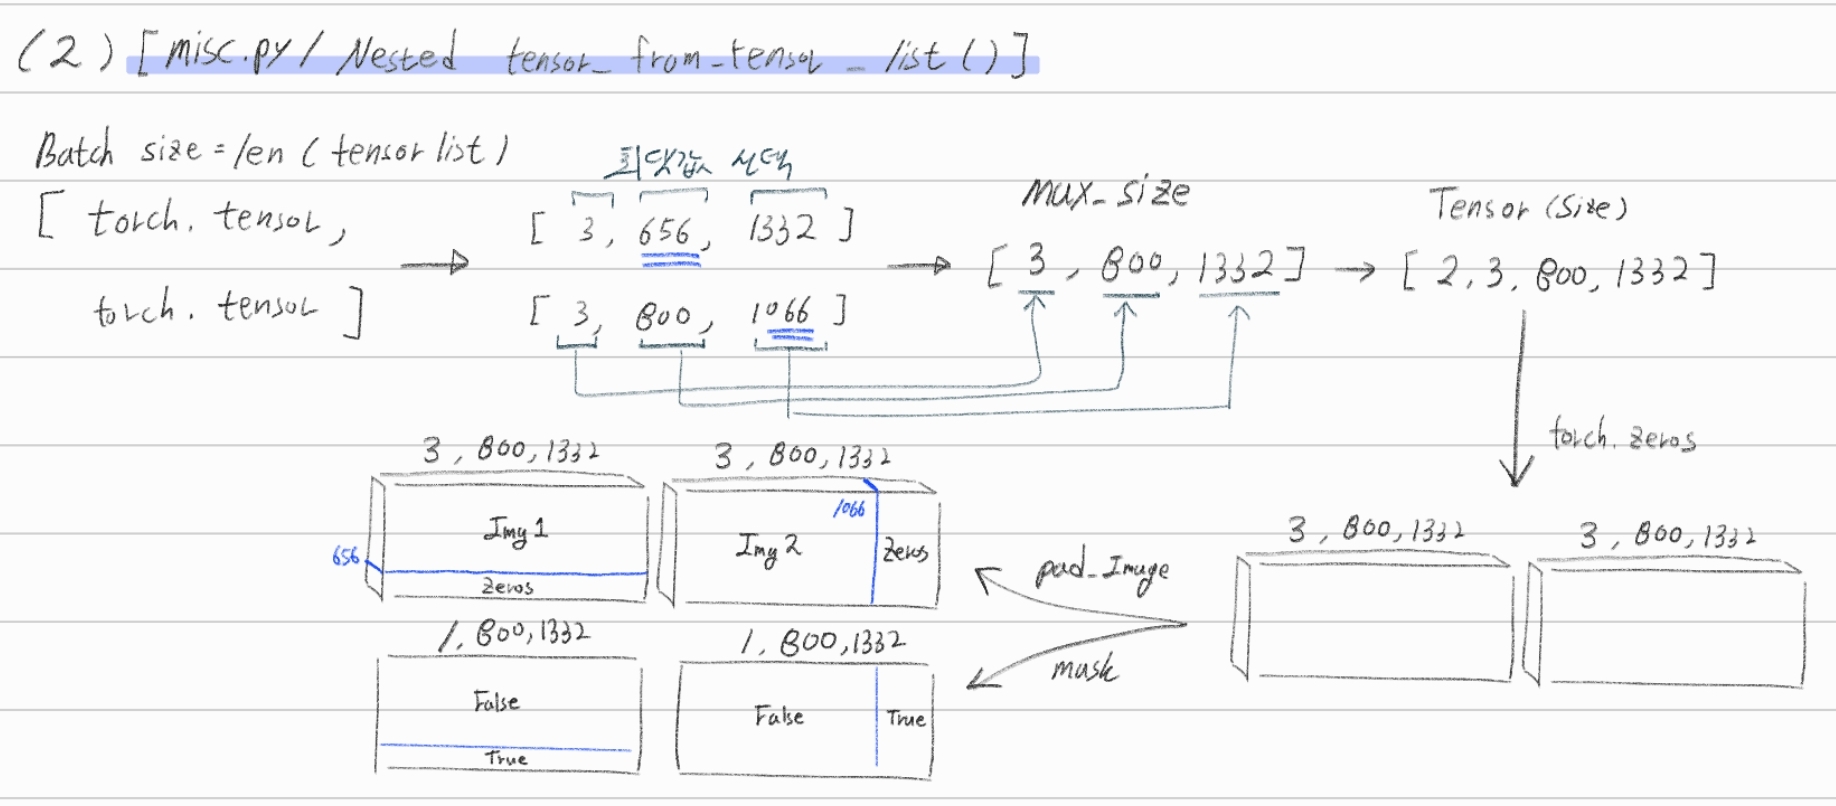
torchvision.datasets.CocoDetection를 상속한다. (링크) 여기서!target_transform가 의미하는 것은, (Image, label) 쌍에서 image augmentation만해주는게 아니라, label에 대한 변형(agumentation)까지도 해주는 것을 의미한다.dataset/coco.py안의make_coco_transforms함수에서Transforms(agumentation)을 정의한다. 이때dataset/transforms.py에 정한 Transformer만을 사용한다. 여기서Transforms(agumentation)을 정의하는 것을 보면, 다 공통적으로 아래와 같은 구조이다. 따라서 내가 구현하고 싶은 Agumentation이 존재한다면 참고해서 만들도록 하자.class New_Transformer_Name(object): def __init__(self, p=0.5): # just 맴버 변수 정의 def __call__(self, img, target=None): return img, targetBackbone에 이미지가 들어가기 전에, DataLoader에서 나오는 변수의 타입이 type(Image, label) = (torch.tensor, dict) 이었다가 (NestedTensor, dict) 으로 바뀐다. 그 이유는 torch.utils.dataloader의 파라메터인
collate_fn=utils.collate_fn덕분이다.dataset_val에는 build_dataset()으로 부터 받은
torch.utils.dataset클래스이다. 따라서 transforms가 적용된 후!collate_fu이 적용되는 것이다.## main.py 아래의 collate_fn=utils.collate_fn !! 덕분이다. data_loader_val = DataLoader(dataset_val, args.batch_size, sampler=sampler_val, drop_last=False, collate_fn=utils.collate_fn, num_workers=args.num_workers) ## util/misc.py def collate_fn(batch): # batch[0] : len이 batch_size인 tuple. Image 정보 들어가 있다. batch[0][0]에는 torch tensor가 들어가 있다. # batch[1] : len이 batch_size인 tuple. label 정보 들어가 있다. batch[1][0]에는 dict()가 들어가 있다. dict_keys(['boxes', 'labels', 'image_id', 'area', 'iscrowd', 'orig_size', 'size']) batch = list(zip(*batch)) batch[0] = nested_tensor_from_tensor_list(batch[0]) return tuple(batch) def nested_tensor_from_tensor_list(tensor_list: List[Tensor]): return NestedTensor(tensor, mask) ## datasets/transforms.py def resize(image, target, size, max_size=None): """ 이미지에서 (w,h 중) 작은 쪽을 size(val일때 800) 크기로 변환해준다. 작은 쪽을 800으로 변한해서 큰쪽이 max_size보다 커치면, 큰쪽이 max_size가 되도록 이미지를 변환한다. """collate_fn함수는misc.py의 Nested_tensor_from_tensor_list()함수에 의해서 정의 되어있다.
2.2 models/detr.py
- 아래로 내려가면서, 함수가 호출된다. build에서 핵심적인 내용반 뽑았다.
# main.py
from models import build_model
model, criterion, postprocessors = build_model(args)

# models/detr.py
def build(args):
    backbone = build_backbone(args)
    transformer = build_transformer(args)
    model = DETR(backbone, transformer, num_classes=num_classes, num_queries=args.num_queries, aux_loss=args.aux_loss)
    matcher = build_matcher(args)
    criterion = SetCriterion(num_classes, matcher=matcher, weight_dict=weight_dict, eos_coef=args.eos_coef, losses=losses)
    postprocessors = {'bbox': PostProcess()}
    return model, criterion, postprocessors
따라서 아래의 과정을 따라서 차근차근 공부해나갈 예정이다.
- build_dataset()
- build_backbone()
- build_transformer()
- model = DETR()
- build_matcher()
- SetCriterion()
- PostProcess()
2.2.1 models/position_encoding.py /build_position_encoding()
- 2가지 방법 embeding 방법이 존재한다.]
- Leaned - Positional Embeding
nn.Embedding,nn.init.uniform_를 사용해서 row_embed, col_embed 변수 정의하기pos = torch.cat([x_emb.unsqueeze(0).repeat(h, 1, 1),y_emb.unsqueeze(1).repeat(1, w, 1)], dim=-1).permute(2, 0, 1).unsqueeze(0).repeat(x.shape[0], 1, 1, 1)- (demo) 최종 pos의 shape : (N장, 256, 25, 25) 여기서 25는 feature map의 width, hight
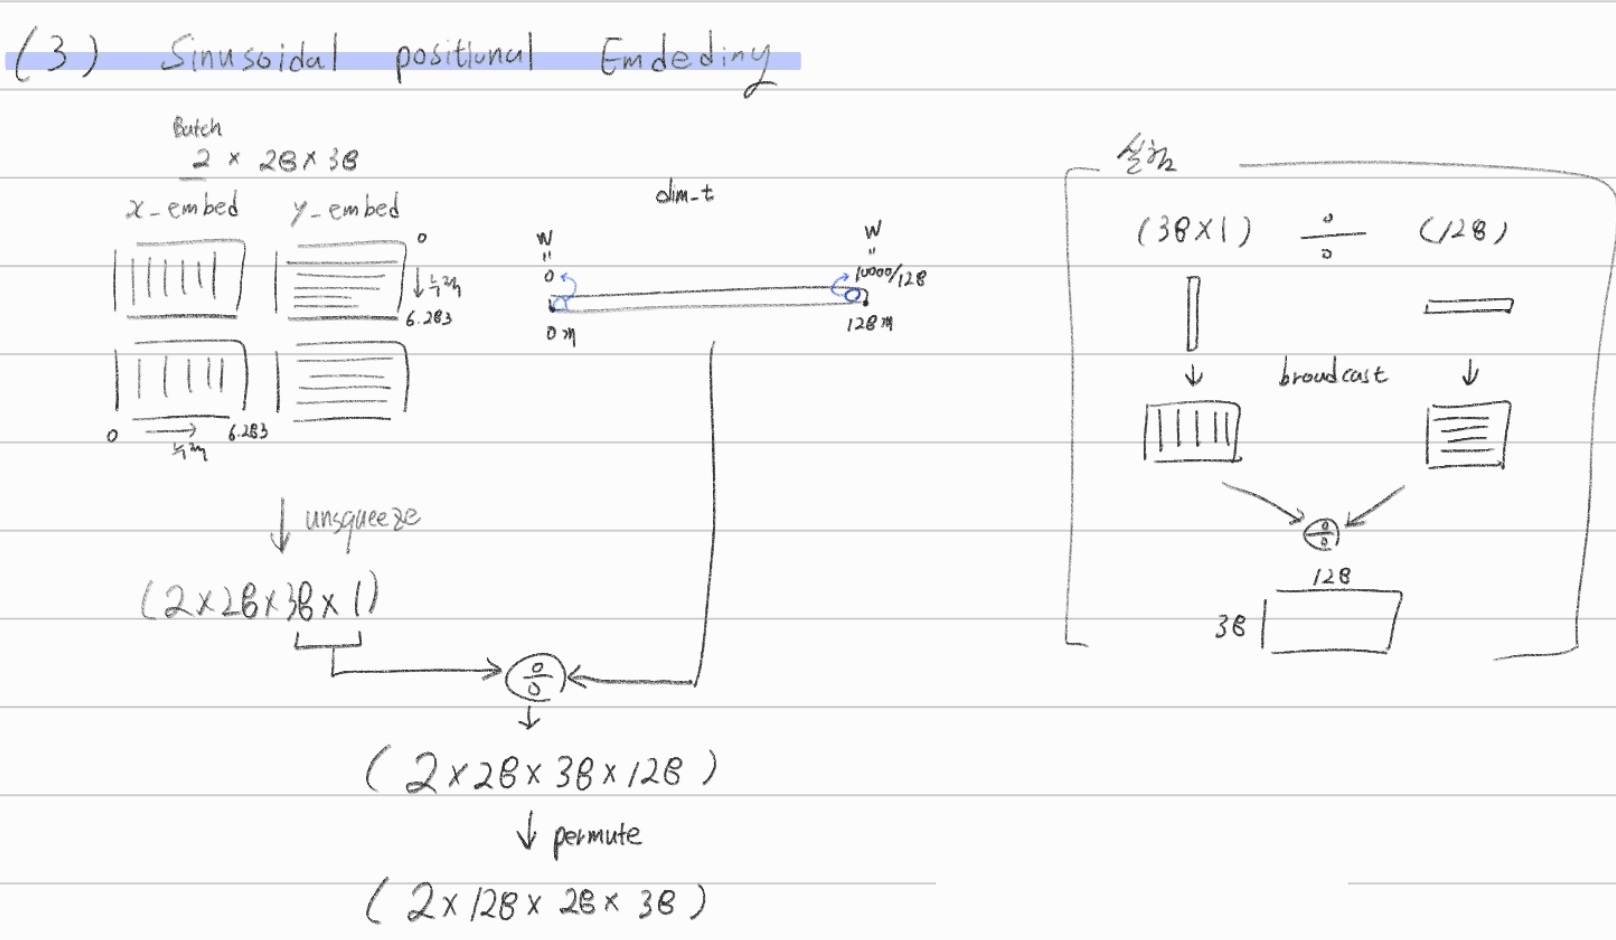
- sinusoidal - Positional Embeding
- 어려울 것 없이, 아래의 4. Additions. Positional Embeding Code 와 똑같은 코드이다. 이 코드에 의해서도 shape( #Vector, Vector_dim )이 만들어진다. 아래에서 최종적으로 만들어진 pos_x , pos_y 또한 똑같다.
- pos_x : shape[2, 28, 38, 128] -> 여기서 28개 모두 같은 값이고, 결국 만들어진 것은 38*128이다. (아래의 4. Additions 참조)
- pos_y : shape[2, 28, 38, 128] -> 여기서 38개 모두 같은 값이고, 결국 만들어진 것은 28*128이다. (아래의 4. Additions 참조)
- (main.py debug) 최종 pos의 shape : (N장, 256, 28, 38) 여기서 25는 feature map의 width, hight
2.2.2 models/backbone.py /build_backbone()
def build_backbone(args):
    # 핵심 module 정의 1. position_embedding
    position_embedding = build_position_encoding(args)

    # 핵심 module 정의 2. backbone
    train_backbone = args.lr_backbone > 0
    return_interm_layers = args.masks
    backbone = Backbone(args.backbone, train_backbone, return_interm_layers, args.dilation) # torchvision.models

    # nn.Sequential 로 2개의 모듈 묶어주기
    model = Joiner(backbone, position_embedding)

    # model의 type은 nn.Sequential 이기 때문에, 아무런 맴버변수가 없다. 아래에 의해서 클래서 맴버변수 하나 만들어 놓음
    model.num_channels = backbone.num_channels
    return model


class Joiner(nn.Sequential):
    def __init__(self, backbone, position_embedding):
        super().__init__(backbone, position_embedding)

    def forward(self, tensor_list: NestedTensor):
        xs = self[0](tensor_list) # self.backbone(tensor_list)
        # xs['0'].tensors.shape = torch.Size([2, 2048, 28, 38])
        # 만약에 resnet 중간에 feature map을 뽑아 왔다면, xs['1'], xs['2'], xs['3'] 순차적으로 저장된다.
        out: List[NestedTensor] = []
        pos = []
        for name, x in xs.items():
            out.append(x)
            # position encoding
            pos.append(self[1](x).to(x.tensors.dtype)) # self.position_embedding(x)

        # 여기서 0은 backbone에서 가장 마지막 C4 layer에서 뽑은 결과
        # out[0].tensors.shape = torch.Size([2, 2048, 28, 38]). out[0].mask 있음
        # pos[0].shape = torch.Size([2, 256, 28, 38])
        return out, pos
2.2.3 models/transformer.py /build_transformer()
def build_transformer(args):
    return Transformer()

class Transformer(nn.Module):
	def __init__(self, d_model=512, nhead=8, num_encoder_layers=6,
                 num_decoder_layers=6, dim_feedforward=2048, dropout=0.1,
                 activation="relu", normalize_before=False,
                 return_intermediate_dec=False):

        encoder_layer = TransformerEncoderLayer(d_model, nhead, dim_feedforward,
                                                dropout, activation, normalize_before)
        encoder_norm = nn.LayerNorm(d_model) if normalize_before else None
        self.encoder = TransformerEncoder(encoder_layer, num_encoder_layers, encoder_norm)

        decoder_layer = TransformerDecoderLayer(d_model, nhead, dim_feedforward,
                                                dropout, activation, normalize_before)
        decoder_norm = nn.LayerNorm(d_model)
        self.decoder = TransformerDecoder(decoder_layer, num_decoder_layers, decoder_norm,
                                          return_intermediate=return_intermediate_dec)

        # 모델의 전체 파라미터 초기화를 아래와 같이 한다. 잘 알아두기.
        self._reset_parameters()
	def _reset_parameters(self):
        for p in self.parameters():
            if p.dim() > 1:
                nn.init.xavier_uniform_(p)
- 모델 전체 파라미터 초기화
nn.init.xavier_uniform_(p) - 위의 코드처럼,
models/transformer.py에 정의된 아래의 함수들을 순차적으로 사용한다. 차근차근 알아가보자.- TransformerEncoderLayer
- TransformerEncoder
- TransformerDecoderLayer
- TransformerDecoder
- 코드 전체에서
attn_masktgt_mask변수는 사용되지 않는다.(=None이다) 이 Mask 기법은 All you need attention 논문에서, decoder의 sequencial한 input과 output을 구현해 학습시키기 위해서 사용되는 변수이다. 자세한 내용은 아래 4. Attention 부분의 내용을 참조할 것. - 대신
key_padding_mask변수 은 사용한다. 배치에 들어간 모든 이미지를 한꺼번에 처리하기 위한 Transformer를 구현하기 위해, 배치 속에서 상대적으로 작은 이미지는 pading된다. 이 pading된 값에 대해서는 Attention을 구하면 안되므로, Mask처리를 해준다. Value도 0이다. 위의Nested_tensor_from_tensor_list내용에 있는 손 그림 참조.

MultiheadAttention
- torch.nn.module.MultiheadAttention
- 사용 예시
self.self_attn = nn.MultiheadAttention(d_model=512, nhead=8, dropout=dropout)
TransformerEncoderLayer
MHA 이나 Feed Forward하기 전에 Normalization 하기= forward_pre로 구현MHA 이나 Feed Forward한 후에 Normalization 하기= forward_post로 구현

dropout은 임의로 노드를 잠궈버리는 것. 즉 Zero로 만들어 버리는 것이다. 따라서 dropout의 forward를 위한 파라미터는 노드를 넣어줘야한다. (코드 예시.src = src + self.dropout1(src2))
TransformerEncoder
같은 TransformerEncoderLayer를 서로 다른 layer로 구성하기 위해서 아래와 같은 코드기법을 사용했다.
def _get_clones(module, N):
    return nn.ModuleList([copy.deepcopy(module) for i in range(N)])

class TransformerEncoder(nn.Module):
    def __init__(self, encoder_layer, num_layers, norm=None):
        super().__init__()
        self.layers = _get_clones(encoder_layer, num_layers)

    def forward(self, src,
                mask: Optional[Tensor] = None,
                src_key_padding_mask: Optional[Tensor] = None,
                pos: Optional[Tensor] = None):
        output = src
        for layer in self.layers:
            output = layer(output, src_mask=mask, src_key_padding_mask=src_key_padding_mask, pos=pos)
TransformerDecoderLayer
MHA 이나 Feed Forward하기 전에 Normalization 하기= forward_pre로 구현MHA 이나 Feed Forward한 후에 Normalization 하기= forward_post로 구현- 그림은 나중에 추가할 예정(코드 미리 쪼개고 분석해놨으므로 금방한다.)
TransformerDecoder
- 위의
TransformerEncoder코드와 같이_get_clones함수를 이용한다. - 나머지는 별거 없다.
- 최종 Output= [100, 2, 256] * 6개 (decoder layer에서 나온 결과 모두) = torch.Size([6, 100, 2, 256])
- 위의
2.2.4 models/detr.py /DETR()
self.class_embed = nn.Linear(hidden_dim, num_classes + 1) # 91 + 1 -> 92

self.bbox_embed = MLP(hidden_dim, hidden_dim, output_dim=4, num_layers=3)

# Backbone을 통과하고 나오는 결과의 Channel은 1024인데, Channel Reduction을 해준다. (to 256)
self.input_proj = nn.Conv2d(backbone.num_channels, hidden_dim, kernel_size=1)
2.2.5 models/matcher.py /build_matcher()
return HungarianMatcher(cost_class=args.set_cost_class, cost_bbox=args.set_cost_bbox, cost_giou=args.set_cost_giou)
class HungarianMatcher(nn.Module):
def __init__(self, cost_class: float = 1, cost_bbox: float = 1, cost_giou: float = 1):
super().__init__()
self.cost_class = cost_class # 1
self.cost_bbox = cost_bbox # 5
self.cost_giou = cost_giou # 2
@torch.no_grad()
def forward(self, outputs, targets):
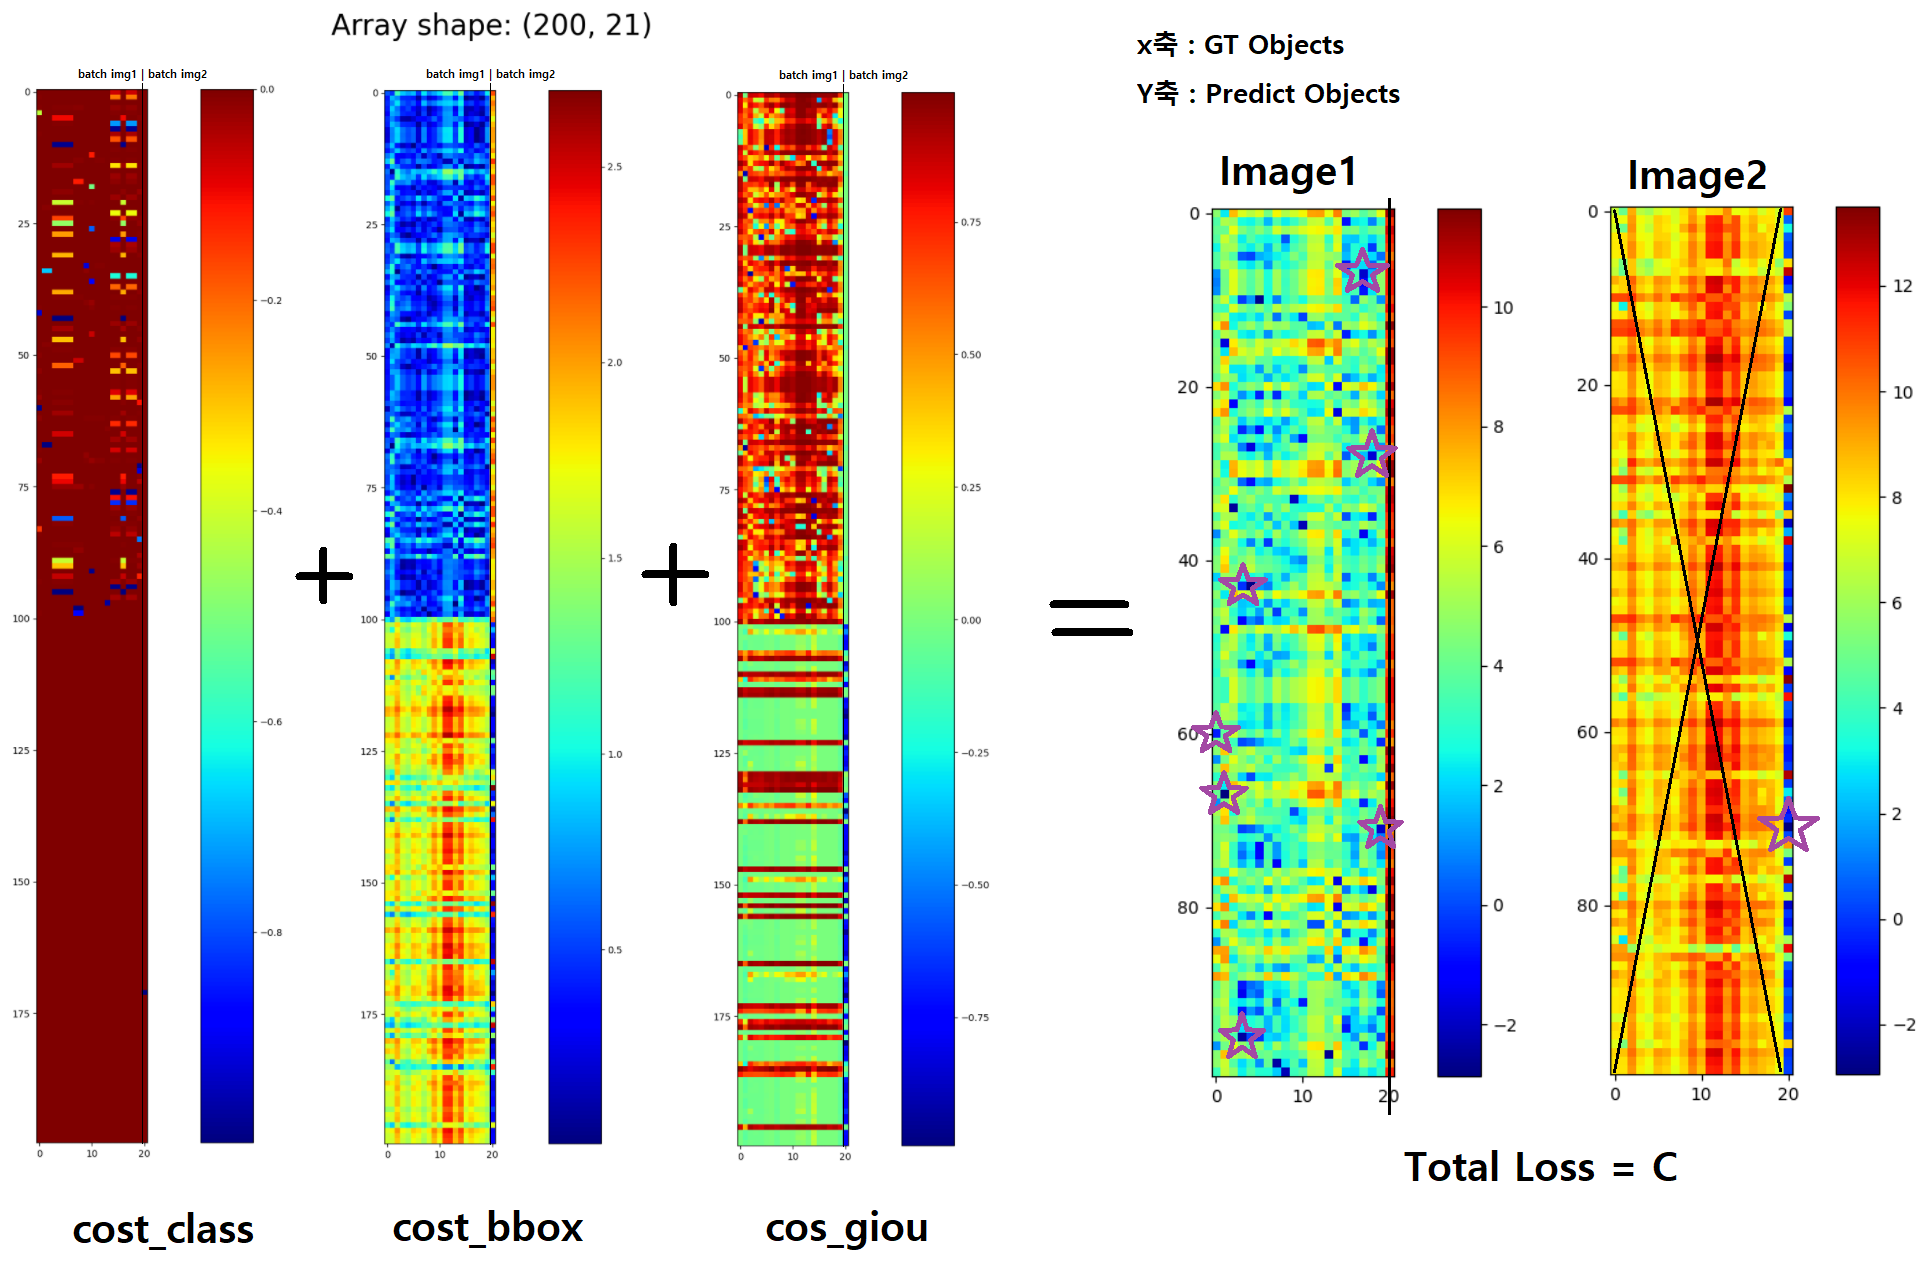
C = self.cost_bbox * cost_bbox + self.cost_class * cost_class + self.cost_giou * cost_giou
C = C.view(bs, num_queries, -1).cpu() # torch.Size([2 batch, 100 예측 object, 21 GT object])
sizes = [len(v["boxes"]) for v in targets] # [img1 num_box, img2 num_box]
indices = [linear_sum_assignment(c[i]) for i, c in enumerate(C.split(sizes, -1))]
- forward 앞에
@torch.no_grad()가 정의되어 있다. 이런 식으로 어떤 특정 layer, module에만@torch.no_grad()처리를 해줄 수 있다. - 아래의 그림에서 보라색 별이 indices 의 결과로 나온 값이다.
- indices는 (batch, all_predict_obect, all_GT_obect) 으로 구성되어 있다. all_GT_obect 각각이 all_predict_obect 중 어디에 매칭되어야 하는지에 대한 정보가 들어가 있다.
- linear_sum_assignment가 the Hungarian algorithm 을 사용해서, 최적의 매칭을 찾아준다. Hungarian algorithm을 사용하지 않고 Naive한 방법을 사용한다면, O(n!) (100P#GTobjec0=1.043196014E+41)s의 매칭을 고려하여 최적의 매칭을 찾아야 하지만, 헝가리안 알고리즘을 사용해서 O(n^3 = 10^e6) 의 시간복잡도 안에 최적의 매칭을 찾을 수 있다.
- 아래의 그림에서 batch_Image 1에는 GT object가 20개가 있다. 100개의 예측 중, 20개는 object중 80개는 non-object로 분류된다.
2.2.6 models/detr.py /class SetCriterion(nn.Module)
class SetCriterion(nn.Module):
    def __init__(self, num_classes, matcher, weight_dict, eos_coef, losses):
    def loss_labels(self, outputs, targets, indices, num_boxes, log=True):
        # 'loss_ce': Classification loss Using F.cross_entropy
        # 'class_error': Score만을 봤을 때, 정확한 예측을 한 예측의 겟수 비율을 점수로 계산 수 100점을 빼주어 error계산한다.
    def loss_cardinality(self, outputs, targets, indices, num_boxes):
        # 100개의 예측 증 object라고 판단한 예측의 갯수가 target과 같은지 l1_loss를 계산한다
    def loss_boxes(self, outputs, targets, indices, num_boxes):
        # 'loss_bbox': l1_loss
        # 'loss_giou': using loss_giou
    def get_loss(self, loss, outputs, targets, indices, num_boxes, **kwargs):
        # 위의 3개의 loss 중에서 선택된 하나의 loss를 계산하여, dict에 값을 넣어주는 형태로, loss 값 return 해준다.
    def forward(self, outputs, targets):
        losses = {}
        for loss in self.losses: # type(loss) = (str)
            losses.update(self.get_loss(loss, outputs, targets, indices, num_boxes))
        return losses
    	'''
    	return 되는 예시.
    	losses :
    	{'cardinality_error': tensor(3.5000, devic...='cuda:0'),
    	'class_error': tensor(23.8095, devi...='cuda:0'),
    	'loss_bbox': tensor(0.0446, devic...='cuda:0'),
    	'loss_ce': tensor(0.5508, devic...='cuda:0'),
    	'loss_giou': tensor(0.4350, devic...='cuda:0')}
    	'''
2.2.7 models/detr.py /class PostProcess(nn.Module):
- the model’s output format을 coco api에서 필요한 format으로 바꾸는 클래스이다.
class PostProcess(nn.Module):
    @torch.no_grad()
    def forward(self, outputs, target_sizes):
        out_logits, out_bbox = outputs['pred_logits'], outputs['pred_boxes']
        ## 중간 계산 절차를 거친다.
        results = [{'scores': s, 'labels': l, 'boxes': b} for s, l, b in zip(scores, labels, boxes)]
        return results
- batch 2일 때, results의 결과 예시

2.3 engine.py /def evaluate()
# main.py
model, criterion, postprocessors = build_model(args)
test_stats, coco_evaluator = evaluate(model, criterion, postprocessors, data_loader_val, base_ds, device, args.output_dir)

# engine.py /def evaluate()
def evaluate(model, criterion, postprocessors, data_loader, base_ds, device, output_dir):
    for samples, targets in metric_logger.log_every(data_loader, 10, header):
        outputs = model(samples) # ['pred_logits'] ([2, 100, 92]),['pred_boxes'] ([2, 100, 4])
        metric_logger.update(loss=sum(loss_dict_reduced_scaled.values()),
                             **loss_dict_reduced_scaled,
                             **loss_dict_reduced_unscaled)
        metric_logger.update(class_error=loss_dict_reduced['class_error'])
    # 2500개의 validataion 이미지가 모든 계산된 이후에 아래의 작업이 수행된다.
    stats = {k: meter.global_avg for k, meter in metric_logger.meters.items()}
    return stats, coco_evaluator
    # 계산된 loss들이 stats에 들어가 반횐되고,
    # coco_evaluator는 나중에 필요하면 공부하자
3. Train 흐름 따라가기
똑같이 main.py 함수를 사용한다. 그리고 위에서 사용한 함수와 클래스들을 그대로 사용한다.
차이점은, Evaluation에서 사용하지 않던 값들은 여기 Train에서는 사용한다.
# main.py
for epoch in range(args.start_epoch, args.epochs):
    train_stats = train_one_epoch(model, criterion, data_loader_train, optimizer, device, epoch, args.clip_max_norm)
    lr_scheduler.step()
    # 이후에 checkpoint_paths에 .pth 파일 저장

# engine.py /train_one_epoch
def train_one_epoch(..)
	for samples, targets in metric_logger.log_every(data_loader, print_freq, header):
        outputs = model(samples)
        loss_dict = criterion(outputs, targets)
        losses = sum(loss_dict[k] * weight_dict[k] for k in loss_dict.keys() if k in weight_dict)
        optimizer.zero_grad()
        losses.backward()
        optimizer.step()
        # metric_logger 에 return 해주고 싶은 값들을 넣어준다.
        metric_logger.update(loss=loss_value, **loss_dict_reduced_scaled, **loss_dict_reduced_unscaled)
        metric_logger.update(class_error=loss_dict_reduced['class_error'])
        metric_logger.update(lr=optimizer.param_groups[0]["lr"])
    # 1 epoch 동안 계산된 모든 것, return
	return {k: meter.global_avg for k, meter in metric_logger.meters.items()}
4. detr_hands_on.ipynb 파일 분석하기
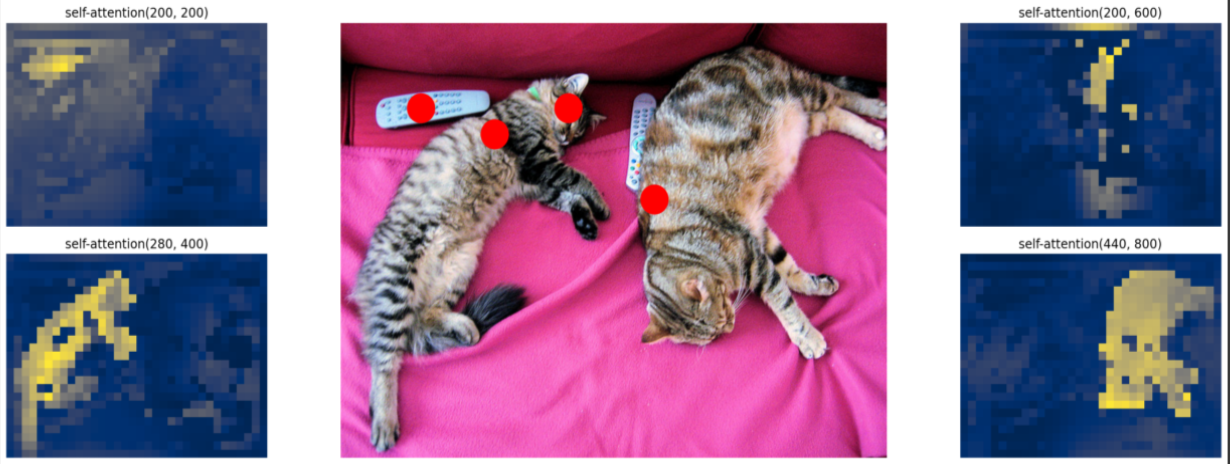
아래 New modules에 있는 함수 중, register_forward_hook 사용해서 score 값을 뽑아 낸다.
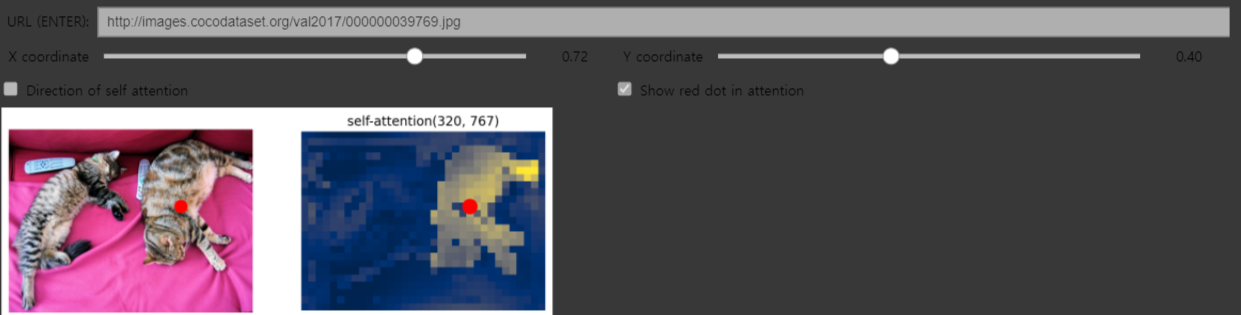
그리고 아름답게 함수를 구현해서 아래와 같은 plot 혹은 program을 만든다. 2번째 그림의 program은 신기하고 재미있으니 시간나면 한번 꼭 공부해보자. 코드는 맨 아래에 추가했다.
아래 이미지에서 좌표는, 실제 이미지 상의 좌표를 의미한다.
꼭 어떻게 만드는지 배워보자. (코랩 코드)
5. New modules
torch.repeat(sizes), torch.expand
- sizes (torch.Size or int…) – 각 차원에 대한 반복 수 (The number of times to repeat this tensor along each dimension)
>>> x = torch.tensor([1, 2, 3])
>>> x.repeat(4, 2)
tensor([[ 1,  2,  3,  1,  2,  3],
        [ 1,  2,  3,  1,  2,  3],
        [ 1,  2,  3,  1,  2,  3],
        [ 1,  2,  3,  1,  2,  3]])
>>> x.repeat(4, 2, 1).size()
torch.Size([4, 2, 3])

self.col_embed[:W].unsqueeze(0) >> torch.Size([1, 25, 128])
self.col_embed[:W].unsqueeze(0).repeat(H, 1, 1) >> torch.Size[25,25,125]
torch.flatten(input, start_dim=0 : int, end_dim=-1 : int) → Tensor
- h : (1, 256,25,25)
- h.flatten(2) = h.flatten(start_dim = 2) : (1, 256, 625)
torch.permute(2,0,1)
차원 치환/교환
(1, 256, 625) -> (625, 1, 256)
torch.unsqueeze(d)
- d: unsqueeze하고 싶은 차원
- d =1 -> (625, 256) -> (625, 1,256)
torch.transpose(input, dim0, dim1)
- 딱 2개의 차원을 교환한다
torch.nn.Linear(in_features_int, out_features_int)
- forward에 들어갈 수 있는 shape는, 무조건 in_feature_int 차원의 1차원 백터가 아니다!! 아래의 차원이 될 수 있다.
- Input :
(N,*,H_in), 이렇게만 forward로 들어가면 된다. Output:(N, *, H_out) - 여기서
H_in = in_features :int,H_out = out_features :int이다.
argparse
- config 파일을 사용해서 환경변수를 저장하기도 하지만, 여기서는 간단하게 argparse만으로 환경변수를 정의했다.
main.py의 argparse 기법을 사용하면,args.junha = 1만 코드에 추가해줘도 자동으로 새로운 key, valuse가 생성된다.
torch.tensor.numel()
- tensor 안에 들어 있는 파라메터 갯수 자연수로 반환
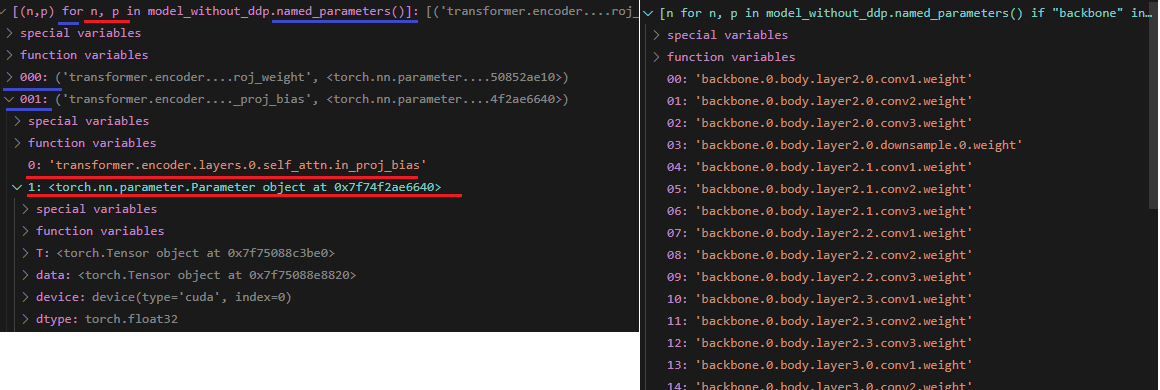
nn.Module.named_parameters(), nn.Module.parameters()
- iteration 이다.
[p.shape for p in model.parameters()],[p for p in model.parameters()]이런식으로 출력해서 보기[n for n, p in model_without_ddp.named_parameters() if "backbone" in n and p.requires_grad][(n,p) for n, p in model.named_parameters()]
nn.Embedding
- torch.nn.Enbedding documentation
self.row_embed = nn.Embedding(50, 128)self.row_embed.weight.shape= torch.Size([50, 128])
nn.init.uniform_
- torch.nn.init 여기에 모델 weight를 init하는 방법이 다 있다. 사용은 아래와 같이 한다.
nn.init.uniform_(self.row_embed.weight)
torch.tensor.cumsum(input, dim)
- dim 차원으로 바라봤을 때, 나오는 1차원 백터들에 대해서 누적된 합을 계산한 텐서 반환.
- [1, 2, 3] -> [1, 3, 6]
nn.Dropout(p)
- p = 노드를 zero로 만들어 버릴 가능성
dropout은 임의로 노드를 잠궈버리는 것. 즉 Zero로 만들어 버리는 것이다. 따라서 dropout의 forward를 위한 파라미터는 노드를 넣어줘야한다. (코드 예시.src = src + self.dropout1(src2))
nn.diag(x)
- x가 2D이면, 대각행렬만 뽑아서 1D를 return해준다.
- x가 1D이면, 1D를 대각항으로 가지는 2D를 return해준다.
nn.topk(x,k)
- top k개
- tensor x중에서 가장 큰 수 k개를 뽑아낸다.
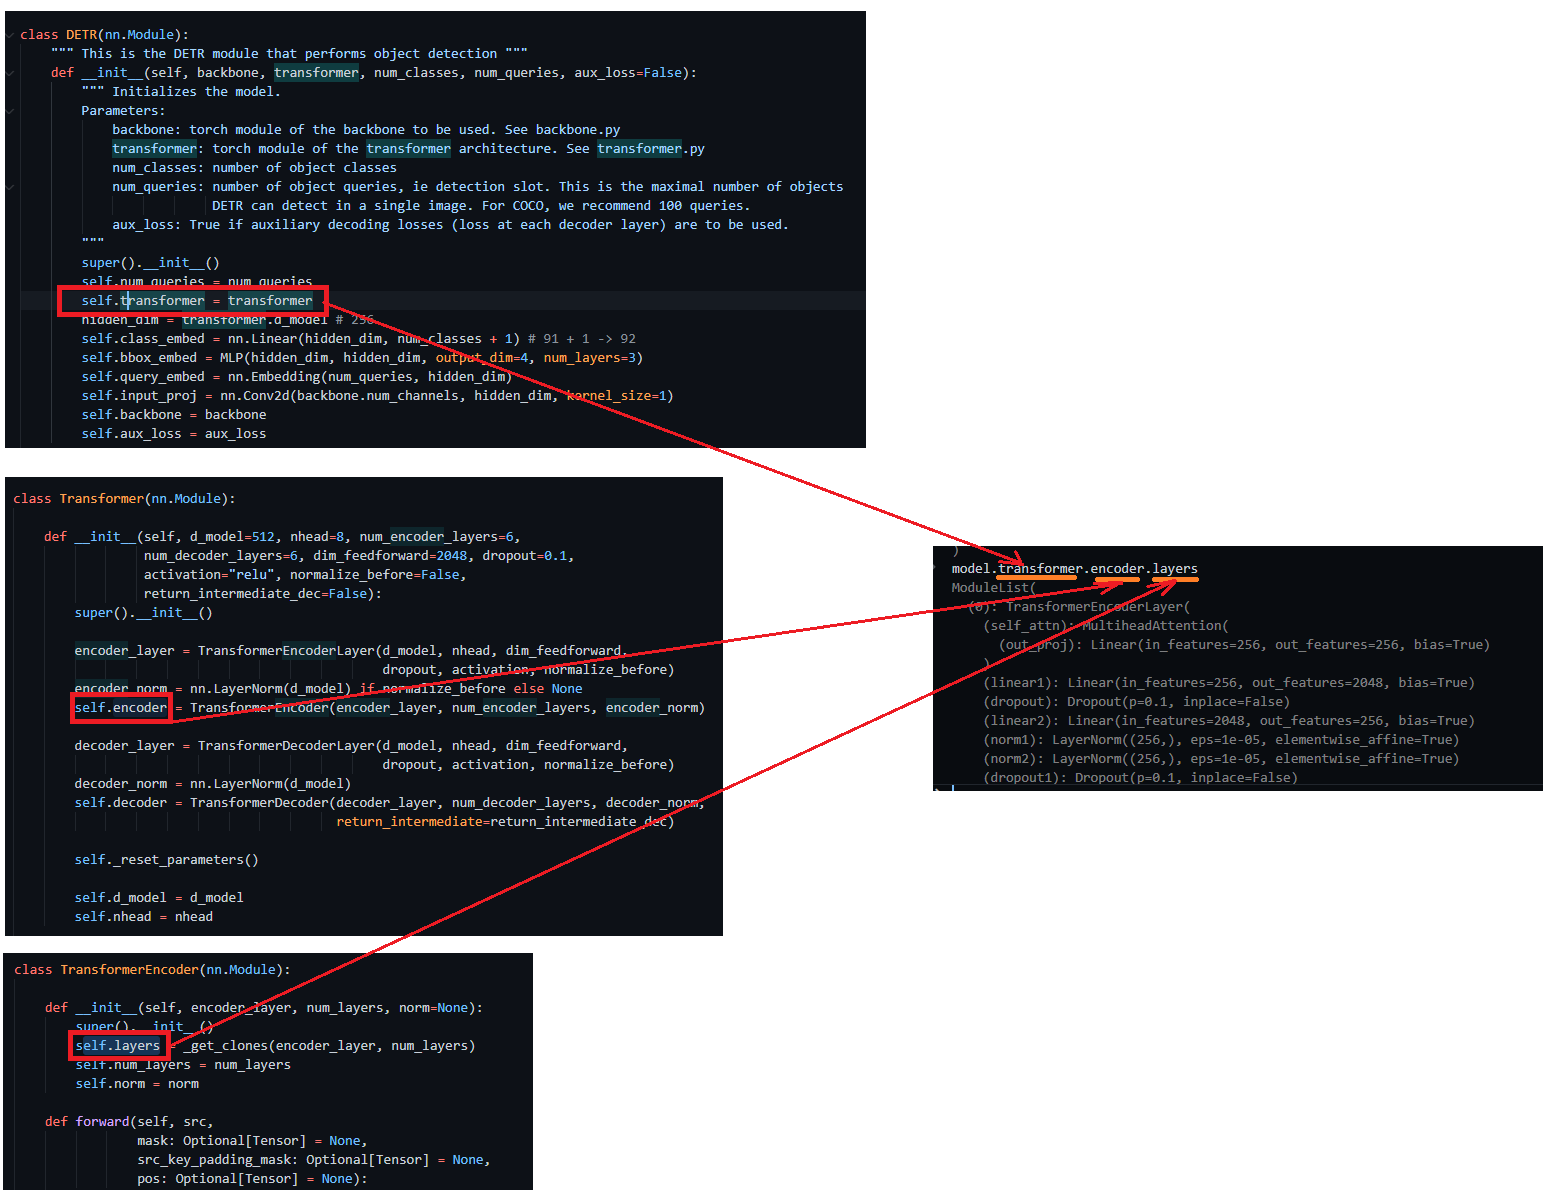
torch.nn.Module.register_forward_hook(hook_function)
(1) torch document, (2) 한글 설명 tutorial
Network의 특정 module에서의 input, ouput을 확인하고 싶거나, 바꾸고 싶을 때 사용한다.
해당 nn.moulde의 forward가 실행된 직후에 설정해 놓은 함수*가 실행된다. 어떻게든 register_forward_hook를 정의해 놓는 순간부터, 해당 코드에서 Network 전체 forward가 돌아가면 무조건 그 함수*가 실행된다.
아래와 같이 global을 사용하지 않더라고 전역변수처럼 변수를 모듈 내부에서 사용할 수 있다.
# use lists to store the outputs via up-values
conv_features, enc_attn_weights, dec_attn_weights = [], [], []

hooks = [
    model.backbone[-2].register_forward_hook(
        lambda self, input, output: conv_features.append(output)
    ),
    model.transformer.encoder.layers[-1].self_attn.register_forward_hook(
        lambda self, input, output: enc_attn_weights.append(output[1])
    ),
    model.transformer.decoder.layers[-1].multihead_attn.register_forward_hook(
        lambda self, input, output: dec_attn_weights.append(output[1])
    ),
]

# propagate through the model
outputs = model(img)

for hook in hooks:
    hook.remove()
    # forward 이후에 실행해달라고 만들어 놓은 함수가 hook이다.
    # 이 hook을 제거한다. (network를 원상복구한다.)

# don't need the list anymore
conv_features = conv_features[0] # 최종 feature map의 width, hight를 파악하기 위해서.
enc_attn_weights = enc_attn_weights[0] # 마지막 encoder layer의 attention score를 파악하기 위해서.
dec_attn_weights = dec_attn_weights[0] # 마지막 decoder layer의 attention score를 파악하기 위해서.
torchvision dataset 함수 수정해서 path 뽑아내기
- 아래와 같이 dataset함수를 수정하니까 dataloader에서 나오는 값이 그대로 바뀌었다.
- 즉 dataset class의 return 값만 변경해줌으로써 dataloader에서 나오는 값의 형식이 다르게 만들수 있다.
1. torchvision.datasets.CocoDetection 여기서 path 변수 사용하는 거 파악
2. detr/datatset/coco.py class CocoDetection
   - class CocoDetection(torchvision.datasets.CocoDetection):
   - 	path = self.coco.loadImgs(self.ids[idx])\[0\][\'file_name\']
   - 	return img, target, path
   -	# 위와 같이 path 내용 추가!
3. for samples, targets, paths in metric_logger.log_every(data_loader, 10, header):
   # paths 추가!
6. Additions
4.1 논문 외 보충 내용
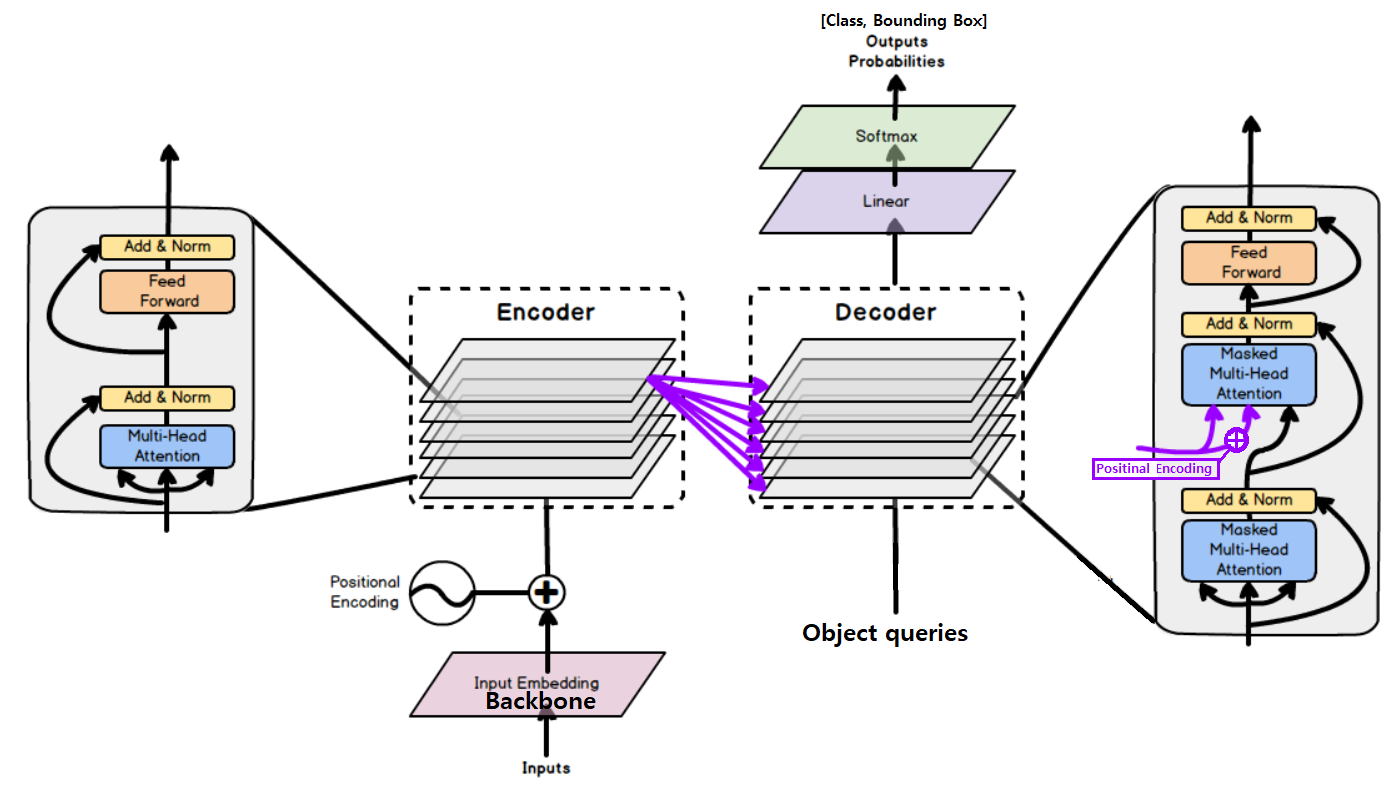
Attention is All you need의 논문 내용 정리! 같은 색 매칭해서 보기! - 그리기 코드는 맨 아래에 참조
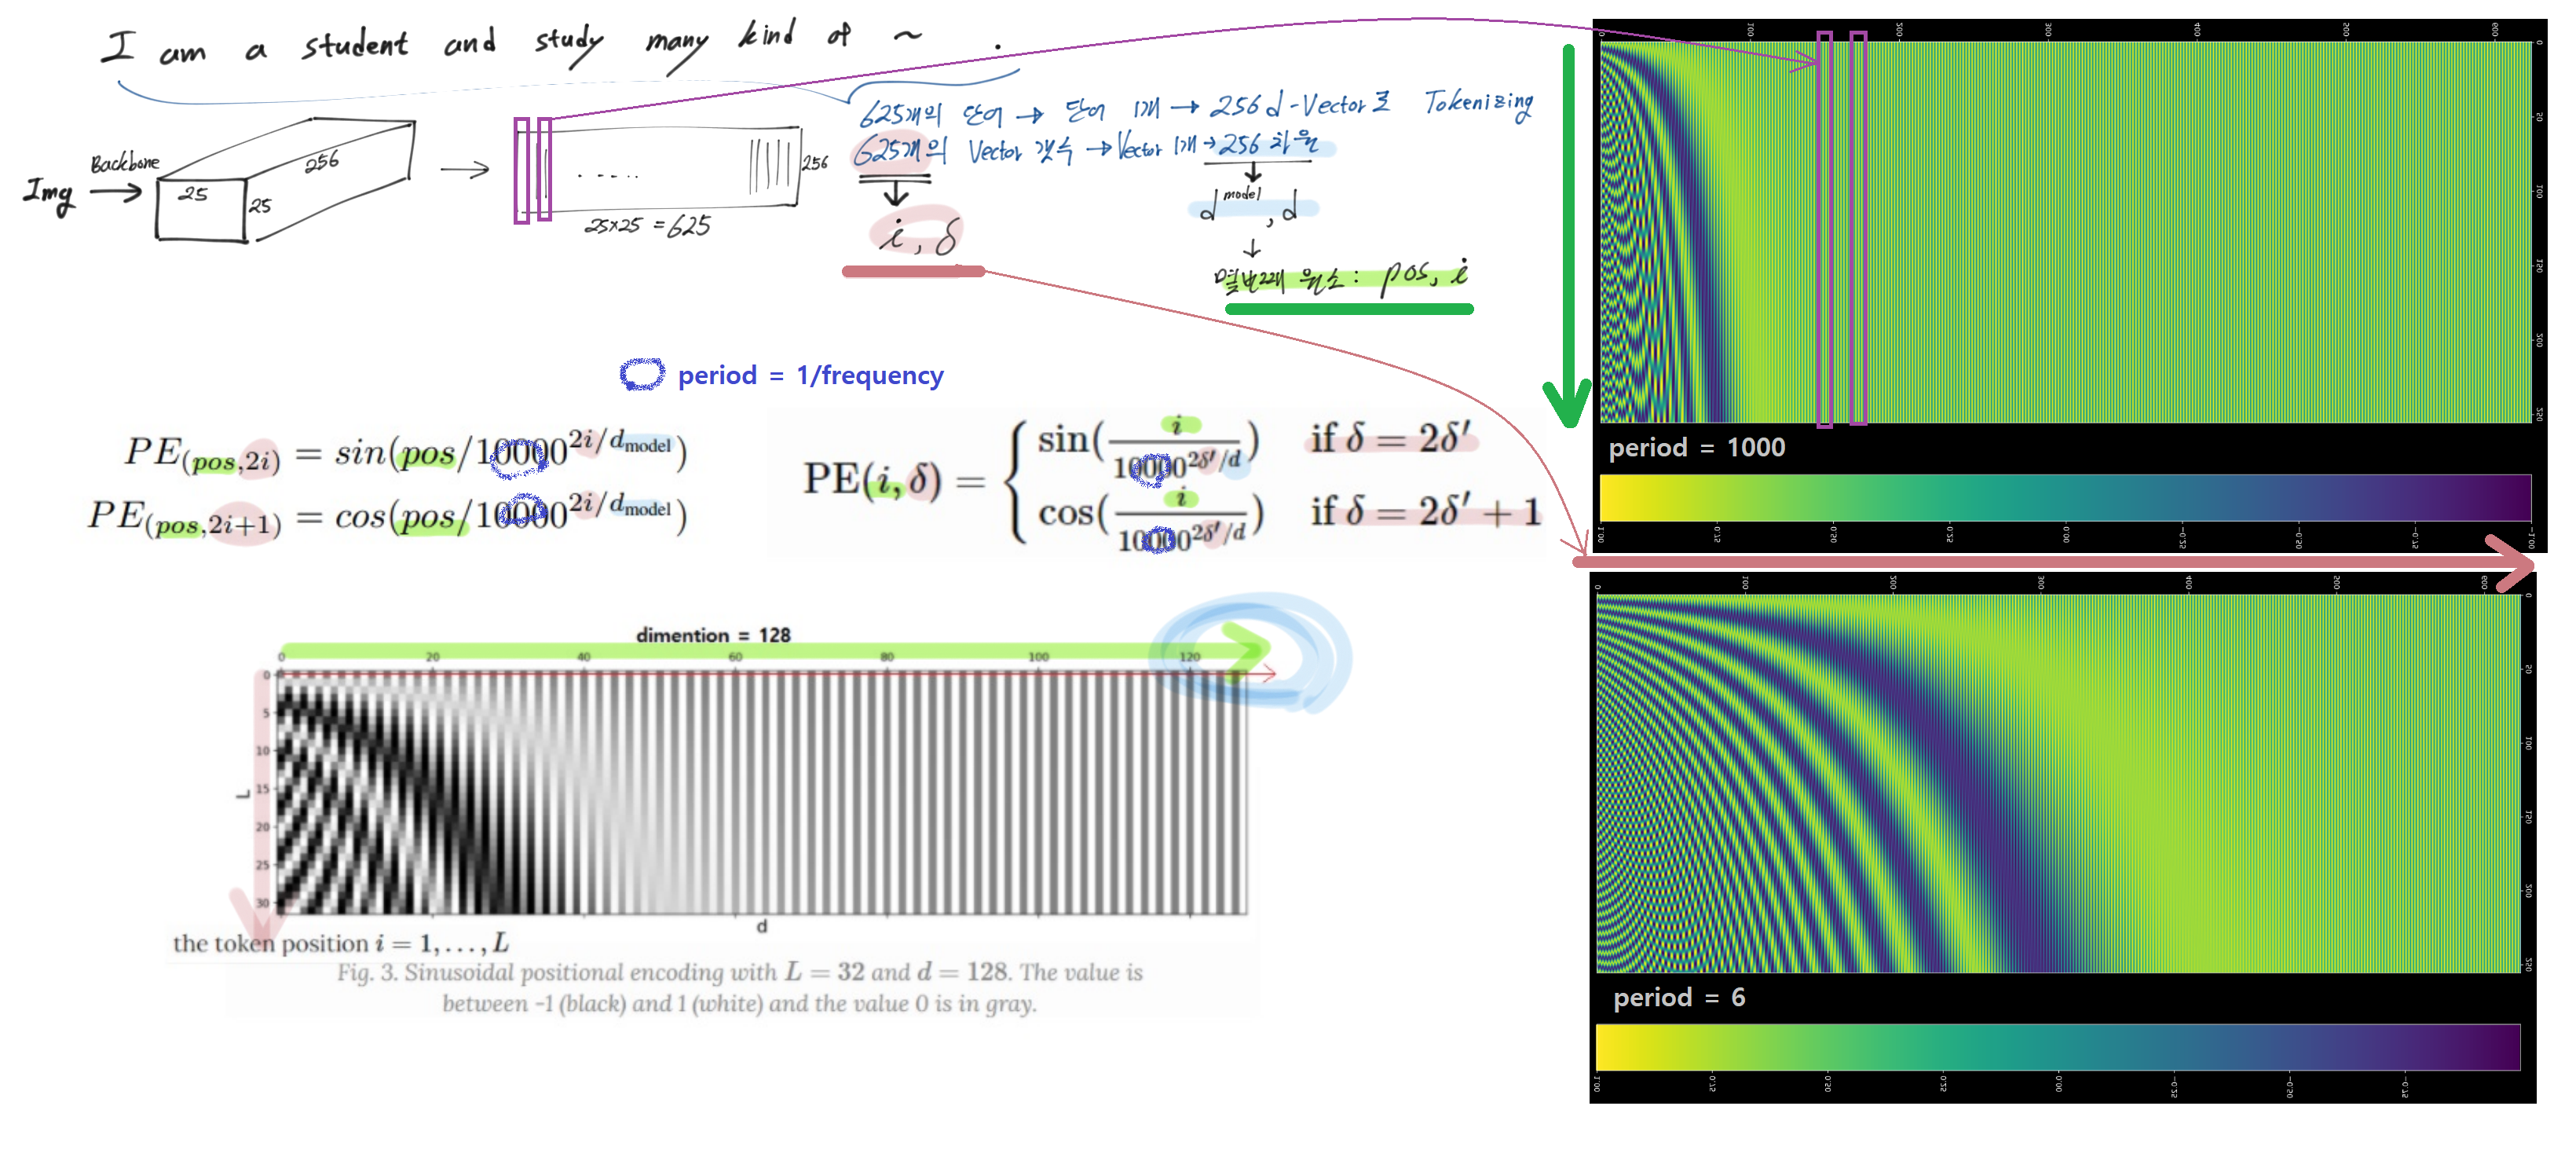
Sinusoidal - Positional Embedding Code
import numpy as np
d_vector = 256
num_vector = 625
PEs = np.empty((num_vector,d_vector))

period = 1000
for i in range(num_vector):
    if i%2 == 0:
        w = 1/ period**(2*i/d_vector) # 상수. for문에 의해서 num_vector개 만들어짐
        pos = np.arange(256)
        PEs[i] = np.sin(pos*w)
    if i%2 != 0:
        w = 1/ period**(2*i/d_vector)
        pos = np.arange(256)
        PEs[i] = np.cos(pos*w)

%matplotlib inline
import matplotlib.pyplot as plt
from matplotlib.pyplot import figure

figure(figsize=(25, 23), dpi=80, facecolor='black')
imgplot = plt.imshow(PEs)
plt.colorbar()
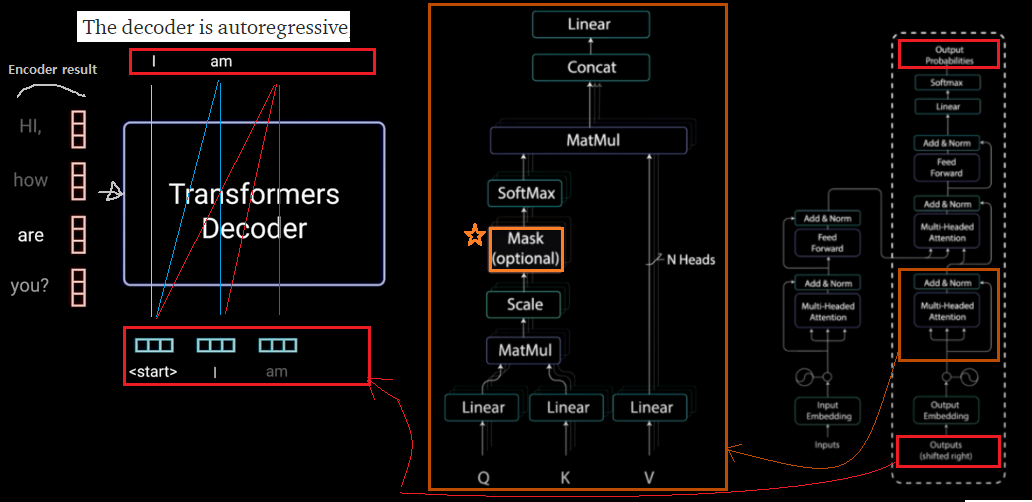
Multi head self attention에서 Mask 개념, Masked Self-attention
- Reference
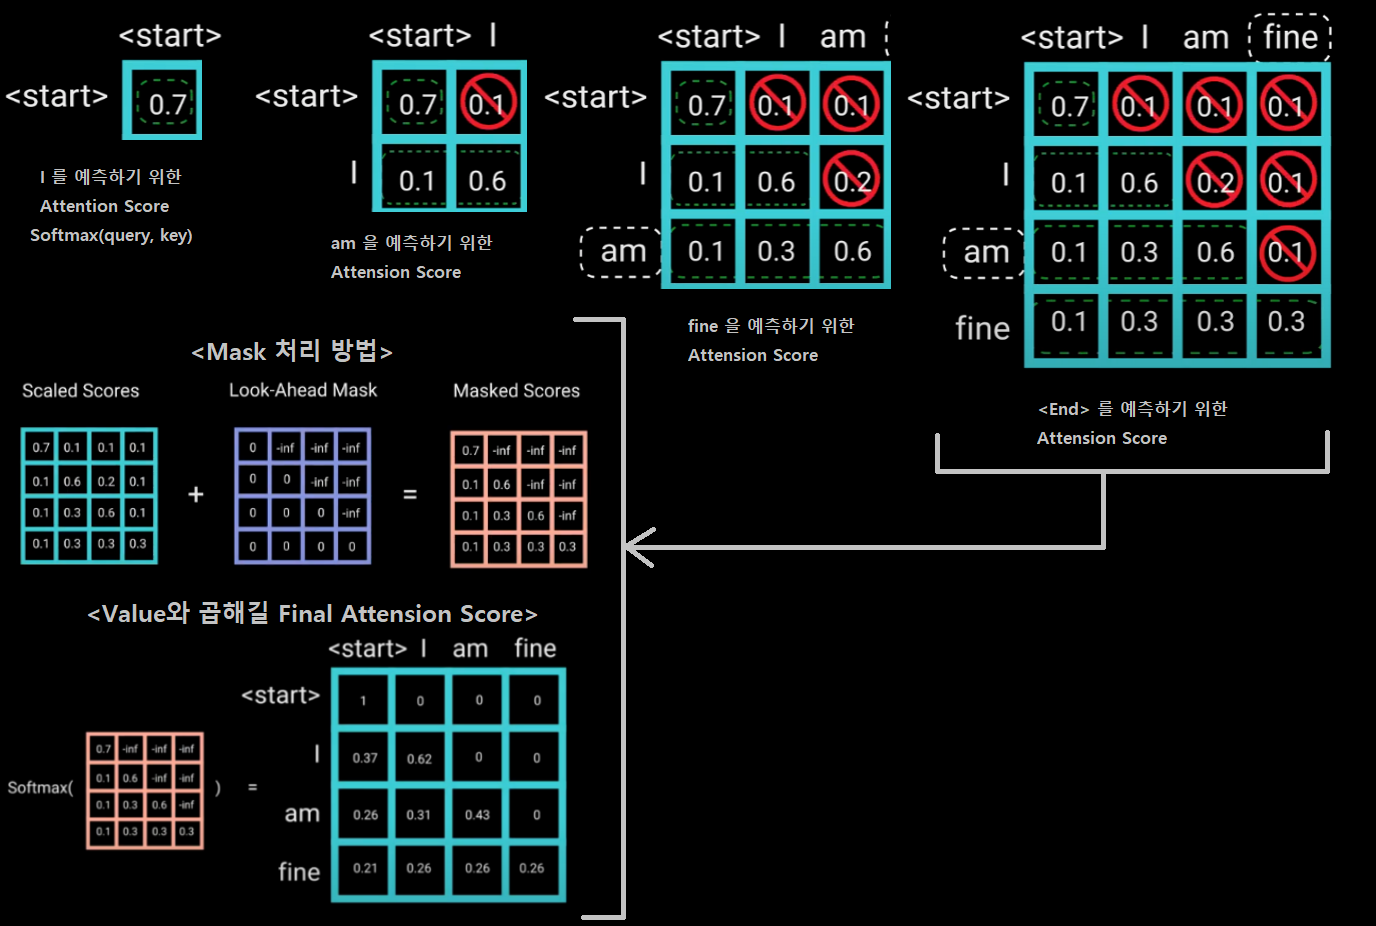
- NLP에서 Mask는 Decoder에서 사용되어야 하는 Layer이다. Decoder에서 3번쨰 단어(fine)를 예측할 때, Decoder의 (Emcoder 결과 말고) Input(I, am)으로 2개의 단어가 들어간다. 학습할 때 우리는 Input(I, am, find)를 모두 가지고 있으므로, find은 가린체로 decoder의 Input으로 넣어줘야한다. 그게 Mask가 하는 역할이다.
- Mask가 처리되어야 하는 부분은 다른 곳이 아니라 저 부분만 이다. 그래서 Masked 개념은 Decoder에서만 사용된다.
- Mask를 이용한 연산 처리 방법
4.2 추가 추신
COCO dataset 다운로드 하기
$ apt-get install wget
$ wget https://gist.githubusercontent.com/mkocabas/a6177fc00315403d31572e17700d7fd9/raw/a6ad5e9d7567187b65f222115dffcb4b8667e047/coco.sh
$ sh coco.sh
dockerfile
- 그대로 사용했다가, torchvision 버전 엉망됐다.
requirements.txt에서 torch, torchvision, sumitit 삭제하고 설치하자. $ pip install torch==1.5.0+cu101 torchvision==0.6.0+cu101 -f https://download.pytorch.org/whl/torch_stable.html- docker-hub의
-runtime,-devel태크 분석하기. 지금 내가 쓰고 있는게pytorch/pytorch:1.5-cuda10.1-cudnn7-runtime이다. 아래의 단서로 runtime은 그냥 가볍게 만든 우분투, devel은 최대한 다 넣어놓은 우분투 라고 예측할 수 있다.- 지금 runtime image에 wget도 설치가 안되어 있다.
- docker-hub를 보면 runtime은 3.3G 정도, devel은 5.3G 정도이다.
- 그대로 사용했다가, torchvision 버전 엉망됐다.
vscode에서 #%%를 사용하면서 pdb이용하기

$ pip install pdbpp
vscode python debugging debug args setting 설정
,"args": ["--batch_size", "1", "--no_aux_loss", "--eval", "--resume", "https://dl.fbaipublicfiles.com/detr/detr-r50-e632da11.pth", "--coco_path", "/workspace/coco"]위의 내용을,
/pythonPackage/.vscode/launch.json의 config 파일에 넣어두기{ "version": "0.2.0", "configurations": [ { "name": "Python: Current File", "type": "python", "request": "launch", "program": "${file}", "console": "integratedTerminal", "debugOptions" : ["DebugStdLib"], "justMyCode": false, "args" : ["--batch_size", "1", "--no_aux_loss", "--eval", "--resume", "https://dl.fbaipublicfiles.com/detr/detr-r50-e632da11.pth", "--coco_path", "/workspace/coco"] } ] }
Pytorch 분산학습
추가 저장
# debug에 사용
from via import via; via(samples.tensors[0].cpu(), out='real_img' , color_img= True)

i == self.num_layers - 1

_ ,num_v ,_ = score.shape
from via import via; via(score.reshape(num_v ,34,25)[28::40].cpu(), out='encoder_attention')
신경망 파라미터 변경하기
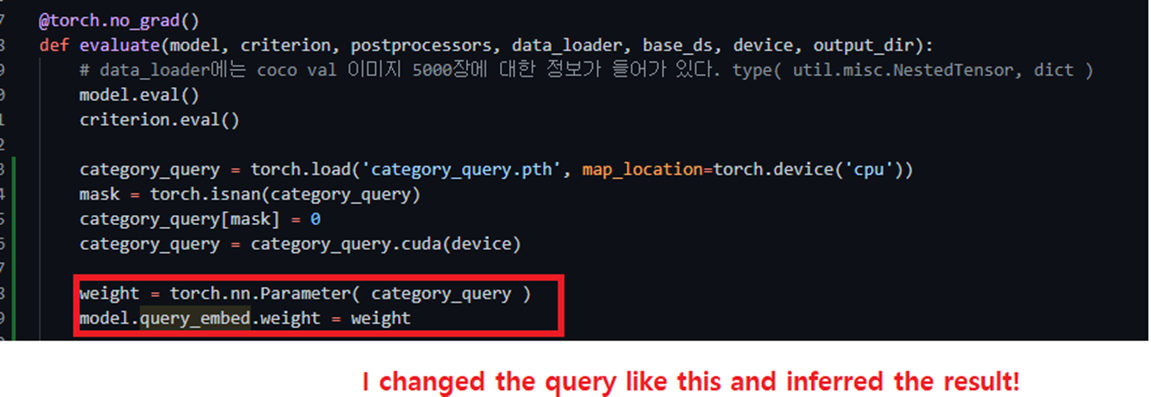
신경망 파라미터! 도대체 너는 뭐냐!!
nn.Module의 __init__ 내부에 self.variable과 같이 맴버변수로 저장된 것들을, 모델 호출에 사용할 수 있다.
Netron 프로그램 사용방법 및 파라미터 검색 방법

신경망 파라미터 정보 읽기 - torch.nn.Module.load_state_dict 동작원리 파악하기

