【Detection】Bottleneck Transformers for Visual Recognition
- 논문 : Bottleneck Transformers for Visual Recognition
- 분류 : Detection
- 읽는 배경 :
- 느낀점 :
- 참고 사이트 :
- 목차
- Paper review
- 블로그 내용 정리
Bottleneck Transformers
1. Conclusion, Abstract
self-attention(MHSA)모듈을 사용하는 backbone을 만들었다. 그것들을 사용해서 몇가지 task에서 성능향상을 가져왔다. 미래에 추천하는 연구로는 (1) self-attention for self-supervised (2) combining botNet backbone with DETR (3) smalll object detection 와 같은 연구들이 있다.- ResNet 에서 일반적은 Conv2d(= spatial convolution) 연산을 global self-attention으로 바꾼것이 전부이다. 이렇게 만든 backbone을 사용함으로써 성능 향상, (상대적인?) 파라미터 감소, 연산 시간 증가 등의 효과를 볼 수 있었다.
- Result : Mask R-CNN 44.4 Mask AP on COCO / BoTNet for image classification 84.7% top-1 accuracy on ImageNet
2. Instruction, Relative work
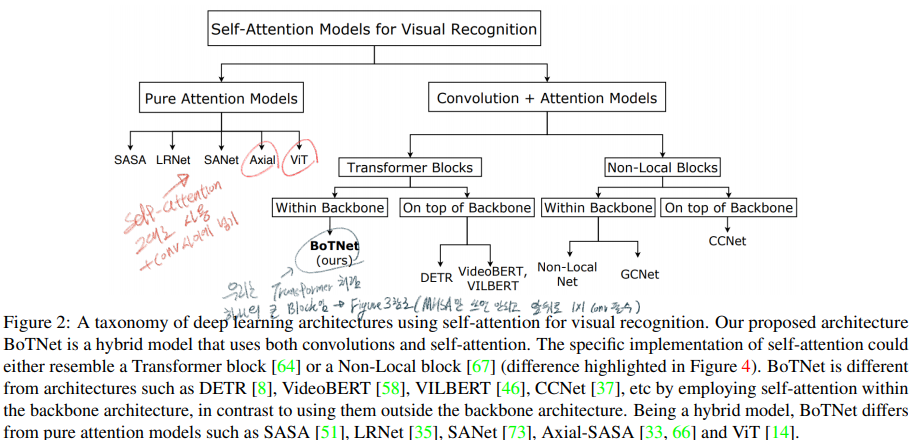
- Related Work에서는 (1) Transformer vs BoTNet; (2) DETR vs BoTNet; (3) Non-Local vs BoTNet 에 대한 비교를 한다. 이 비교에 대한 정리는 아래에
블로그 정리부분에 추가해 놓았으니 거기서 참고할 것
3. Method
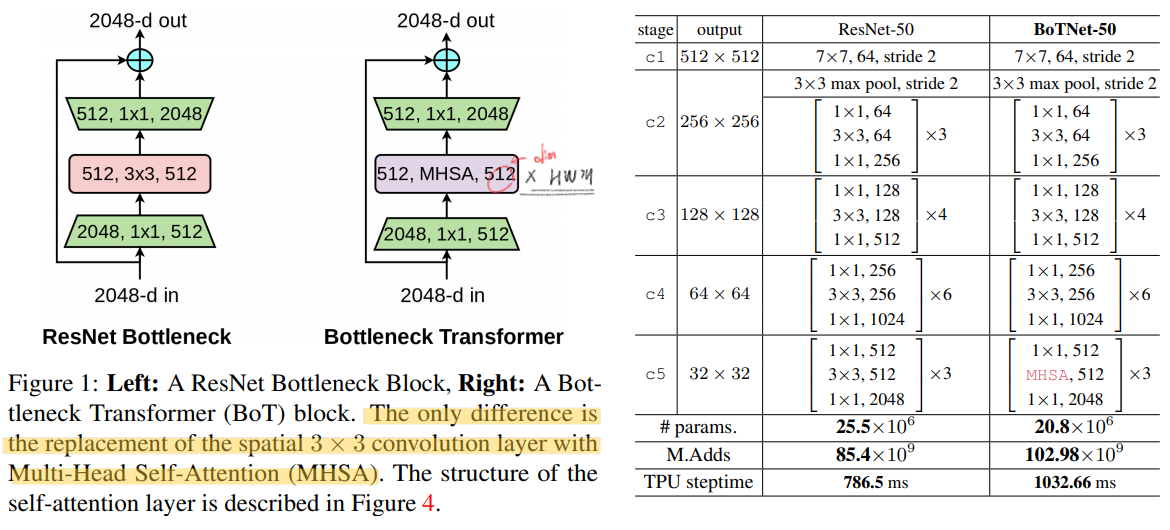
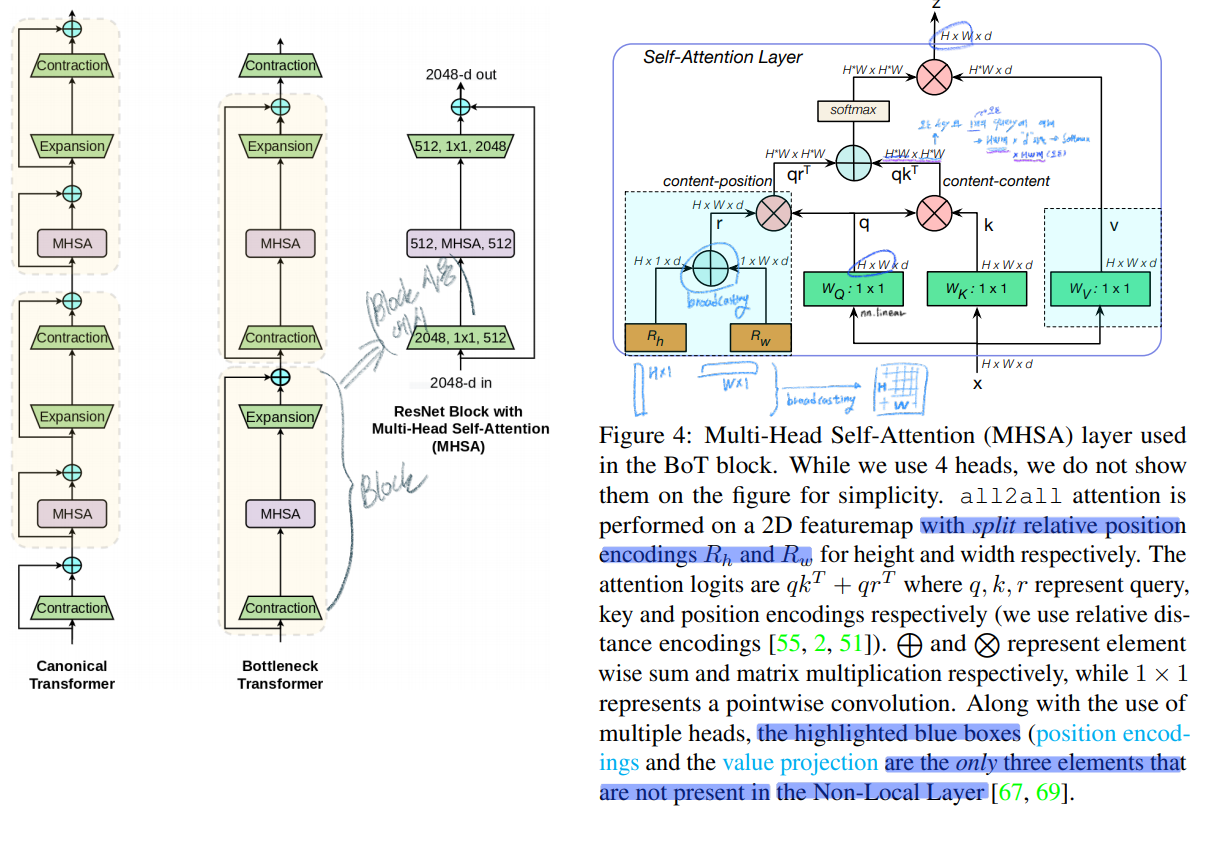
- BoTNet은 아주 심플하게 만들여졌다. 맨위의 표처럼 resnet의 c5의 3x3 conv를 global (all2all) self-attention over a 2D featuremap을 수행하는 MHSA으로 바꾼것이 전부이다.
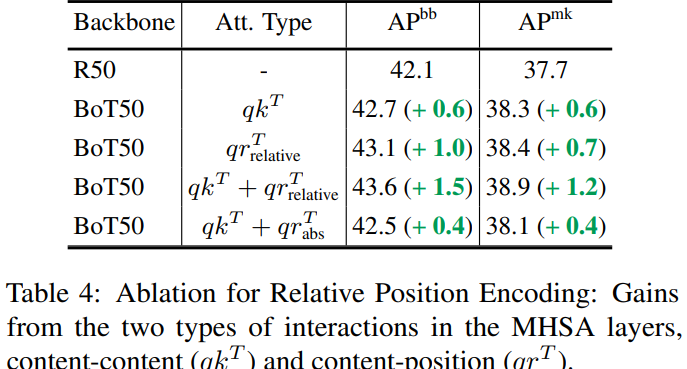
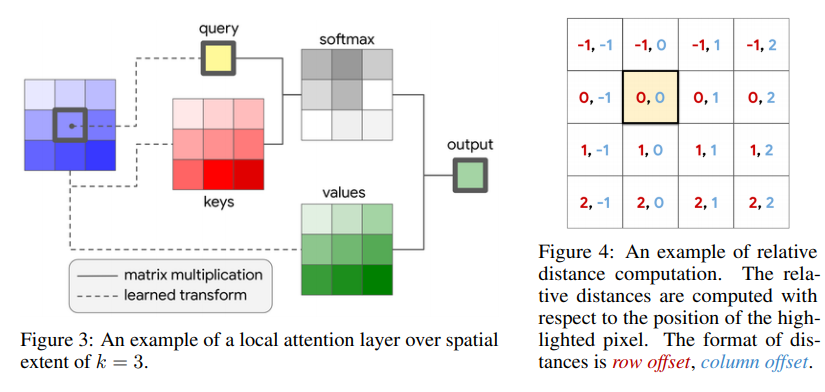
- In BoTNet, the 2D relative position self-attention [51, 2] 을 사용했다. (absolute, relative position embeding에 대한 차이를 아직 모르겠다. 이 차이를 알기 위해서 코드를 확인해봤짐나)
4. Experiments & Results
- 여기에서 나오는 4.1 ~ 4.8 까지, 지금까지 실험해본 결과(= the benefits of BoTNet for instance segmentation and object detection )를 요약해놓는 식으로 논문을 정리해보았다. 하나하나씩 간력하게 살펴보고 넘어가자
- BoTNet improves over ResNet on COCO Instance Segmentation with Mask R-CNN

- multi-scale jitter 란, 이미지를 자유자제로 scaling하는 것이다. 예를들어, Input Image : 1024x1024 / multi-scale jitter : [0.8, 125] 조건에서는 이미지를 820~1280 크기로 이미지로 scaling 한다.
- Scale Jitter helps BoTNet more than ResNet
- multi-scale jitter의 범위를 심하게 하면 할 수록 더 높은 성능향상을 가져다 주었다.
- Relative Position Encodings Boost Performance
- Why replace all three c5 spatial convolutions?
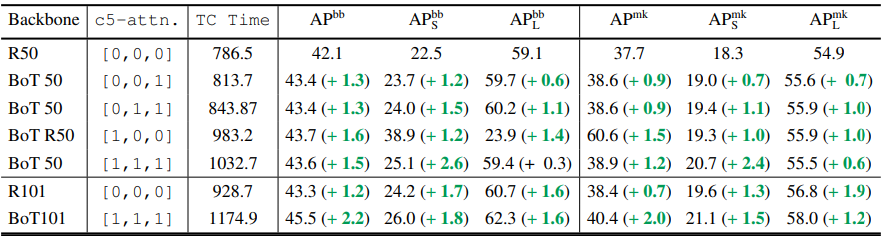
- BoTNet improves backbones in ResNet Family
- BoTNet scales well with larger images (1024보다 1280 크기에 이미지에 multi-scale-jitter 심하게 주고 학습시키면 더 좋은 성능이 나온다.)
- Non-Local Neural Networks 보다 훨씬 좋은 성능이 나온다.
- 이것을 보면, 버클리와 구글에서 이미지 처리에 가장 좋은 MHSA 구조를 사용하는 방법에 대해서 많은 실험을 해서 나온 결과가 BoTNet이라는 것을 짐작할 수 있다. MHSA를 그냥 사용하는 게 아니라, BottleNet구조로 바꿔고, BottleNet Transformer라는 새로운 Block을 만들고 이름까지 명명해버렸다. (이미지 처리를 위해서 가장 완벽하게 Transformer를 사용하는 구조를 많은 실험을 통해 최종적으로 찾아낸 BottleNet Transformer 이라고 말할 수도 있을 것 같다.)
- Image Classification on ImageNet

블로그 내용 정리
블로그 링크 : https://sanghyeok.tistory.com/5
BoT와 vanilla transformer간의 차이
transformer BoTNet Normalization layer normalization Batch normalization (ResNet처럼 그대로) Non-Linearities FFN block에서 1개의 non-linearity 3개의 non-linearities Output projection output projection(?) 있음 없음 Optimizer Adam SGD with momentum DETR과 BoTNet과의 차이점
DETR BoTNet outside(after) the backbone backbone내부에 Transformer같은 block 삽입/대체 RPN그리고 NMS 제거를 목적으로 함 recognition의 많은 task에서 적용가능 visibly good gains on small objects (상대적 작은객체 탐지 더 좋음) NL(Non-Local)Net과 BoTNet의 차이점
NL(Non-Local)Net BoTNet channel reduction ration 2 4 Role 네트워크에 추가로 삽입 convolutional block을 대체 또 다른 차이점 (1) multiple head (2) value projection (3) posutuib encodings Method
- ResNet의 가장 마지막 c5 stage에서 마지막 3개의
saptial convolution = conv2d을 모두MHSA로 대체한다. 단, c5 stage는stride 2가 적용된 conv연산이 있음으로, 똑같이MHSA를 하기 전에2x2 average pooling을 수행한다. 2D relative position encoding를 사용했다. figure4에서 확인 할 수 있다.- 논문에서는 ResNet구조를 바꾸는 것만 보여주지 않고, BoTNet의 영향력을 보여주고자 노력했다. Detection 또는 Segmentation에서도 좋은 성능을 확인할 수 있었다.
- ResNet의 가장 마지막 c5 stage에서 마지막 3개의
Experiments
- 여러 논문에서 Vision Transformer에서
hard augmentation이 성능 향상에 도움을 준다고 이야기 하고 있다. - 여기서도 강한
multi-scale jitter기법을 적용해서 (적은 epoch으로) 더 빠른 성능 수렴 을 얻었다고 한다. content-content interaction = self attention과content-position interaction = position encoding이 성능에 영향을 미치는 정도를 비교하였다.position encoding이 영향을 미치는 정도가 더 컸으며 둘을 함께 사용했을 때가 성능이 가장 좋았다.absolute position encoding의relative encoding에 비해 성능이 좋지 않았다.
- 여러 논문에서 Vision Transformer에서
Code 참조
absolute positional embeding
class AbsPosEmb(nn.Module):
    def __init__(
        self,
        fmap_size,
        dim_head
    ):
        super().__init__()
        height, width = pair(fmap_size)
        scale = dim_head ** -0.5
        self.height = nn.Parameter(torch.randn(height, dim_head) * scale)
        self.width = nn.Parameter(torch.randn(width, dim_head) * scale)

    def forward(self, q):
        """
		from einops import rearrange
		에 의해서 만들어진 rearragne 함수 어려워 보이지만 어렵지 않다.
		처음 원본의 shape -> 내가 바꾸고 싶은 shape
		로 쉽게 shape를 변형할 수 있다.
        """
        emb = rearrange(self.height, 'h d -> h () d') + rearrange(self.width, 'w d -> () w d')
        # 1*h +(element wise sume) 1*w = h*w ?! 브로드 케스팅에 의해서 연산된 결과이다
        emb = rearrange(emb, ' h w d -> (h w) d')
        # from torch import nn, einsum = element wise sum (multiple은 그냥 * 곱 연산)
        logits = einsum('b h i d, j d -> b h i j', q, emb)
        return logits
relative positional embeding (stand-alone attention 논문에서 나오는 것이라 한다. 아직은 아래 코드가 무슨 행동을 하는지 이해 안 함 = 코드도 복잡하고 논문도 복잡하니 필요하면 그냥 가져와서 사용해야겠다. Axial deeplab에서 추천하는 논문들 (stand-alone, Position-Sensitivity 논문이 이에 관한 좋은 코드 정보로 제공해줄 것 같다.) ㄷ
class RelPosEmb(nn.Module): def __init__( self, fmap_size, dim_head ): super().__init__() height, width = pair(fmap_size) scale = dim_head ** -0.5 self.fmap_size = fmap_size self.rel_height = nn.Parameter(torch.randn(height * 2 - 1, dim_head) * scale) self.rel_width = nn.Parameter(torch.randn(width * 2 - 1, dim_head) * scale) def forward(self, q): h, w = self.fmap_size q = rearrange(q, 'b h (x y) d -> b h x y d', x = h, y = w) rel_logits_w = relative_logits_1d(q, self.rel_width) rel_logits_w = rearrange(rel_logits_w, 'b h x i y j-> b h (x y) (i j)') q = rearrange(q, 'b h x y d -> b h y x d') rel_logits_h = relative_logits_1d(q, self.rel_height) rel_logits_h = rearrange(rel_logits_h, 'b h x i y j -> b h (y x) (j i)') return rel_logits_w + rel_logits_h- 확실하게는 이해 안되지만,
absolute positional embeding는 각 query(1xd)에 대해서 그냥 절대적인 하나의 1xd positional embeding을 element wise sum 해준것이다.
relative positional embeding은 각 query(1xd)에 대해서, 각 query(1xd)가 전체 key에 대해서 상대적으로, 어디에 위치하는지에 대한 정보를 가지고(=input사이에 pair-wise relationship을 고려) positional embeding 값을 만드는 것 인것 같다. (아래 그림은 stand-alone attention 논문 참조)
- 확실하게는 이해 안되지만,
